Additionally, if you plug a battery that is more charged (higher voltage) into the charge port of a less charged (lower voltage) battery, there is no current control or limiting, so whatever the maximum current from the difference in voltage vs the resistance of everything in the path (not much) is will flow.
If that's only the few amps that your battery normally charges at, that's ok, but it's possible (even likely) that the current will be much higher than it is designed for, and if the BMS doesn't turn off the charging port to protect against it, it can damage the wiring, BMS, and worse, the cells. If the BMS does not stop a high current, it can heat up your cells enough to damage them, and damage can lead to a fire, sooner or later (if it doens't happen immediately from a very high current).
If both batteries are at the same voltage when you plug the one into the other's charge port, then this damage is avoided, but there is still no current limiting there, so if your system draws enough current to cause high enough current thru this connection to overheat wiring or connectors or BMS FETs, etc., damage can still happen, and that damage could lead to a fire in some cases.
Your best bet to use a second battery in a system like this is to just stop and unplug the first battery, then slide the new one into place and startup again. That requires a battery of the same casing/connector type as your existing one.
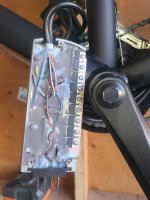
Your next best bet is going to require cutting into that silicone (or hot glue) at the battery end of the controller, but this has a risk of shorting or damaging things and making your system not work at all, potentially requiring a new controller (possibly the specific one from the bike manufacturer).
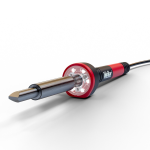
If you do want to do this, you'll need a big soldering iron, something like this 80w weller with a big fat finger-sized tip

to hold enough heat to properly solder to those terminals without melting things. (sounds backwards, but this is how it works--apply large heat very short time = less risk of damage than small heat very long time). You will also want to practice soldering big wires to big terminals like this using junk electronics you don't care about, such as old chargers, power supplies, etc., before you try this on your controller--you only want to have to do this once, and correctly, and you don't want to damage the controller or terminals, and you don't want to insufficiently solder the wires to the terminals or they may fall off and short and damage things or start a fire.
There are professional tutorials and guides out there on exactly how to solder the wires to the terminals for proper connection (you do not want to have the solder be the conductor, it is only there to "seal" the connnection, so you have to first connect the wire securely to the terminal before you solder it).
Then you'll have to clean the silicone/etc from around the terminals that you need to solder to. First test your main battery to find out which is + and which is -, and mark those on those terminals on the controller. You only need to unpot the ones actually being used.
Then you'll need to get the right connector for your new battery, and thick enough wires to carry the current from that connector to this point, that are long enough to reach the place you will mount the new battery and run safely along the frame, etc. If possible use wires that are in an enclosing jacket or shroud, like electrical cords are in, so that the actual wires are not exposed outside of the connector and the terminals you're soldering to.
before you actually connect these wires to your terminals, you will need to connect your new battery to the connector with the wires on it, and test with your multimeter which one is + and which is -, and mark them so they cannot be confused or miswired, then remove the new battery from the connector, and the old battery from the terminals, and only then solder the wires to the terminals.


