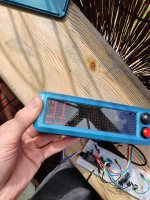
I might have missed something ... What's the light tan material you've (?) heat formed over the frame? Whatever it is, it looks like a fun experiment and possibly novel solution.
Speaking of in place molding... you can make fantastically (almost too much) detailed molds with 100% silicone mixed ~20:1 (highly variable ratio) with acrilic paint. Clear silicone and bright color paint helps you know it's mixed. The paint is the catalyst and it will cure in about an hour. You might have to make a mother mold to support the part you'll be casting after the cure if its big in order to maintain geo. Hard part is getting the material to stick to the part once mixed. I found lightly soapy (generic blue dish soap surfactant) water 1:10 over the part to be molded breaks surface tension, and then using the same soapy water mix on your hand as a lubricant to press the loose silicone mixture like loose clay onto the part and into crevasses is important. Using a liberal amounts of silicone (cross sections thickness) helps resist my biggest encountered negative of the method, shrinking post cure.
Honestly though, I've not used this method on anything greater than a couple hundred sqr cm. It might not work as well for larger parts, but your last post gave me a convergent sense of sharing like means. It's like RTV mold making, without the benefits of pourability, yet with the benefit of being able to get the materials needed easily (my local rural dollar store sells 100% silicone for windows/bath and acrilic craft paint).
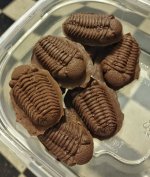
Much smaller scale and totally different application, yet some context on the results with the method. Chocolate trilobites")
EDIT: hopefully this reference of the method isn't too far off topic. If so please let me know and I'll modify.
Speaking of in place molding... you can make fantastically (almost too much) detailed molds with 100% silicone mixed ~20:1 (highly variable ratio) with acrilic paint. Clear silicone and bright color paint helps you know it's mixed. The paint is the catalyst and it will cure in about an hour. You might have to make a mother mold to support the part you'll be casting after the cure if its big in order to maintain geo. Hard part is getting the material to stick to the part once mixed. I found lightly soapy (generic blue dish soap surfactant) water 1:10 over the part to be molded breaks surface tension, and then using the same soapy water mix on your hand as a lubricant to press the loose silicone mixture like loose clay onto the part and into crevasses is important. Using a liberal amounts of silicone (cross sections thickness) helps resist my biggest encountered negative of the method, shrinking post cure.
Honestly though, I've not used this method on anything greater than a couple hundred sqr cm. It might not work as well for larger parts, but your last post gave me a convergent sense of sharing like means. It's like RTV mold making, without the benefits of pourability, yet with the benefit of being able to get the materials needed easily (my local rural dollar store sells 100% silicone for windows/bath and acrilic craft paint).
Much smaller scale and totally different application, yet some context on the results with the method. Chocolate trilobites
EDIT: hopefully this reference of the method isn't too far off topic. If so please let me know and I'll modify.
Attachments

Last edited:


.jpg")