Way, way behind in posting... but there are presently a couple of active threads about wheel building and truing
so this looks like a good time to post up some shots taken earlier in the year.
New Skills - New Tools:
Poor wheel maintenance led to a broken spoke a while back. Wheel truing and I are strangers and LBSes around here have never seen a hubbie - I just kept putting off giving one an opportunity to learn on mine... Anyhow - Ilia at Ebikes SF built my wheels with a lifetime warranty I so gave him a call. Unfortunately, he's 3000 miles away so we worked out a deal and Ilia sent me some nipples and spokes for L/R sides of front and rear wheels in lieu of the cross-country ship to get the wheel fixed under warranty - his usual Outstanding Service! (FWIW - his wheel went 8400miles before neglect did it in...)
Since I needed to get the spoke installed, the wheel trued, and also needed to have a wheel built for a new build, I figured it was time to learn a new skill or two and decided to pick up a truing stand. Although there are some quick and dirty truing stand approaches, I kind of believe that it's the novice that needs the best tools - so I looked at truing stands and was pretty well resolved to picking up a Bikehand stand which seems to be a high quality clone of the revered Park TS-2.2:
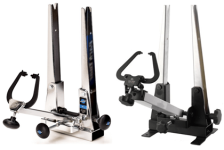
But - just before ordering, I ran across an on-line wheel building book
"The Professional Guide to Wheelbuilding" that has plans for what appeared to be a pretty nice stand. The stand is made of MDF and a few bits of wood and has some clever guides for lateral and radial truing.
View attachment 8
Sadly, woodworking and I are not good friends, so I looked around the shop for scraps of this and that to fab an equivalent stand. Using a scrap of MDF and some aluminum and plastic stock from the drops bin, I only needed to spring for an HDPE cutting board and a handful of hardware. All the metal and plastic work was done on small table and chop saws using Freud aluminum and plastic blades - quick and easy - just a few chops and a little drilling. The dropout plates took the longest to cut and file, but even that went pretty quickly.
There's lots of ways to make WheelPro-like stands - here's how mine came out:
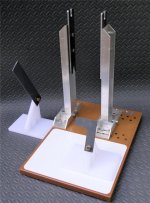
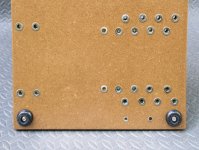
I used some scrap aluminum channel and just sliced it to make dropout width adjustment slots. This was a quick and sleazy gimmick but I had to drill a few extra holes for the right upright to get adjustment range for really wide hubs... no problem and it avoided fussy work with the router. Putting the extra adjustment holes too close together would weaken the MDF when the EZ-Loks were screwed in, so I just made two rows for the odd/even holes and just pick any hole that seems to line up okay in either slider slot. Setup using other holes takes an extra couple of minutes which is fine for my occasional use.
Scrap plastic and a $5 cutting board from the dollar store made up the truing guides. Brass terminal nuts (Ace Hardware) run down a couple of 10-32 screws make small finger adjusts for the moveable guide arms - they mate with RivNuts set into the plastic guide bases. The guides are accurate, easy to use, and avoid the complicated mechanism of the Park/Bikehand style stands. Dishing is measured from the rim to the uprights using a $10 Harbor freight digital caliper - there is no need for a separate dishing tool.
A small stainless pocket rule is screwed down as a width gauge and there is a fixed aluminum stop at 100mm for quickie width setup for front wheels.
View attachment 2
A 35mm wide plastic spacer can be dropped behind the fixed 100mm setup stop to quickly align the upright for rear wheels.
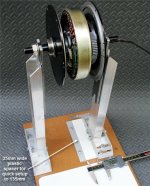
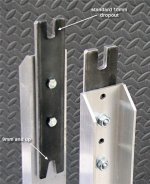
The dropout plates are made from 1/4" mild steel and can be flipped around for either standard hub motor 10mm slots or other sizes sizes (9mm and up). The plates can be raised in the uprights to accommodate 29er wheels with mounted tires.
The uprights and dropout plates are rigid enough to serve double duty as a motor test stand.
View attachment 4
All the bolts to the base are run into EZ-Lok threaded inserts (901420-13 1/4-20 x 13mm) that are just threaded into the MDF using a hex wrench. The small screws go into 4mm and 5mm RivNuts (designed for sheetmetal) that were just set into the MDF and expanded in place.
I used the stand in the unfinished form to true up my wheel, then applied MinWax satin varnish later to seal the MDF. It took quite a few coats, but since this was after the fact with no time constraints, it didn't matter. A square of white adhesive contact shelf liner over the front of the base makes the gap from rim to truing gauge easy to see.
When I finally set out to change the spoke and true the wheel (and as it turned out, replace some nipples as well), I ran into the noobie problem of not really knowing what a 'good' spoke tension sounded like when plucked. This is the 'experience' part that gets you to the point where you don't need fancy tools. I found a table of
'musical note to spoke tension' on line and downloaded a piano app for my tablet so I could play the tones. This worked pretty well and I tuned up the wheel using this technique.
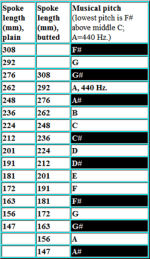
None the less, I decided to spring for a Park tension meter for peace of mind ($$ substitute for 'experience' :wink: ):
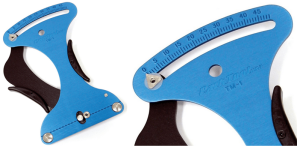
The gauge works by hooking the three measurement pins over the spoke and releasing the grip so the calibrated spring can deflect the spoke by trying to force the center pin to move between the two end pins. The deflection is read of the gauge and the reading is looked up on a provided chart according to the spoke type.
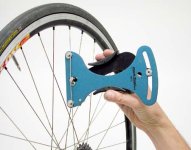
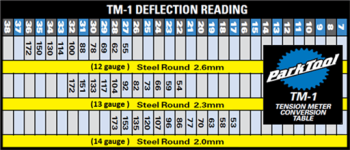
Anyhow, with a few spokes adjusted into the proper zone, I could pluck my way around the wheel pretty well using the initial TM-1 measured spokes as a baseline. My 'piano app' strategy had worked well, but the tension was a little low. I went back and used the gauge after the fact to see how things came out and fixed up some spokes that were too far off - final truing leaves spokes a little unbalanced anyway...
IMHO as a noobie at this, the TM-1 was a good buy to make up for lack of experience and no musical ear. Since the whole stand cost very little, the gauge seems like a good investment to get the most out of the rest of the rig. The stand is certainly more than the minimum required, but it was a fun project that will last me forever.
Anyhow - with hundreds of miles of miles on my trued wheel, I'm feeling very LBS-independent these days....


