Active pre-charge/inrush control

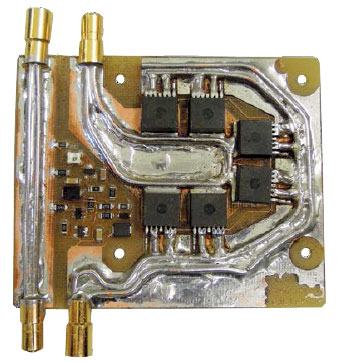
On Thursday I got around to replacing the MOSFETS and testing the old ones. I also added the additional 1M resistor between the Gate and Source and everything is working great now!! No more sparks when hooking up the Anderson Powerpoles and the reading from Gate to Negative switch line is at 11.2 volts. I tested the old MOSFETs and they were definitely damaged. Only thing I wish is that the switch would completely cut off the voltage from the battery, but other than that this works great for getting rid of the large spark with minimal drain!! Thanks again everybody! Attached is a small video of the circuit working now.

https://youtu.be/4y672zLSdZE
 
The switch should completely cut off the voltage from the battery. You may measure something with a voltmeter just from leakage, but with any kind of load, it should be zero.

Cleaning the board with alcohol might help too, as soldering flux residue can be conductive.
 
I'd like to add back-to-back mosfet(s) to prevent any current in and out of the pack (for example when driving or charging).
Can i simply add the additional fets to the source from the other fets and connect the pack to the 'lower' drain and the load/motor/charger to the upper drain ?

schematic.png
 
Ok ,changed the schematic on this one, tested it and it works.
The +12V and GND which drive the FET gates come from an isolated dc-dc converter connected to the pack by a small on-off switch.
This +12V is actually fed into an AVR controller which controls the CAN-BUS BMS and triggers the FETS on and off on LowVoltageCell and HighVoltageCell events.
This means i only have one SB50 connector used for either load or charger connections. It will automatically disconnected from the load when LVC and from the charger when HVC occurs and reconnect when every cell is within voltage range.


Not sure about the caps values though for delayed-on, delayed-off..
Any suggestions ?

new_schematic.png
 
And here's another change for my smartswitch concept..

I've split the control signals for the load/controller part and for the charger part of the switch.
My bms controller provides two separate signals: LVC and HVC.
I want to control when current is allowed to flow into the pack (charging) and when allowed to flow out of the pack (driving).

- When LVC (one or more empty cells) occurs the pack must be disconnected from the load/controller to prevent more current flowing out of the pack BUT must it be able to be recharged when connected to a charger so current flowing into the pack.
This means the FETS in the load part Q1 and Q2 must be closed and Q3 and Q4 must be open.

Same applies when HVC occurs (one or more cells have overvoltage), current flowing into the pack must be prevented but current flowing out of the pack allowed.
This means FETS Q1 and Q2 must be open and Q3 and Q4 must be closed.

When neither LVC or HVC occurs all FETS are opened and current can flow in and out of the pack, this would be a normal situation.
When BOTH LVC and HVC occur all FETs are closed because you have a serious unbalanced pack...

smartswitch.png
 
i really don't understand what you're trying to achieve. and if so you're making thing more complicated than needed, and you add another error source.
if you use a bms to monitor and control your battery then why do you want it to control your inrush limiter? the bms has fets installed anyway and will stop current flow from charger to battery, and same will happen if the battery is too low. no need to trigger a separate switch.
this circuit was meant to prevent sparking when connecting the battery to the controller. and it may be used as central power switch as well. normally there is no need for a inrush limiter for chargers. so i don't get the point :)
 
It looks like the power stage on a typical BMS.
There is probably no need to slow the charging FETs. I think you could eliminate the resistor/cap and just switch 12v to the charge FET gates. The discharge side still needs the cap.
 
izeman said:
i really don't understand what you're trying to achieve.
if you use a bms to monitor and control your battery then why do you want it to control your inrush limiter? the bms has fets installed anyway and will stop current flow from charger to battery, and same will happen if the battery is too low. no need to trigger a separate switch.
this circuit was meant to prevent sparking when connecting the battery to the controller. and it may be used as central power switch as well. normally there is no need for a inrush limiter for chargers. so i don't get the point :)

I'm not using one of these 'chinglese' bms systems, this one is modular upto 16 modules monitoring 12 cells each (so max 192cells) and has a separate controller which communicates with the modules, display etc by using a can-bus. The pack is not permanent installed/connected into the ev/bike but will be switched off or even removed when not used for example. Most of these systems are equipped with a heavy sort of kilovac relais with permanent shunt resistors installed on them but i won't be able to use these. Hence the need for the inrush current limiter function when re-attaching or enabling the pack. So what it does it warns the driver when any cell is below an adjustable voltage (LVC) and sounds a buzzer for example when this event occurs for more the 5 seconds. After those 5-seconds pre-warning the ev/bike/load has to be disconnected from the pack to prevent undercharging.
Same accounts for when its charging, when any cell get higher then maximum voltage it should disconnect or disable the charger and start shunting these cells which are over-volted.
 
fechter said:
It looks like the power stage on a typical BMS.
There is probably no need to slow the charging FETs. I think you could eliminate the resistor/cap and just switch 12v to the charge FET gates. The discharge side still needs the cap.

Okay i thought of that first also but i have a charger here which really sparks when connecting to a pack, regardless if its switched on or not when connecting the pack.
So I think it matters on how many (empty) capacitors the charger really has for sparking or not. Just to be safe i think an in-rush current protection is not a bad thing to have.

By eliminating the resistor and cap you mean the R5 and C2 ?
I thought R5 should be there anyway to release any stored charge on the fets gate when removing the gate power signal.
Also to prevent any floating input to the gate i thought it was good practice to tie it to ground anyway but i could be wrong.

What values for the C1 and C2 would your recommend: also 1uF like in the original setup ?

Thanks,

Paul
 
prensel said:
By eliminating the resistor and cap you mean the R5 and C2 ?
I thought R5 should be there anyway to release any stored charge on the fets gate when removing the gate power signal.
Also to prevent any floating input to the gate i thought it was good practice to tie it to ground anyway but i could be wrong.

What values for the C1 and C2 would your recommend: also 1uF like in the original setup ?

Thanks,

Paul

Yes, I was suggesting eliminating R5 and C2. The caps in the charger are fairly small and I think the FETs could just turn on hard and be OK. I suppose using the slow turn-on wouldn't hurt, but probably just not necessary.

Normally the BMS will be telling the charge FET to be on, so you would still get a spark unless you can turn it off somehow.

On the discharge side, I would suggest removing R4. If the switch grounds the FET gates, it will drain the charge on the gates. If you want a safety bleed, it should be 1M - 10M or so, otherwise the gates won't get 12v. I put a 1K in series with the capacitor just to be nice to the switch contacts when it turns off.

I would recommend a 12v zener, even if the FETs have logic level gates.
 
Hey Fechter,
Just wanted to say (sorry, I know this was a month ago): The switch I got to work actually does completely cut off the voltage from my battery like your design says it should. I was a tired doofus that night and measured from the wrong side of the negative bus bars. It works great though and the voltage slowly drains down to zero after about 40 seconds. Very cool. Anyhow just wanted to say it does work as intended and thanks again! Now I am done with the electrical work on my bike for the most part and can get on to finishing it!
 
I had the lack of judgement to buy a shark pack instead of a dophin pack from Luna Cycle and the former has no power switch. So I will likely have to make a switch myself. Are there any fundamental difference between the Automatic Precharge 3 circuit and this: http://www.crydom.com/en/products/catalog/d_1_d.pdf, other than the price, insulation of control circuit and packaging? If there are, what are they? I'm not fluent in electronics, so I'm trying to understand what solutions there are and how they compare.
 
The Crydom SS relay requires power to activate the optocoupler. You could get this from the pack but would probably need a resistor to drop the voltage. Not hard, but it will draw a little more current when it's turned on. You wouldn't want to leave it turned on for days at a time. One advantage is it's isolated, so you could place it on the positive or negative leg of the pack.

One other difference is these will just slam on suddenly vs. the slow precharge. If they turn on fast enough, it might be fine.

Bet those are kind of expensive.
 
So apart from the control circuit characteristics - power, insulation - the difference on the switching side is speed of switching. I'm not too worried about that since the alternative is plugging and unplugging the battery which would be instant so the controller has to be able to deal with it. Yes, the price is a lot higher - $150-200 depending on the rating. Also if I read the datasheets right, thermal dissipation is also higher, requiring a heatsink. I guess I'd be better off building the AP3.
 
We know that if the switching speed is in certain range, the FETs tend to self-destruct. If they switch on super fast, they will be fine. Super slow, like the pre-charge circuit, fine. Somewhere in between they blow up. It would suck to blow up a $100 part.
 
When you say it would suck to blow up a $100 part, do you refer to the controller?
 
Well, I assume that they've designed it so that the mosfet/s inside it don't blow up if used as a relay (as intended). Otherwise it would be a pretty shitty expensive part, no? Or am I misunderstanding anything?
 
With the capacitors in the controller, there will be a huge current spike when it turns on. It may not be designed for this.
 
I see. So to be safe, a perchance circuit would also be needed with it. And if that's the case, I might as well just build the AP3 circuit to do both switching and precharge. Thanks for the info. I may have more questions as I start making it. :)
 
I ran across this, and see the circuit and explanation is available on Circuit Cellar.

X-Treme Inrush Current Limiter

Good to 40V. The layout is interesting.

120733-51.jpg
 
Back
Top