Controller upgrade help for REI Gen E1.2

r0hands

1 µW
Joined
Mar 17, 2023
Messages
4
Location
CA
Long time, first time.

I recently bought this bike from REI on mega sale hoping to use it to commute to my work, which is up a massive hill. I have another BBS02 conversion I used, but shit keeps falling apart on that bike, and I am now car free, so I wanted a backup bike, in case I don't have time or the parts to fix issues that may arise on my primary bike.

I took this new bike for a test ride up my big hill, and it barely got me there. Of course, this is a class 1 bike, and the controller is limiting the power, but I didn't realize how bad that would be.

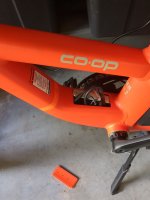
When I opened the user manual for this bike, I realized this has the RM G060.750.D Bafang rear hub motor with a DP C11.CAN display. This motor should be (as per the Grin simulator) plenty strong to get me up my hill using most of their controller options. So I figured, I just need a better controller (or I need to re-program the one I have). Here is where I am stuck : firstly, I can't get the damn controller out of the bike frame. The wiring is internally routed through the frame, but there is this strange metal plate on the side of the controller, which makes it really hard to get the damn thing out (image attached).

I can however access the cables to the connector. So, I may be able to re-program it? I see the connector model is CR x20s.250.fc 3.0 and the software version is CRS104c4812h103085.0 . In one section of the manual, I see the current limit on the controller is 12A, but I am not sure if this is applicable to what the controller is actually doing on my ride.

So-- what would the wise folks of ES recommend I do? If I could somehow force that controller out of its box and replace it with something better, I think that would solve all my issues, but not sure if that is possible.

Thanks!
 

Attachments

  • IMG_20230819_171018_01.jpg.jpeg
    IMG_20230819_171018_01.jpg.jpeg
    123.8 KB · Views: 34
The metal plate looks like a heat-distribution bar meant to bolt the controller to the frame so the frame heatsinks it (otherwise it's heat is "trapped" in the space with it due to airgaps, and the controller becomes thermally limited in power output...if it doesn't have actual thermal limiting it just gets hot, often overheated, and ages faster than it should (or actually fails)). It probably just unscrews from the controller so you can get the controller itself out; there is probably at least one bolt or screw somewhere on the frame (back of the seattube?) that secures the bar to it.


When upgrading the controller, consider the battery's capabilities--it was probably designed only for the power level of the existing controller, so it will be harder on it to use higher power, and it might not handle it very well (or at all), often limited by the BMS but the BMS might be limited this way to protect cells not capable of more.

If you have a wattmeter you can put in series with the battery to controller connection, you can get a good idea of what it is really doing on your rides.
Many thanks! It definitely makes sense that this metal bar could be a thermal connection between the frame and the controller. Its also screwed onto the case of the controller, but its almost like they put some bolts in, and then used an angle grinder to remove the head, just so I cant open it easily. I want to avoid any solutions which need angle grinders just yet :).

I also do have a wattmeter, but these internally routed cables mean I cant get to the space between the battery and the connector easily. I actually think the display can show me the wattage also, so maybe thats another thing I can do. I didnt think of the BMS settings and the max current sourcing capacity of my battery. I think thats the concern youre raising. Will dig around a bit more tomorrow to see if I know what power its maxing out at.

Thanks again for taking the time to respond!
 
My cabling on the REI e1.1 allows the controller only comes fully out of the frame by about an inch. You have to angle the controller just right to get it to come out of the hole as the controller is wider than the hole. Do you know if the controller on the e1.1 is the same on the e1.2? I looked at my manual and my motor is rated for up to 48v. It made me second guess my y purchase of a replacement 36v battery when maybe I could have installed a 48v. My battery stopped working after my mileage (since purchase) hit 125 miles. My local REI looked at the battery exterior and said that they would not warranty it. They don't have the ability to diagnose the battery issue. There are only about 3-4 business on the entire west coast that diagnose batteries. REI wanted $500 for a new 36v battery. I replaced it with a 36V/19.2 from UPPbattery.com which supposedly has LG batteries and was a bit under $300. It has an on/off switch and a USB port. I had to replace the battery base that mounts to the frame. I also had to put new ends on the battery base since REI and UPPbattery don't use the same plugs. UPPbattery has a lot of end choices to chose from but not the REI bafang plug style. I looked at a lot of 36v batteries and I probably should have gone with the model that had the same base style. But I wanted a bit more Amp hours. So far my only worry is that the battery base plate only allow 2 attachment screws. I can't use the lower screw as the new battery base won't line up. The only solution would be to pull the tire and fender and drill and tap a new screw hole. I am going to keep an eye on the base plate and see how it works with just the upper two screw holes. After it was all installed i began to wonder if I could have mounted a 48v battery instead. Ahh buyers remorse.
 
My cabling on the REI e1.1 allows the controller only comes fully out of the frame by about an inch. You have to angle the controller just right to get it to come out of the hole as the controller is wider than the hole. Do you know if the controller on the e1.1 is the same on the e1.2? I looked at my manual and my motor is rated for up to 48v. It made me second guess my y purchase of a replacement 36v battery when maybe I could have installed a 48v. My battery stopped working after my mileage (since purchase) hit 125 miles. My local REI looked at the battery exterior and said that they would not warranty it. They don't have the ability to diagnose the battery issue. There are only about 3-4 business on the entire west coast that diagnose batteries. REI wanted $500 for a new 36v battery. I replaced it with a 36V/19.2 from UPPbattery.com which supposedly has LG batteries and was a bit under $300. It has an on/off switch and a USB port. I had to replace the battery base that mounts to the frame. I also had to put new ends on the battery base since REI and UPPbattery don't use the same plugs. UPPbattery has a lot of end choices to chose from but not the REI bafang plug style. I looked at a lot of 36v batteries and I probably should have gone with the model that had the same base style. But I wanted a bit more Amp hours. So far my only worry is that the battery base plate only allow 2 attachment screws. I can't use the lower screw as the new battery base won't line up. The only solution would be to pull the tire and fender and drill and tap a new screw hole. I am going to keep an eye on the base plate and see how it works with just the upper two screw holes. After it was all installed i began to wonder if I could have mounted a 48v battery instead. Ahh buyers remorse.
Has anybody managed to switch out the controller on this bike? My stepdaughter has an E1.1 and really wants it to have a throttle since she has MS and being able to start moving without pedaling would be a big help for her. Not looking to up the performance by any leaps and bounds but will play with the settings to tweak it as needed.

IMHO these bikes are pretty much a collection of off the shelf parts so swapping the old controller out for a new one should be doable. Keeping it neat by stuffing the new controller back in the existing space and keeping all the wiring hidden would be great, but I'm not above mounting it outside and extending wires if necessary. I don't have access to the bike right now but should get it to work on around Xmas.

So if anybody who has some experience with one of these can chime in, I would be most appreciative. Just trying to help my kiddo..
 
Lookin for some help. This bike belongs to my stepdaughter. She likes it quite a bit but really needs it to have a throttle since she has MS and has problems starting out from a stop at times. Her money is tight so I offered to see what I can do to re-engineer the thing. In my book, most of these off shore bikes are just a collection of parts. This one might be a bit more special.

Got the bike yesterday to work on. Removed the controller this afternoon. It's a tight fit but I got it out. Uses a 9 pin connector to the motor and has what looks to be some proprietary connectors for the display, pas/torque sensor and battery. Initial searching around and I'm finding controllers that are pretty generic, they have the 9 pin to the motor and everything else is generic. A few pics might help:

image_2024-12-09_154450172.png

The one with the larger contacts is for the battery and its electronics. I think the lavender is for the torque sensor and the 8 pin is for the display and brake switches. It has a couple of two wire outputs for the front and back lights.

image_2024-12-09_154619773.png
Motor is a 9 pin connector

image_2024-12-09_154734621.png

Its a tight fit into the cavity


image_2024-12-09_154908735.png

Ideal case would be to find a controller and probably a new display, throttle and PAS sensor to put on the bike. Fitting it back in the hole would be nice but I'm not above sticking on the outside somewhere. Any help with potential leads on the parts would be most appreciated. I'd like to try and get it back to her at Christmas, but that may not be possible. Thanks in advance for any help.
 
Lookin for some help. This bike belongs to my stepdaughter. She likes it quite a bit but really needs it to have a throttle since she has MS and has problems starting out from a stop at times. Her money is tight so I offered to see what I can do to re-engineer the thing. In my book, most of these off shore bikes are just a collection of parts. This one might be a bit more special.
This will be a challenging and possibly costly upgrade. Most factory ebike upgrades are. You will need to decide whether the new controller needs to fit in the tight space, or be mounted externally (probably right above the current location). If you still need torque sensing, then you need to do some disassembly to get the part number of the bottom bracket torque sensor (described in the Q&A on the REI site). Then you will need to find a compatible controller. If you need to replace the torque sensor, that’s $150+, so hopefully it’s a common model. If you want to maintain the in frame cable routing, you’ll probably need to fish the new cables through, using the old cables, which could be challenging.
For the controller that supports torque sensing PAS, the options are slim. There are less costly options if you are handy with installing/flashing custom firmware and solder in some new conductors, but your plug and play options will cost a couple/few hundred dollars. You could by a cheap generic controller with a throttle input, and a Cycle Analyst display/computer, which can connect to a torque sensor, and convert it to a throttle signal, plus a throttle, which could be a more economical route.
None of these options is simple, and you’ll need tools, like a soldering iron or wire crimpers, plus a multimeter for troubleshooting, in addition to the normal bike tools (bottom bracket removal tool, etc.).
Switching to a basic cadence sensing PAS would cut costs significantly, but the installation would still have many of the same challenges. If you're lucky you may be able to abandon the existing torque sensor in place to add a cadence sensor, since they just mount on the bottom bracket spindle.
If you still want to pursue the upgrade, you can obtain help here, but there will be a lot of back and forth and Q&A to get enough details to do the job successfully and safely. So everyone, including you, needs to be patient to avoid frying something in the process.
 
Thanks for the detailed reply.

I'm not looking to spend lots of money upgrading a 700 dollar dept store ebike. It's not a bad bike considering. Has hydraulic brakes and a name brand hub motor. As for the torque sensor, that can just stay where it is, I can add an external PAS sensor. I asked her last summer if she knew what she had and she didnt have a clue.

What I'm looking for is some type of controller I can swap in for the existing box that will work with the existing bafang motor without any problems. Current controller is rated for 15a at 36v. If I have to start cuttin and splicin I can do that, though it's not the first choice. If I can fit it in the existing space, thats fine too, otherwise I figure out a spot to mount it outside. I'll also need a matching display and the new PAS and throttle.

I do wonder if it is worth opening up the OEM box to see if there may be some terminals or unused connection for a throttle switch that was not used to keep it as a class 1. Sorta like the Tongsheng mid drive controllers that could be hacked to hook up a throttle.
 
OK, you have more options going with cadence PAS. If you’re ok with mounting the controller in that little triangle space above the current location, then it will be an easier task. You can decide later testing, if you want to undertake the internal cable routing, since none of the existing cables, except for the motor cable, will be reused. A KT controller will likely be a good brand to go with, since their cadence PAS is smooth, rather than jerky like many tend to be. There are some KT experts that can advise, or reassure you that the cable harness to the motor will be compatible (I believe so). Everything upstream will be replaced.
Can you take a pic of the brake levers and if there are wires exiting them (brake cutoffs)? Also, does the bike have lights or other electric powered accessories?
Also, a pic of the left bottom bracket area where the spindle exits.
 
I've found one kit on Amazon that I think might do the trick. Amazon link It has the controller, pas sensor, display, I looked again last night at the bike and the output cable. The only existing connections I have to use are the output to the motor and the DC in and that is just 2 wire. There are no brake switch inputs since it was a torque sensor crank and as long as you stop pedaling, the motor stops instantly. I'd rather order off Amazon than Aliexpress, If I have problems, returns should be much easier.

I'm thinking I can hook this up for testing first without cutting any of the existing wiring and see it work. I gotta keep in mind that I'm not the end user and that it has to be pretty seamless or I'll hear about it for a long time. If it doesn't work well enough, I want to be able to put it back as it was and tell her I gave it a good try. Lots of these offerings seem to have the same parts, the controller in this case has speed misspelled as Speet and that pops up on more than a few I've seen.

image_2024-12-10_083439552.png
 
Good idea on something you can return. If the bike is quiet, you may find it more noisy using that controller. It’s likely square wave controller rather than sine wave, which will make the motor run noisier. No issue, unless noise irritates you. Plus, PAS may not be smooth on a lot of those generic controllers.
 
It says its a sine wave controller in the description. No switches on the brakes, they are hydraulic so I wont be swapping them out, best case would be some magnetic switches. Bike has a front and back light too.

image_2024-12-10_101814763.pngimage_2024-12-10_103243291.pngimage_2024-12-10_103326311.png
 
Parts finally came in today. I did a test hookup to see if it powered up and it did. Throttle works, pas seems to work, display works and I modified the settings as needed. Controller is a tad bit longer than the original and I might be able to stuff it back in the cavity for a very neat install, but I dont know about how the wiring will all fit. My stepdaughter is all excited about it, was ready to ride it. I told her not so fast, it's going to take a bit of work before its actually road worthy, but fingers crossed, I may get it functional by the 25th.

1734841594682.png

1734841623592.png

First question. I have accounted for all the connections except for these two. The red one with 3 pins and two white wires.

1734841735664.png
According to the very minimal documentation I got with the controller, the red is for lights which would leave the two whites for brakes? If they are for brakes, does shorting the two whites together signal brakes closed? I need to order some magnetic switches and don't want to order ones with the wrong connection. Thanks
 
I would normaly guess the two whites are a self-learn, since they are setup to plug into each other.
Pic is too blurry to see what the red connector actually is or how many contacts it has, so can't really guess on that.
 
Time for an update. I had to return that controller as something failed and it would keep the light on as long as the battery was connected. I ordered another controller and that one seems to be behaving itself. I also ordered a 1 to 5 cable and that is what I am also using on this one. It has connections for the light and two brake inputs and a throttle and display. All seem to be working fine so I started to pull the old parts off the bike and put the new ones on.

1736184258784.png

The multi input cable was a bit bigger than the opening that the old cables went through so I had to break out my old pneumatic filer and open the hole up a bit. Since its an aluminum frame I'm not too worried about corrosion, but I'll do my best to seal it up.

1736186542346.png

1736186576983.png

I tried to mount the pas sensor on the inside of the locking ring which mostly worked, the magnetic pickup slightly bent, but when the magnet ring is on and the pedal is back on it is too tight to turn. Any idea of an alternate way to mount it?

1736186688653.png

I need to order an extension for the 9 pin motor connector. The one on the controller is just too short, but hopefully I'll have this done soon. Thanks for lookin.

Bob
 
So I think what I need to make this work is a new bottom bracket and crankset. I dont think there will ever be enough space with the wide threaded inserts that hold the existing BB in. To top it off, the crank is in two pieces, the arm and the chainring itself and the chainring fits on the end of the BB assembly on a spline. I measured and while the diameter of the inserts that hold it in look to be standard, the width is 100mm.

I'm going to order a single ring 48t crankset with square tapers and a 100mm sealed BB that I think together will give me enough room to mount the sensor.

1736197586442.png
1736197645042.png


None of these parts are super high quality, but this is a fairly cheapass bike to begin with. Hopefully I can get the sensor mounted and it all put back together in another week or so depending on how fast I get all the parts.
 
Any idea of an alternate way to mount it?
Bend the metal ring perpendicular to the sensor mount part of the bracket, so it would sit under the BB shell, and secure it to the BB shell so that the sensor still sits where it is now. You can use whatever method of securing it that works for your use-case (zipties, epoxy, gorilla-glue, duct tape, etc).

Or you can fabricate a bracket (metal, plastic, etc) that allows you to mount the sensor like that, and secures to the underside of the BB to the derailer/brake cable guide plate / screw.

But if the rider is going to use the throttle, you don't even need to install the PAS sensor.

Remember that for nearly all systems, the cadence type PAS sensor doesn't give control over the system, it just turns it on at full amount of the assist level presently chosen, if there is any pedalling. It doesn't measure the pedalling speed or pressure, it just goes.
 
Last edited:
So I think what I need to make this work is a new bottom bracket and crankset. I dont think there will ever be enough space with the wide threaded inserts that hold the existing BB in.
I can't tell by the pic, but if the inner part of the Bafang bottom bracket is 20 tooth and the same as the Shimano cups (see below), then you can use one of the single piece PAS sensors, like the KT-V12L.
51oM7FnQbrL.jpg

61NsMdZZEgL._AC_SL1500_.jpg
 
The new BB finally came in today along with a new crank and arms the other day. Figured out how to get it in without cross threading it and it now has enough clearance to fit the Pas sensor. Yes, that chain needs some TLC, I'll get to that when I get it all up and running.

1736732328977.png
 
Yes, that chain needs some TLC, I'll get to that when I get it all up and running.
Hey, the rust is protecting the rest of the bits that don't need to be shiny. :p (not really, but it sounds funny)

Given the fairly dry conditions where I am, I don't worry about the rusty bits myself, as long as the bushings and pins are all moving like they should, no sticky links, and the chain isn't worn ("stretched").
 
I have a bunch of other projects going but I spent an hour or so working on the bike. It seems like this bike has quite a bit more wiring to deal with now. I had to buy an extension cable for the motor wire, the long wire off the Pas sensor, the 1 to 5 cable, you name it. The controller itself could probably fit inside the frame but I havent even tried to stuff the wiring in first yet.

I also looked at the brake levers and could not figure out how I was going to mount the switches and the magnets. The brakes are Tektro hydraulic so there was no swap of levers happening. But Google is your friend so I searched and found this:

1736857647942.png

It just so happens that I got myself a belated holiday present in the form of a Bambu Labs P1S printer. If you are new to 3d printing, Bambu is what you want. These machines are appliances, you set them up and just start printing stuff. The picture came from printables website so I downloaded the two parts and printed them last night while watching TV. It was late so I pulled them off this morning. I checked the fit and they should work great. I may have to reprint them in black so they match the hardware. but that is easy enough to do.

1736857911505.png

Total cost for this project so far is about 180 in parts. I didn't think it would have been this expensive, but if it allows her to keep riding the bike, its fine. I still think something like a Townie or Day6 with a mid drive would be a better bike or even putting a mid drive in this frame and swapping the rear wheel out would have been less of a hassle, but you work with what you have.
 
This will be the last post for posterity unless somebody has a question or two. Bike is finished. With all the extra wiring, there was no way I was going to stuff the controller back in the frame even though it was pretty much the same size as the original. With the new 1 to 5 cable, motor extension, PAS wire and power lines there was a bunch of wiring to stuff in and it just couldn't fit. So I opted to mount it in a box I 3d printed, hung off a thin strip of aluminum bar stock on two screws that conveniently were there for the taking.

1737655538057.png

3d printed the parts for the brake magnets which seem to work fine even though the magnet seems a but far away .
1737656688368.png

I had some black abs sheet kicking around from another project so I decided to enclose the opening and give it a bit more of a factory look. I also cut a small piece to cover up the opening and used some double stick tape to hold it down.

1737655664885.png

I made a cardboard template of the opening and cut two pieces on the bandsaw and used some stainless screws to hold either side on. Not perfect but it encloses the space and hides the messiness.

1737655799197.png

So I started this out thinking "how hard can it be?" The answer was much harder than it should have been. Between waiting on parts, having to send back the first controller for a different one, ordering more parts as I went along just to find I still needed something else like the motor extension cable. it took probably 3x as long as I originally estimated and came in about the same amount over what I thought I could do it for. Here is the parts list for anybody interested.

Controller with display 66
Pas sensor 23
1 to 5 cable 20
Throttle: freebie
Hydraulic brake sensors 20 + a 3d print
Motor extension cable 10
Different front light from the parts bin
Crank and bottom bracket 35
3d electrical box print and ABS no cost or nominal and was already on hand
Stainless screws (2 trips to the store) 9
Total spent on parts 188

No idea of total hours but probably somewhere between 12-15 if can guess accurately enough.

But it is done. I took it out for a very short ride two days ago and my face almost froze off. Been in the 20's since Sunday in SE VA and we are not used to it. I got the bike up to about 16 but have since upped the amps limit to 15 from a default of 11 so it may go a bit faster but I'm not going to try it out. She weighs a lot less than me so that should also factor in too.

Thanks for the help and following along.

Bob
 
So I started this out thinking "how hard can it be?" The answer was much harder than it should have been. Between waiting on parts, having to send back the first controller for a different one, ordering more parts as I went along just to find I still needed something else like the motor extension cable. it took probably 3x as long as I originally estimated and came in about the same amount over what I thought I could do it for.
This might have been better in it's own dedicated thread or in a build thread, so it doesn't get buried under the huge number of posts on this subforum. One of the newer subforums is called Ebike Electronics Hacking, meant for prebuild bikes, but the forum purpose/title is narrower in scope for hacking the electronics of a factory/pre-built ebike (if there were a more general subforum, like Prebuilt Ebike Hacking, that would be a great place for it). Anyway, good work on a successful upgrade/conversion!
 
Back
Top