Currie Escooter chain install

twilloug

10 mW
Joined
Dec 15, 2019
Messages
21
Kind of old post but I did finally get the new bus installed and the battery appears to be good. Now I need to get chain adjusted so it is tight.

Does chain go around tensioner or between tensioner and sprocket?
 
The chain usually goes between the tensioner and the sprocket. This gives a little more wrap around the sprocket and reduces the chances of slipping.
 
I have an older Currie escooter. I replaced the motor with a 500 w motor and now the chain is too loose. I tried to take a link out and now it is way too tight without any chain tensioner. My question is whether the chain goes on the outside of the tensioner or between sprocket and tensioner? Neither way seemed to work.
 

Attachments

  • 70CE6560-5F6F-41D3-B7F8-A36971323BD9.jpeg
    70CE6560-5F6F-41D3-B7F8-A36971323BD9.jpeg
    3.3 MB · Views: 135
I compared the new and old motor sprockets. They appear to be same size. It is like the drive gear for new motor is in slightly different location.
 
twilloug said:
My question is whether the chain goes on the outside of the tensioner or between sprocket and tensioner? Neither way seemed to work.
Assuming that the pic is a top view and the wheel spins in the direction of the red arrow, then the tensioner would be pressing up against the chain, from the outside, in the location and direction of the green arrow (non drive side of the chain).

tensioner.jpg
 
The picture shown has the tensioner installed correctly based on the responses here. You can see the see the slack in the chain is stop to much. The motor is fixed, the wheel axle location is fixed with the “tabbed” axle washers. So I tried removing a link from chain. Now it is too tight. Looking for ideas…
 
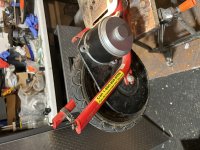
Is the motor bracket the same one as the original?

Is it installed the say way it was originally?

Are the motor mounting bolts exactly the same? fitting the holes in the bracket exactly the same?

You can measure where the center of the motor shaft is relative to the mounting bolt centers, for each motor.

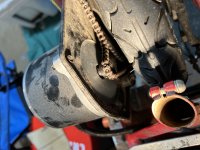
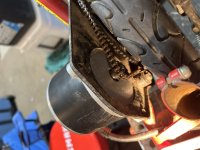
Is the tensioner installed the same way it originally was, including it's spring, if any? (if you look at your "before" photos you can compare...if you didn't take any then you'll need to go by memory, or by looking at the wear / installation marks on the mounting points, etc).

Whatever is different between the setups would have to be the cause of the problem, if the chain is the same chain as original, and there is nothing that can move or be installed differently between any of the other parts.
 
twilloug said:
The picture shown has the tensioner installed correctly based on the responses here. You can see the see the slack in the chain is stop to much. The motor is fixed, the wheel axle location is fixed with the “tabbed” axle washers. So I tried removing a link from chain. Now it is too tight. Looking for ideas…
I think you mean the tensioner is installed on the right part of the chain, but if it were correctly installed, it would be pressing up against the chain to remove the slack. Is the tensioner spring loaded?
 
The tensioner is not spring loaded. It is just set in a position and tightened down. Before I shortened the chain I was able to push the tensioner to where it contacted the the chain on the wheel sprocket and chain was still not tight enough.

With chain shortened one link, it is now too tight.
 

Attachments

  • image.jpg
    image.jpg
    1.8 MB · Views: 99
  • image.jpg
    image.jpg
    2.4 MB · Views: 99
twilloug said:
The tensioner is not spring loaded. It is just set in a position and tightened down. Before I shortened the chain I was able to push the tensioner to where it contacted the the chain on the wheel sprocket and chain was still not tight enough.

With chain shortened one link, it is now too tight.

You might consider carefully, and very slightly, elongating the top and bottom holes in the black plate using a round file, to allow the motor to slightly rotate around third bolt. That would provide enough slack, and you can use the tensioner for any adjustments.

bolts.jpg
 
Thx for the feedback. I got the chain figured out and operating good. Added an offset link. Now just have to figure out how to add spacer for battery space. The battery is about 1/2” too tall for compartment so cover doesn’t sit flush.
 
Back
Top