Dee Jays Giant Revive projects

WOW!

Happy Friday!

I got more Dewalt packs and have achieved modularity with my batteries.

check out my charging harness schematic. Excuse the crude drawing... the gray boxes represents the charging connectors for ten cells each
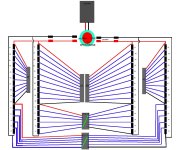
cells.png

Now I don't have to carry 9ah / 11ish lbs NiMH pack just to take a 5 km round trip ride. With the my Special Current Limiting Throttle-Wrist, 2.3 ah is just a little more than enough to pick up my son from school. For longer rides, just slap on a few more packs and it still won't be as heavy as the NiMH pack!

SHHWEET!

My **dreams are materializing one at a time. I am as happy as a little girl...


Now I just need to:

- find a cool looking black plastic or aluminum enclosure, about 45 to 50 cm long x 7cm tall x 5.5 cm wide

- find a small industrial strength battery selector switch.

- buy schottky diodes

suggestions for the first two are appreciated in advance :wink:


The downside of using M1 packs on PAS mode is that the PAS give WOT assist with each pass of a magnet so trying to keep up with the motor by pedaling is pretty exhausting in this heat! I'm wasting energy and getting less range since I can't provide pedal assist at 32kmh without trying too hard! Time to upgrade my chain ring.
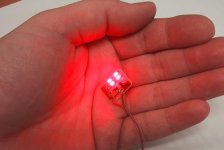
low-volt-alarm-light.jpg

**with this simple homemade device, I may actually be able to build a cell bypass system!

http://endless-sphere.com/forums/viewtopic.php?f=14&t=3956

THANK YOU WebX!

Imagine one of these and a 30 amp bypass relay for each cell . . .

http://www.webx.dk/rc/lipoly/low-volt-alarm.htm
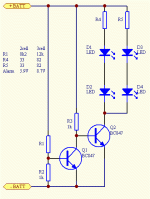
low-volt-alarm-schematic.gif

:p I am so done with my 36 volt NiMH pack. My son will be using it on his own LLEV (Little Lite Electric Vehicle). It's a 3 wheel plastic toy that we found on the way to the children's bicycle rental park. It was in a junk pile on the sidewalk ready for pick up so we hopped off the The Legendary DCR and and inspected it.

It was dusty and had a few rocks wedged inside the fairing as if it had been sitting in a garden or some dusty old tool shed... It also had a crack on the pedal accelerator platform which I fixed with a few angled aluminum pieces and some screws. It ran on a 6 volt SLA/AGM that had died many moons ago. Didn't find the AC charger though. Hell, I may upgrade the motor.

The funny thing was that we didn't have a way to get the thing home on the bike so I just winged it by dragging it behind the bike using a nylon strap I just happened to have in my bike bag, and it worked out, he he! It was slow and noisy, people stopped and stared including policemen in their patrol car but even the cops didn't care as there were no safety violations.. it made quite a racket though but the Japanese love noise, at least in Tokyo.

Check out my wannabe Cycle Chic video which includes the finding of the LLEV! The music at the beginning was from the bike speakers, then I made a smooth transition into the actual music track at the editing process. . . because that's what DJ's do!

I missed a great video shot while riding behind the pony-tailed girl. Get this, just when I stopped recording she slowed down, stepped off the pedals and landed gracefully while walking her bike without missing a beat. I kicked myself for missing that one! I know most cyclist can do this but it's better when a girl like her does it. :wink:


http://home.catv.ne.jp/ss/a1b2c3d4/cruz.mov

ENJOY

And Happy Friday! 8)

J

EDIT: I'm having technical difficulties with the cruz.mov file.

MP3 files stream just fine but mov files won't.

I never had this problem before!

Is it possible that my ISP is censoring my webspace content ? ?
 
Picture 1.png
I found the perfect size A123 M1 pack enclosure yesterday!

MB-15 by Takachi,

11 bucks each. I bought 2.

325mm D
75mm W
55mm H

My 15 cell packs fit snugly width wise as well as height, with plenty of room in depth for future voltage-upgrade/cell-addition.

Maybe too perfect that the charging harness may not fit, hhhmmm. I may have to use thin ribbon wires.
CIMG0001.jpg
CIMG0006.jpg

For now, I'm getting by with the Journey Kit's quick release pack enclosure. FYI, 30 A123 cells also fit nicely in the Journey Kit enclosure. I'm going to miss the convenience of quick release but it's just not modular.

I'll need to build a clever quick release system for these enclosures and around my existing custom made aluminum bracket somehow.

I didn't even think I'd find something so perfect! I really didn't want to resort to making the enclosures myself because I can already imagine ending up with something with rivets all over it. No way.... I want a solid look on my packs. By that I mean, not too busy looking/not too many details. I'm trying to keep things elemental as much as possible.

The semi metallic gray blends in ok with my fully metallic bike. Not too bad at all!

WOO HOO!

Part 2 electronica mix coming soon!

Happy Friday 8)
 
The best part of it is I won't have to commit to gluing, taping, and heat shrink wrapping my A123 cells. If a single cell died, I won't have to tear into all the packing material. I'd just be able to unscrew the enclosure open, cut out the dead cell and solder in another.

(I'll need to make sure the cell don't short out on the aluminum with some sort of sheet barrier on top and bottom off the cells.)

I'm sure not having so much packing material will also help release heat during discharge.

Plus I'm saving $$$ on those big-ass expensive heat shrink!

yay
8)

Yay
8)

YAY!
8)
 
Cool beans! 8)

Took my journey kit 36v NiMH pack apart and divied it to 6 packs, 5 cells each. They're now running my boy's 6 volt toy LLEV trike, one pack at a time. Will go parallel soon! I have enough cells to run lights and other accessories! The hot glue and green heat shrink tubing was strong, it was a pain cracking the cells apart at first, then I took a needle-nose plier to it and pried them apart from inside the space between the cells, carefully not damaging the cells or shorting out.

7.jpg
19.jpg

Dee Jay said:
:p I am so done with my 36 volt NiMH pack. My son will be using it on his own LLEV (Little Lite Electric Vehicle). It's a 3 wheel plastic toy that we found on the way to the children's bicycle rental park. It was in a junk pile on the sidewalk ready for pick up so we hopped off the The Legendary DCR and and inspected it.

It was dusty and had a few rocks wedged inside the fairing as if it had been sitting in a garden or some dusty old tool shed... It also had a crack on the pedal accelerator platform which I fixed with a few angled aluminum pieces and some screws. It ran on a 6 volt SLA/AGM that had died many moons ago. Didn't find the AC charger though. Hell, I may upgrade the motor.

The funny thing was that we didn't have a way to get the thing home on the bike so I just winged it by dragging it behind the bike using a nylon strap I just happened to have in my bike bag, and it worked out, he he! It was slow and noisy, people stopped and stared including policemen in their patrol car but even the cops didn't care as there were no safety violations..
0.jpg
View attachment 3
14.jpg

The original 6V SLA was DOA and my son didn't know that this toy is electric. I surprised him today when I hooked it up with a NiMH. Should've seen the look on his face, Mad EV GRIN at 3 years old!

Got very positive reactions from everyone on the street , young and old!

gggrrr...

now he's much more popular in our town than his old man on the ebike! :wink:

Just wait until I fab a bubble machine and a chrome tail pipe together at the back... man, we'll surely get some cheers. Can you imagine bubbles shooting out his tail pipe?? With some kind of fragrance?? Bananas? Flowers? Superman's Pheromones?? We will be such Teh Bomb! GAH-ROWN-TEED!

Cheers and Happy Friday!

J

New mix up soon, so stay tuned and stand by!
 
I've been eye-balling this stolen/abandoned scooter's forks! I believe it's been parked across the street from us for over a year. I saw two high school kids picking parts out of it in broad daylight several months ago. I'll see if I can't legally acquire the forks if I offer the local authorities to pay the wrecking fee.

25.jpg


On second thought, the fee might be outrageous, possibly the reason it was abandoned in the first place. And the local government is not trying to go into abandoned vehicle wrecking business. Hell, they're already struggling with the abandoned generic bicycle business! Authorized by the government, tons of bicycles are hauled away regularly, mostly shipped out to other countries and sold by foreign owned business here! *Cha-ching*Unfortunately, no one wants a carcass of a dead scooter... Disposable Culture sucks..

...but man I want that fork for my Revive! I want to use *maybe a Unity* motor/freewheel/chain/sprocket combo at the fork and I have this crazy idea of using the this sprocket as a brake rotor. Anyone know if a sprocket/rotor had been done before?
 
Umm, so perform a public service and dispose of the scooter for them. :wink:
 
Mark_A_W said:
Umm, so perform a public service

service the fork...

That's what I'm saying...

Slip a wooden block under the chassis, bring screwdrivers flat & philips... 8, 10, 12 mm wrenches maybe even 14.. for a few clamp bolts, one hydraulic fitting, a speedo cable...
 
Dee Jay said:
Slip a wooden block under the chassis, bring screwdrivers flat & philips... 8, 10, 12 mm wrenches maybe even 14.. for a few clamp bolts, one hydraulic fitting, a speedo cable...
+ Cordless hammerdrill with a 3/8 socket adapter (or cordless impact wrench). Heavy diagonal cutters for wires.

Hang a sign on it: "free parts". Set it on a crate, so the rest can be had quickly by other folks.
 
roll it over to a garbage dumpster. take off the plastic fender, and maybe the seat and drop them in, then dismantle at your leasure. if anyone asks what you're doing, just tell them you're dismantaling it to throw it away responsabily. If anyone questions it, all they need to do is look in the dumpster to see you are throwing parts away.

People tend not to question anything that has an easy, reasonable answer.
 
My charging regiment with the Dewalt DC9000 is not working as well as I hoped. Since the A123 cells equalize during discharge, I'm able to recharge evenly the first 10 cells in my 15 cell packs.
4.jpg
But the last 5 cells of Pack A, when combined with Pack B's last 5 cells, do not charge evenly... so:

-if A's 5 cell string are evenly at 3.21v

-and the B's 5 cell string is 3.25v

-as a 10 cell recharge, A would be about 3.61v and B is about 3.75v.

So I made an equalizing harness that plugs each cell of Pack A parallel to another cell of Pack B. One harness for 10 cells strings, and another harness for the last 5 cells strings.
34.jpg
This harness does it's job nicely after a few hours, unfortunately, I'm still getting uneven recharge . . . but there were a few times when i got an even recharge . . .I'm still experimenting so it might be too early to be sure what's actually happening

I believe the key to have the last 5 cells strings recharge evenly with another pack's 5 cells would be to have A & B packs discharge evenly in parallel with a schottky diode.

We'll see soon.

J
 
Another weird thing had been happening... My BMS had been dying! I believe the charger is the culprit, it had been getting unusually warm lately, it could be due to extremely warm days:

- I would recharge the first 10 cells of each pack first.

- and then recharge the last 5 of two packs and that's when I get Bad Battery lights flashing. (so I put them on my lap and spanked their bums :lol:) :rim shot:

- I tried reconnecting to the first 10 cells again and still get Bad Battery lights.

- I fixed it by changing out the dead BMS with an unused one.

I'm down to my last BMS out of 5.. Out of desperation, I dug through a dead BMS potting to bypass the 15 amp fuse. I was going solder a mini fuse holder so I'd be able to simply pop out the blown fuse...

but found out something odd...
31.jpg
this fuse was NOT blown!

Yep, checked the continuity with my multimeter.

Yo, WTF ?

It seems I'm tripping something else on the BMS. thermistor perhaps? Or lack there of... whatever it is remains a mystery hhhmmmm..... :lol:

J
 
"We need to take it to DEFCON 1, General Mills"

"Roger that, Captain Crunch!!
39.jpg
It'll be a while till I get started on my battery pack enclosures and its quick release system so it's going to look like this for now. I should've used black wires instead of blue...
 
Idea time....
 

Attachments

  • 0.jpg
    0.jpg
    63.5 KB · Views: 3,924
  • 2.jpg
    2.jpg
    61.2 KB · Views: 4,268
Those are great motors! Where did U get that one?
otherDoc
 
Neodymium magnets are $ooo money...

3.2mm dia.

For my rotary charger switch, in the werks. 8)

J
 

Attachments

  • 4.jpg
    4.jpg
    47.2 KB · Views: 4,227
docnjoj,

It's an old model bike and haven't seen any newer versions so I'm assuming they'd been discontinued. People that use these bikes don't travel very far with them, nor very fast, so other than the belts being dry rotted from being parked outdoors, they should be in really good condition. New original belts should still be available. Other than that, no details to tell until I get my hands on one and taken apart. :twisted: *rubbing hands* I'm curious to know how much power they can handle so I'll be pushing its limits.

I'd just been seeing it parked in the same spot for a while now but never seriously thought about getting one until last week. Behind the bike is the designated trash pick-up area. The owner might've left the bike there hoping it would be picked for free. I'd be willing to buy them if in good condition if had to...

I will actively be looking for these hubs to sell to those of you interested. Or I may use them to convert Revives to sell here.
8)
J
 
I believe that is the Sanyo-Rabbittool motor that ran quite well and silently. Yes belts are availible. Contact me off line if U desire to sell the motor only!
otherDoc
 
docnjoj said:
Yes belts are availible. Contact me off line if U desire to sell the motor only!
otherDoc

Sure thing, docnjoj! I wonder what the shipping would be to Alabamy . . .

Motor/Gear Hub only, of course . . .the bikes themselves are disposable and get no love.

Are you planing on trying to use the original controls or are you gutting it and use another controller and motor?

will let you know when I find more.

J
 
First let me start by saying that my DC9000 charging system failed. Yup, my last DC9360 BMS died and I'm back to charging individual cells with my power supply. I have 45 cells, for cry I ! So my DCR had been down for about a month now.. I took the pack and the *two motors off and had been muscling my son on the POR "Plain Old Revive" *This was why I borrowed my wife's wheels with Big Apples and I'm liking them, save for the reflective strips... that and I was too lazy to swap tires. Her Revive has the stock rims and tires now which are pretty worthless but she's not in condition to ride bicycles for a while anyway... but as soon as she is, I promised to get her a new set of Big Apples.

Anyway, I'm now forced to continue working on my Rotary Charger which had been a slow process due lack of precision drilling and the brittle plexiglass discs. And also I had no solution to trigger the solenoid.... Until Now! woo woo!

During the Rotary Charger's incubation... I grew a wild hair up my ass one night. I figured "hell, since the motors are off the bike, it would be a good time to experiment with them" so I decided to go light with my DCR by doing away with my 4011 motor and use the 408 in the rear where the drop-outs are beefier and somewhat reinforced by the derailer mount because I was concerned running the 408 on the fork with no torque arms. And while I was at it, I might as well consider drilling holes on the aluminum part of the armature for water cooling copper tubes and install the temp sensor.

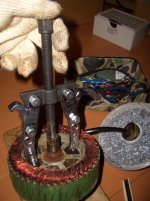
So how was I to pull this off?? TO USE THE 408 AT THE REAR?? This was where a wild idea kicked in... after some deep thought, I realized the armature of 4011 and 408 are the same, 1.jpgthe only differences were their axles and winding counts. OF COURSE! It would be as simple as swapping axles and installing the 408 in the 4011 hub! Farkin' genius, right? Well, everything was fine dandy until I used a puller to push the 4011's axle and to pop the side cover on the wired side. I cracked the spoke flange! 2.jpgImmediately, I ran to the toilet because I *just about* SHAT in my pants (like William Shattner)! After wiping and changing my shorts I broke out the Ruby slippers closed my eyes, clicked my heals and tried to wake my self up! That didn't work. I was screwed. I'm no longer The Bomb.

After a few days of grieving, I came up with another wild idea... how about using the 408 armature and the 408 hub casing BUT with the 4011 side covers! Urethra! They actually fit! 7.jpg8.jpgExcept for the screw holes, which means I'll need to drill and tap new holes on the 408 hub. Should be easy... for now, I need to concentrate my energies to the Rotary Charger.. but I'm too obsessed with the making an AlterMotor!

Oh! and one other problem... the 408 axle is rusted. My puller trick worked to push out the 4011 axle but not the 408.0.jpg I found a machine shop run by one guy, and let me tell ya, he's got machines. I asked him if he can push the 408 axle out for a 10 bucks or 20... I was desperate, and he dropped what he was doing for little ol me! At first he tried to use a rubber mallet but I explained how futile that will be and asked him to use his hydraulic press and a steel tube combo. And so he tried, BUT HE COULD NOT DO IT! I offered him 10 bucks but he refuse since he wasn't able to help me... great guy! I got his business card with the intention of trying again after applying heat on the axle with a propane torch. Until then, I'm SOL.

FYI: after closely examining the two motors, I discovered that the only reason for dishing the 4011 to the wired side was due to beefier design of the 4011 side covers. Weird...

I have other news on my 4011 but will save it for another post

TTFN
:(
J
 
Thats some horror story DJ. I tried way back on a WE 409 to pop the covers like that and BANG, I popped the center out of the cover. Seems U gotta remove the screws first! :oops: My machinist welder fixed it and its still in use. I dont use wheel pullers on those motors any more, just my machinists 12 ton press and metal support plates for the bearings. Works fine!
otherDoc
 
pwbset said:
Talk about leavin' me hangin' there!
Gent-le-men... Didn't mean to leave you hangin' ha ha! That last thing I wrote was just a Note-to-self because it's very important to pass on this last bit of fiasco... this melee... ggrrrr The 4011 continued...

I believe that the flange had weakened after a year and half of use so it shouldn't be a surprise that it failed. That motor took some abuse from:

-hard spokes
-in radial pattern
-hopping off curbs
-with hard BMX tire
-supporting 90% of the weight (if not more)

As for the the 408 axle, as I mentioned, it is rusted and stuck. The way my tofu works is: I should not to take a chance destroying the 408 because it works just fine. But I need a rear motor because I should not run the 408 on the fork, and I'm not ready to take on my torque arm project... So what does a guy who grew a few wild hairs up his bum do? Grow more wild hair, sure... Let's subtract windings from the 4011 and turn it into a 408, Bob's your uncle! Even though I wasn't sure if it was as easy as unwinding 3 windings off each pole(?), I had to TRY! Worse case would be having to re-wind the entire armature and I was willing to learn. I am down as fnck! I had no intention of using the 4011 anyway and it would just end up in a box (actually, it was intended to go on my wife's Revive but she thinks it's a bit heavy...) Add to the fact that I'm lolly-gagging on my Rotary Charger and still need to order a 20amp power supply... I'll have quite some time till I can charge my packs fast enough for daily use.
5.jpg
So there I was, trying to unwind my 4011 from the very end of each phase wire and quickly found that I'd have to unwind the entire 11 windings of one pole/whatever before I can get to the next phase winding.. ho ho ho, mary xmas! Well now I know how it's wound.
View attachment 2
No worries... da brotha's gonna work it out.. da--da--da--brotha's gonna work it out..

yeah those were unfortunate turn of events, one after another... they say bad luck comes in threes, I think I'm up to four so I felt I'm owed a biggun... woo hoo!3.jpg
 
docnjoj said:
Thats some horror story DJ. I tried way back on a WE 409 to pop the covers like that and BANG, I popped the center out of the cover. Seems U gotta remove the screws first! :oops: My machinist welder fixed it and its still in use. I dont use wheel pullers on those motors any more, just my machinists 12 ton press and metal support plates for the bearings. Works fine!
otherDoc

:lol: you must've kicked yourself hard for that one... good to know you were able to have it fixed! :)

J
 
My Rotary Charger is coming along...
10.jpg
The plexiglass sheet was brittle and I didn't have a way to secure it while drilling holes with my drill press. I had to hold the sheet down with my left hand while pressing the drill with my right... but as soon as I drilled through the other side the drill bit got caught on the rough edges and pulled the sheet up and CRACK! :evil: I tried to soften the sheet by applying heat with a hairdryer but it didn't work. Most holes didn't crack, but just when I got into the groove of things, it cracked :x . I failed three times and wasted over ten bucks worth of material and train fare to the DIY shop. After the third failure, :cry: I was frustrated and felt like giving it up until I can come up with a better material to work with, but I had two more pairs of discs and squares so I continued on one more time and succeeded. 8) I had to drill 32 holes and it took a lot of concentration to ease the drill down then back off. It stressed me out when it cracked! :x

Anyway, I won this battle.. tra la la... 8)
View attachment 4
18.jpg
22.jpg
13.jpg
Originally, I wanted holes for 30 cells in series (31 holes) but I changed the plan to charging 15 cells in series paralleled with another pack, so that's 16 holes x 2 opposite of each other. Only after succeeding did I realize that I could've just drilled 16 holes (instead of 32) and went parallel by wires, doh! :oops: Oh well, next version. There's always room for improvement.

Up coming challenges:
- carefully applying super glue to positively secure the neos in their holes without spilling glue onto the electrically conducting surface. (Yes, the magnets themselves are the electrical contacts) I'm aware of possible heat issues and will be using a cooling fan to cool the everything inside a plexiglass box, including the power supply.

- find a way to connect power wires behind the magnet tabs.

Don't know when some good ideas will be beamed down to me from the spaceship so for now I'll do what I can:

- fab copper traces

- cut ratchet teeth on the disc, this time with a hot-blade soldering iron bit, (filing teeth on plexiglass ain't easy)

Oh :!: and what's this? Is it a PWM speed controller kit for DC brushed motor :?: We we we!
7.jpg
Stay Chuned. :mrgreen:

J
 
Back
Top