Deecanios first build the "DC1"

Hey Ypedal,

i went to see a guy today and got some work done - he has the cranks now but doesnt have the taps, apparently i need a 9/16 20 tap, both left and right hand - i need to confirm that the thread we think it is, is indeed correct?
does anyone know for sure if theres a standard for threads on pedals,if so what is it exactly?
i actually want to change the pedals so if they vary i could get the pedals first then buy the taps, any help here welcome??
Heres some work he did on my torque arms - i let him cut and weld them for a pupose fit and secured using the caliper bolt.
being as there was no real cost at risk reshaping them seemed ok to me but as ever i've put some shots up so you guys can see and warn me of potential risks/errors with having them this way.let me know what you think and if its no good ill order two more torque arms sharpish!! lol
 

Attachments

  • DSC03049.JPG
    DSC03049.JPG
    44.5 KB · Views: 3,724
  • DSC03051.JPG
    DSC03051.JPG
    39.5 KB · Views: 3,724
  • DSC03053.JPG
    DSC03053.JPG
    43.7 KB · Views: 3,716
The arm should work fine, but that welding is sure bad! Given the choice of bad welds or bolts, I would overlap the two pieces and bolt them together.
 
Nice progress...

You only have a few threads left on the axle bolt, which is not really enough. I would place the arm under the nut that's there and shorten the spacer that goes to the brake mount if there's enough room. I guess I would have gone for attaching the end of the arm to the other brake caliper mount to get more clearance (of course this would require a different arm configuration).

There's not that much stress on the end of the arm where the m6 bolt goes through. m6 should be plenty strong. There's probably a lot more force on the brake caliper when you jam on the brakes.

Just because a weld is ugly doesn't mean that it's weak, but it's kind of hard to test without damaging anything.

The axle nut needs to be really tight, but not so tight that something fails.
I wonder if there's a torque specification for those?
 
Thanks for the feedback guys,
i suppose the best configuration would be inside the axle bolt and to the other caliper bolt but heres where i am so do you think it will work or do i need to try again? this was about the best config doable with the stock torque arms, so if i need to beef it up im looking at specially made arm that could be costly - i'll spend the money if you think a new config would be safer?
fechter there is maybe 1 1/2 mm extra on the threads left you can see where the torque arms go on the axle,dont you think a good 6 threads will hold them?


cheers

D
 
6 threads should be enough. When the motor starts torquing the arm, the spot where the welds are will be put in compression, which will help their strength. If the main axle nut is tight enough, the torque arm isn't really carrying any load. It's a good safety in case the nut loosens.

If there was enough clearance, putting the arm between the motor and inside of the dropout might be an option. If the end of it hit against the brake caliper, you wouldn't even need to bolt it, since (unless you have regen) it will never try to move backwards. It would be hidden that way as well.

What all these hub motors need is an adjustable angle torque arm. I've seen some fixation jigs that have a thing called a starburst. If there was a starburst on the end of the motor part that butts up against the dropout and a matching one on the torque arm that mates against it, you could adjust the angle in small increments. This would be much stronger than using the flats on the axle. Oh well, just dreaming...
 

Attachments

  • mayfield_a-1018.jpg
    mayfield_a-1018.jpg
    5 KB · Views: 3,682
Hey all,

Had a few more parts come in and get fitted - the guy that did my torque arm did my cranks too but thankfully they seem good so far.....all cabled now just have to change the connectors on the controller and batts and i'm nearly ready to have my first ride!!!
Any points just holla guys - hope to be riding it next week at 36v!!


cheers

D
 

Attachments

  • DSC03074.JPG
    DSC03074.JPG
    27.9 KB · Views: 3,596
  • DSC03066.JPG
    DSC03066.JPG
    24.6 KB · Views: 3,604
  • DSC03070.JPG
    DSC03070.JPG
    22.3 KB · Views: 3,596
  • DSC03068.JPG
    DSC03068.JPG
    44.7 KB · Views: 3,604
  • DSC03063.JPG
    DSC03063.JPG
    38.8 KB · Views: 3,596
  • DSC03059.JPG
    DSC03059.JPG
    41.4 KB · Views: 3,596
  • DSC03055.JPG
    DSC03055.JPG
    42.8 KB · Views: 3,596
great looking bike... how do you plan to protect the controller from water/mud??

also where will the batteries be mounted?
 
Hi d,
Thanks, i've been trying to keep the bike as stealth as possible so i can ride it in the forest where i live, i never ride on the road and always wondered if an ebike could be ridden off road?
the controller will be mounted on the downtube where it was previously (taken off so i can put my connectors on) although i did prefer in the space in front of the rear wheel it would have taken a right bashing.The original idea was an mx type seat so i could hide the controller underneath but most of the guy's seemed to think it was a bad idea and it got dropped (tho in secret i'm making drawings to have one purpose made ssshhhhhh!!! ).
i have 2 x 36v lipo's that i'm planning on having in a rucksack, the wiring will run up the seatpost and present two andersons just at the rear of my seat - still have to devise a quick break solution for when i have to jump ship!!
i must have started looking at ebikes about a year ago now (man,where does the time go?) and inspired by yours and some others vids i put my money where my mouth is around christmas, if this bike can do what i hope i can then i will swap all the parts to a freeride bike with some serious suspension - won't get too excited though as this kit is unproven yet.


cheers


D
 
Hey deecanio may I ask where you got your torque arms from they look ideal for what I need well the main part anyway as I am looking to screw the top part into the two rear carrier threaded screw holes
 
Hi numberonekiwi,

sorry, these are the arms that mark from teamhybrid supplied me when i bought my puma,i dont think he gets involved with the manufacturing,just supplies them with his wheels.you might try doug at evtech tho, i think and i emphasise THINK he supplied them to mark??????

i managed to get a ride today - but only under my own power :(
like knoxie mentioned the weather in the uk has been great (for uk) and it's been a bank holiday weekend of 4 lovely days :)
My own steam ride proved very useful as i found a few problems right off just by pedaling,not all bad news tho :)

i have a chain slippage issue,it only happens under very heavy load but i think the chain is slipping just one sprocket tooth,possibly the rear cog not holding the chain well enough?i'll post a pic of the rear sprocket in situ see what you guys think tomorow - as it said this only happens under really heavy load - pedal as hard as you can sitting and nothing - stand and give it all from off and i hear the dread clunk of chain slip,could be the wrong pitch either chain or sprocket too as i got the rear sprocket from mark and could'nt tell him what pitch i needed so he took best guess? i got the chain and the crank from the lbs so im not sure how i check this out?is there any way to measure them ?
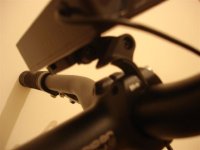
My drainbrain is too springy on that clip,every time i hit the rough it makes like a woodpecker and if there were any numbers on i wouldn't have been able to read them !! lol no biggy, i will sort that out this week.


Anyways those issue aside i was really surprised and pleased by the way the bike rides - i went for a ten minute run to test the crank and make sure all was steady and i came home an hour later,lol.
starting off with the crank it really wasn't as bad as i thought it might be,pedaling was fine - nice smooth action and felt dead true under my feet,really nice and solid and oh how quiet it goes :) i hammered it as fast as i could on road and sitting and all i could hear is the tread on the tarmac.Venturing into the forest and around the pond it behaved just as well off road, i really got lucky with the gearing - it's just a little harder than the gear i used to used all the time when i had the choice 27!! i suspect the weight of the hub is the only difference and as i said i pedaled? around for an hour and it was no biggy - don't get me wrong this is a mainly flat area with some very small hils and i wouldn't say i could pedal up the sort of incline that i could before the electrics,but to pedal it home would be no hassle whatsoever - i would even go as far as to say the bike is no more difficult to ride unassisted than some of the heavy bikes i had as a kid - the raleigh "grifter" springs to mind for those in the uk circa 1977 ish.lol
i was riding today with everything on, controller included, all i was missing was my lipo's and the most impressive thing was just how quiet the bike is.
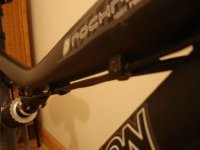
it's the same setup as in previous pics with the controller on the downtube still but now bolted to the frame using one waterbottle hole and two zip ties which hold it rock solid.
i was expecting some rattles and bangs but not a thing!! no noise whatsoever except crushed forest leaves and wind - pre electric it used to clang no end over any rough terrain but the single speed and tensioner has totally eradicated it,very very happy about this as it didn't matter how much i tried the bike refused to make any more noise than a whisper of freewheel :) talking of which again very nice coming home downhill i can honestly say that it was as good as my bike ever freewheeled only quieter!!!
checked the main cables throught the suspension and they were fine too - i did get the suspension to near max too so i'm happy now that it functions without being impeded.

Ok so chainslip aside very very pleased - all i need now is the usual sensible help to finish the electrics,the bike is fully wired and all i need to do is put the battery connections on the lipo's and i can ride under power for the first time :)
i didn't time to get the bike powered up this weekend for a couple of reasons,but one of the main ones is this is where i really need some help - i am a noob,i have lithium packs, they frighten me some.i want to get the connections right first time and i need to know the following...... help me out guys,after todays ride i'm busting a gut to get out there again :)
couple of shots of shunt mounting but then on to the elctrics and the questions i need some help with...............
 

Attachments

  • DSC03125.JPG
    DSC03125.JPG
    60.1 KB · Views: 3,423
  • DSC03087.JPG
    DSC03087.JPG
    40 KB · Views: 3,431
  • DSC03084.JPG
    DSC03084.JPG
    24.2 KB · Views: 3,422
  • DSC03082.JPG
    DSC03082.JPG
    19.1 KB · Views: 3,422
  • DSC03077.JPG
    DSC03077.JPG
    19.7 KB · Views: 3,432
  • DSC03095.JPG
    DSC03095.JPG
    37.6 KB · Views: 3,425
  • DSC03092.JPG
    DSC03092.JPG
    36.4 KB · Views: 3,424
  • DSC03091.JPG
    DSC03091.JPG
    29.3 KB · Views: 3,424
I see that we share similar mental blocks when it comes to some of the finer details lol......

Step back.. take a deep breath.. it will all work out in the end.

1- The charger leads do not really need to be soldered, but they are good to practice on !!!

2- If the tips are warped after crimping, they can be a shore to get into the housings.. flatten them out if they are being difficult.

3- When dealing with Very thin wire, strip back a bit more insulation, fold the wire in 2 and then insert the tip and crimp.

4- Fuse on the phase wires.. knox is the only one i know who does this.. not sure i fully understand why either.. Knox ?..

5- Shrink tubes work best if you can slip them down further into the wire when you solder as the heat makes them shrink pre-maturely and you can't get it where you want it.. Go one size up and apply over the tip after crimping/soldering if you can. Hot glue is great at sealing these things and can be removed vs epoxy that tends to be permanent.

6= Get it done for god sakes.. we want E-reports !!!!!!
 
A small point of interest: epoxies soften at about 180 to 200F, to the strength of dry cheese. Nothing to fear in removing epoxies.

Filled epoxy putties are a bit tougher.
JB Weld fails at low temps (loses its hardness -while hot-)
This weakness reverts upon cooling.

It's why we can't really rely on epoxies for high-temp work--regardless of the makers'

lies!

:lol:
 
Hey there Decanio
Finally got something happening hey! Good onya :D

I've been lurking a bit here -not very often though -busy doing other stuff.

Is that a Surly Singulator you have there? Maybe try the other spring that should have come with it and have the chain push up -should give a bit more wrap.

I did have one of those on my setup -but had to put on the double tensioner -slippage would be worse than yours because my motor is driving the crank.

Keep up the good work mate -looking forward to the finished product.

Cheers
Dom
 
Hi DC

The chain slipping is probably either a stiff link in the chain or the pitch is wrong as you are driving a BMX freewheel? is that correct? if so the chain pitch will be different and you will need BMX chain, which may present a problem at the front.

Either way I doubt you will be peddling too much, however it would piss me off, just 1 stiff link in the chain will cause it to jump under load, check the chain on the bike, if not take it off and examine each link, if they are stiff just apply some lateral force along the links either side and it should loosen, this can also happen when a pin in the link starts drifting out, get a link splitter and drift it back in.

Check you chain alignment as well, the phase fuses are useful when setting up, saved the controller a few times once its up and running you shouldnt need them, I never though they would be quick enough to stop fets blowing but they have been.

Looking good though mate, crimp those Anderson's hard you don't need to solder them, it cant hurt but isnt required, remember little dab of Vaseline inside them before you connect them, helps the contacts last, don't run them dry.

Good luck

Knoxie
 
don't run them dry.
Amen!

The only ideal joints are pressurized joints or crimped---copper to copper (or silver) are in effect a weld.
The grease or the solder is to exclude air,
to prevent corrosion which would otherwise ensue.
A purely silicone grease is neutral, eternal.
My jar of that stuff is forty years old. Looks fresh as new.

Solder adds mechanical strength to non-crimped joints,
however, it's the exclusion of water, air, salts, etc, that's so long-term vital.

Solder's not such a great conductor.
Nothing will beat a hard crimp or a weld.

PS: what a brilliant bike. It is art.
 
hey guys,
thx for all the responses - it all becomes clear :)

Dom,
Hey nice to see you again - yes nearly ready to ride my first bike,knoxie took me under his wing and helped me out no end, just have to connect the batts and im running but like you i'm all out of time again as im getting married in the summer and my very understanding loved one will stand for no more shirking of arrangements :)
its a "powerplay" singulator but yes good idea on the upsprung arm even i have to lose a few links - i will have to show the lbs i think - i think it is a mismatch of pitches but like knoxie it will bug me too as i need to know that i can smash the pedals to help off the mark or just plain pedal if im outta juice.cant wait to finish either and i promise i'll get some vids up as soon as i can (more learning need on that front too ) :roll:

Knoxie,
cheers mate i have all the info now i need to get a ride at last - mark hasn't come back to me on the bolt yet so i wondered would i get away with the arms as is at 36v?i know i shouldnt but im itching to try it out !! haha
crimps are all firm, dont think any problems there - do you mean just enough vaseline to coat the connectors?all andersons?
as i said the chain issue is just a mismatch i think - if it is a bmx rear (ill have to ask mark as he seemed to know pitch measurements as i recall)
then i need to change the rear. we'll see.
thanks for the sketch i really appreciate you helping me out so quickly everytime i ask, your a star mate :)

reid,
thansk for the info mate - crimps and silicone grease it is - i was never any good at soldering lol.
art? :oops: nah just a small conversion for test purposes - wait till you see the dc2 :)

Ypedal,

I'm trying dammit,lol i'm trying!!
looking forward to that chopper- any more pics???
 
Hi Mate

Yes one arm will be fine at 37V don't worry about that, you only need to coat the inside of the connector with a little dab of Vaseline, also make sure when you strip back the insulation that the copper underneath is not green, they don't use the highest quality cable and they suffer a little when shipped with oxidisation so check that.

Yeah try it what the heck!! the most important thing is check and double check the polarity on the power side of the battery, get it the wrong way around and the controller will smoke, so make sure red to red black to black.

Go steady on your first run, in fact take it up and down the road on the first few runs don't hit the woods until you are happy its all working as planned, I will take the 26 Incher to the woods and try it at 72v as well when the woods dry out, be a good test of the puma with the stall currents being so high, if it survives being thrashed around in the woods they its more than likely going to be ok on the road.

Cheers

Knoxie
 
knoxie,

need some help if ur around? putting terminals on batts and i need to check something with you before i charge - i'll leave msn and skype open or mail me any address and ill give you a call?


D
 
haha,

i just put my terminals on the batteries.
one = 39.5v and the other 38.9v
i was going to pop them on the charger indoors but had a few doubts (arse flaps) that i need knoxie to clear up.
when i changed the connectors for the chargers (originals were anderson copies) i stupidly took them all off at once and even though i'm reasonably sure the white shrouded cable is the red i want paul to check his before i plug in,lol
Also i put 30a connectors on the chargers and also on the charging leads on the batteries - i figured as the chargers only put out a few amps i would save my 45a connectors for the battery output leads?
The batteries dont have long leads so i think if i stand they will pull out - i only have 35a cable to extend them and only 30a connectors left - do you think i should wait and get 45a connectors? i will only need about a foot in length but i need to solder these ones as they will be my "rip break" connections :)
i dunno Y it's all questions questions questions - i wanted to go for a quick ride tonight as i'm otherwise engaged all weekend or at the very least connect up and make sure the wheel turns lol


D
 
lol, hook it up hook it up!!!!
i think the 30's will be ok too :)
the pic doesnt help mate - i need to know the charger colours and that batt is slightly different from ours, thanks for trying though Y i know you understand my angst most ;)
do you reckon even though i haven't charged the batts i could hook up at 39v and just try it out? im not sure if im mistreating the lipo if i do this?


D
 
Hey,

Yes had the bd and everything good to go but didn't make it :( haha
i will maybe get to plug in and test at best this weekend as i have other commitments - knoxie must think i've totally lost it hounding him for more info on every front,lol sorry knox - just had gotta ride it bug big time :lol:
i should wait just a little longer and fix up a good "rip break" if any one has some good ideas please share - the andersons seem to come apart easily enough with a tug but i need a "middle" piece of cable to take the strain not my batts or the shunt, i need this too as the batt leads dont rech the shunt in a standing position.
mmmm something for me to ponder whilst busy elsewhere.....
thx for the help Y :) soon ill be running!!!!!


D
 
Hi Mate

The batteries are not charged, all my chargers are in the garage at the moment but yes the white lead is the positive lead and the screen cable is negative, just power it up and test it with the DVM if you are not sure.

The batteries should be near 42V fresh off the charger, charge them both and go easy the first few cycles, 4 or 5 charge discharge cycles before you give them any long hard use.

Dont worry about the Andersons, the 45A or 30A ones will be ok, I am using 30A ones on all my connectors with no probs.

150V controller is good to go, will test at 72V after a few weeks at 40V

Cheers

Paul
 
Back
Top