Destroyed! A warning to those using freewheel cranks....

Thanks Terry!
I did quick search on Token freewheels and the interweb noise wasn't very positive. so I am not surprised by your advice.

What about my question 3) please.
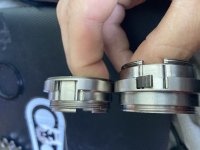
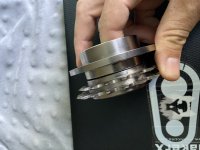
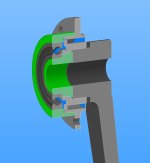
How did you connect the freewheel to the bottom bracket? Did you use an adapter?
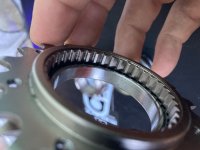
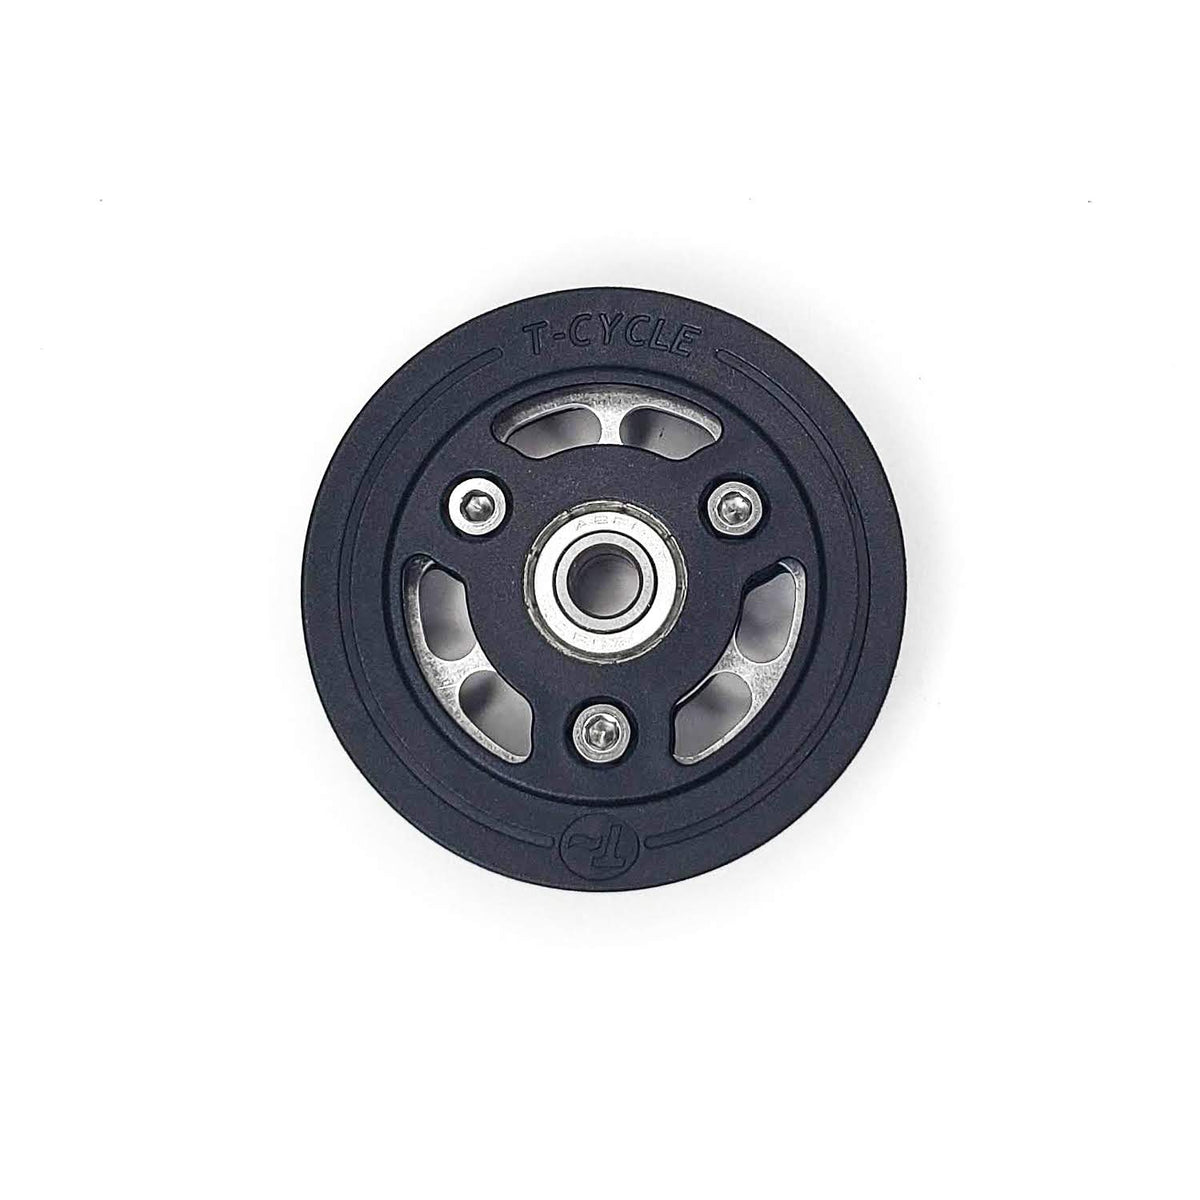
It is not quite clear from the one and only photo of your chainweels crankset :)

BTW - in one of your earlier posts, you were talking about building it with three chainwheels??? but I see that you have ended up with two (same as in your first build).

once again - thank you for taking time to reply and help!
 
hey, you can use the 4 arm or 5 arm Freewheel Spider`s that Sickbikeparts offers.. just depends on your hardware..
I use a 16T FW - which 4 bolt pattern fits straight thru nicely..
For a dual chain-ring or more..requires more adapter plates (spiders) etc..
Right now Im currently using only 1 chainring.. the dual chain-ring worked really well.. but Im running brushless motors now with more torque..
 
Understand adapters etc, thanks!

Understand that (like a majority here, who seem to bent on ever more powerful motors :lol: ) you are not bothered about having more than one chainwheel.

There is still one thing I am not clear about - how do you attach this whole thing to the bottom bracket spindle.
Sorry to be PITA ... :?
 
oh .. you need threaded crank arm.. the FW threads directly onto it.. then bolt sprockets on either side..
 
OK, I am being thick here, please bear with me... :oops:
If you use threaded crank to fix freewheel, than how do you get dual freewheel action, where you can use motor alone, or pedal with motor, or pedal only without dragging motor?
 
Im not sure about dual FW for pedaling without turning the motor .. I think that would require a clutch or something..
small 60mm brushless motors still have some drag.. but I can live with that..
for me being able to pedal with the motor provides super fast RPM redline, high efficiency and can help to save battery capacity if required..
also it is important to have fast engaging rear hub.. and 60 point FW.. otherwise quarter to half a pedal rotation before motor catches up is noticeable..
 
bambuko said:
OK, I am being thick here, please bear with me... :oops:
If you use threaded crank to fix freewheel, than how do you get dual freewheel action, where you can use motor alone, or pedal with motor, or pedal only without dragging motor?

The freewheel threaded on the crank arm is used for riding on motor alone without spinning the cranks.
To pedal without dragging motor you need a second freewheel mounted between the motor and the cranks, for example on the motor output shaft.

Avner.
 
Thanks Avner,
I know that you need two freewheels to do what I want, I just thought that Terry managed to do it in his design (my confusion - all is clear now).
 
myzter said:
yep thats the BB..However.. I got good news and bad news!!
Do NOT get the Token dual bearing FW.. My ($150) mistake for even mentioning it..
FW was failing after a few km`s..
The good news
my favorite bomb-proof, low-cost FW - the Excess Pro ($21) with 3 pawl engagement system and 30 points of contact
has been upgraded to 60 points of engagement..with the Excess Elite FW.. it is pricier.. ($49) and only comes in a 16T version... But the sideways play seen in the Pro version seems to be completely gone in the Elite model..

Hey myzter, can you report how the token freewheel failed? was a ratcheting fail or a bearing fail? if a ratcheting fail, have you bedded in the unit before to apply serious torque on it?
 
I want to make a freewheel with a smaller 58mm bcd for as small as a 20T standard bike chainring. The chainring being so small will have to fit beside the bearing and therefore be far from on the same plane as the bearing, but since using the freewheel as a jackshaft can’t I balance the load along the center of a single ball bearing if I put the chainring and pulley equidistant from the bearing?


The pics show the ultra durable sbp freewheel (it has two 40x50x6 bearings and the ratchet in the middle), compared to the white industries with I think a common 40x52x7. And a pic of the 18$ freewheel off taobao which feels solid but haven’t opened it yet and assume the same design as the white industries


I won’t add a ratchet mechanism and instead will add a slot where a pin can be inserted to make it fixie if needed to get home. I’d rather not hear a constant freewheel while riding and it also removes a potential dangerous failure of a ratchet(although highly unlikely).
 

Attachments

  • D087D4AB-8B63-40C2-85E6-50499583F072.jpeg
    D087D4AB-8B63-40C2-85E6-50499583F072.jpeg
    3.3 MB · Views: 422
  • 18ACA468-FB29-47E0-81AC-F451FF10CD39.jpeg
    18ACA468-FB29-47E0-81AC-F451FF10CD39.jpeg
    1.7 MB · Views: 422
  • 5941EC3C-FA32-4C08-92E6-CE9CC7015005.jpeg
    5941EC3C-FA32-4C08-92E6-CE9CC7015005.jpeg
    1.7 MB · Views: 421
  • F19F3540-9BBF-40D9-B7BE-FC00468B0444.jpeg
    F19F3540-9BBF-40D9-B7BE-FC00468B0444.jpeg
    3.2 MB · Views: 421
  • 72F03CAC-B602-4DA0-A9F8-D3B1B41F61CA.jpeg
    72F03CAC-B602-4DA0-A9F8-D3B1B41F61CA.jpeg
    3.3 MB · Views: 421
  • 4E961FD2-C4ED-4054-967C-64B0FC1B7686.jpeg
    4E961FD2-C4ED-4054-967C-64B0FC1B7686.jpeg
    4 MB · Views: 422
Miles said:
Another way to do it:
This colored pic is Miles’ design

It’s similar to what I’m doing with a 40x62x12 bearing but I’m assuming this kind of off-center loading is what kills the bearing, no?

It will function as a jackshaft with a pulley and standard 58bcd chainring. Do you think I should get the pulley on the other side equidistant with the chainring from the center so the load will balance? Isn’t loading a bearing off the centerline a problem?

Is 4mm of threading enough to secure a chainring? I’ve read three threads secures enough

( my pic of what I want to make won’t post)
 

Attachments

  • 7AFA1432-2039-48D5-BC15-3854EEB4BD95.jpeg
    7AFA1432-2039-48D5-BC15-3854EEB4BD95.jpeg
    43.3 KB · Views: 376
I've done the front freewheel trick on a mid drive Ebike (the front freewheel is already there) you just have to PARTIALLY disable the rear freehub/freewheel like Shimano did with their FFS system. This is for safety reasons. There are 2 ways to do this. One is to use a very small zip tie to lash the cassette to the spokes. If anything hangs up the zip tie breaks and the bike returns to normal, this is the "fail safe" option and I suggest it for testing. It helps to add 1 extra link to the chain to allow a little slack to form w/o breaking the zip tie.
The other method is to create a friction between the cassette and the hub. I used a square section rubber O ring with some silicone grease to create a friction drive. It doesn't take much, all it does is drive the chain around when coasting and slip if there is any resistance. This is the "fault tolerant" option, and doesn't need a longer chain because it just slips. I ride this daily on a 1500W Ebike.
Good chain retention is necessary. Some users with a good chain line and Wide/Narrow chain ring report success with a just a clutch type derailleur. The return spring needs to be strong enough to pull slack out all the way around the chain. Any chain guide that rubs the chain will cause more slack at the top not less. I used a toothed recumbent drive side idler on my bike because my chainline. chain ring, and derailer were not helping at all. The roller guide at the top is too little too late for my application. The toothed idler runs smooth on the back side of the chain.
It's up to you whether to give up, or fix the problem if the chain comes off.
Here is the idler I used.
Here is the frame clamp that holds it on a 1500W Ebike.
I made an adapter plate out of 3/8"x 1 1/2"x 3 1/2" 6061 aluminum bar. The bracket holes are 1.97" apart.
The 1 1/2" width allows you to drill the holes to match the seattube angle for a level installation.
There are some photos here. But not of the wider angle drilled plate.
 
Back
Top