E-S LMX 64 Bike Owners

Some of you asked more details on how to operate the screen, I will add the requests as we go to this file :
https://docs.google.com/presentation/d/1ckwXSldIflWoec7P8ieHLA6gZurej1rS_FDw7P578Ks/edit?usp=sharing

For now I added the access and reset of stats and how to disable the button brightness.
Let me know if you need more informations.
 
Correction. Top speed with 12tooth cog. 56Kmh
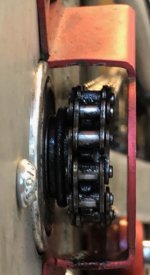
I didn’t reach top speed. There is probably another km/h in there. Full battery. It’s much quieter, and accelerating a little better. Pulls 2cm high power wheelie for a bit. That’s fun. I have one of the spare o rings sitting next to the groove O ring. Keeps the chain in place. 4km run. The o ring has moved. It should be easy to add a second groove and keep the chain in place. Before it was running free left and right. Rattling. Stop the rattling. See photo. The cog could also be increased in width, or a special resistent (cog coating) materials used to decrease the gap.
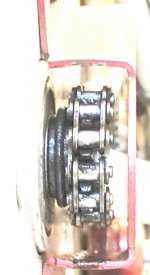
The picture is dark. Zoom in to see the marks on the chain and o ring pushed off. Before the ride it was completely against the chain. Used a screw driver end, to adjust it in place. Now it has moved.
 

Attachments

  • DACD33C6-782A-4B3A-B8DA-31D1BFE5FB86.jpeg
    DACD33C6-782A-4B3A-B8DA-31D1BFE5FB86.jpeg
    76.2 KB · Views: 2,693
Took the picture and over exposed it. Now, you can see it clearer.
 

Attachments

  • 15E3E0C7-5E7F-4725-A5F4-D93B9700ED20.jpeg
    15E3E0C7-5E7F-4725-A5F4-D93B9700ED20.jpeg
    80 KB · Views: 2,691
Could owners (or LMx) not go 18T front cog, and 50% larger rear cog? Visually, it would mean a lot larger rear, I realise.

When I moved from a 12T to an 18T on an LR kit - it was a lot quieter at high rpm
 
PRW said:
Could owners (or LMx) not go 18T front cog, and 50% larger rear cog? Visually, it would mean a lot larger rear, I realise.

The Kart sproket we use max out at 100t or so, so going higher would mean custom sprokets, more chain weight, and we found out going from 12 to 14t did not help much on that.
Adam
 
Joe said:
Took the picture and over exposed it. Now, you can see it clearer.

Thanks for sharing your observations.
It looks like there is room for another O ring on the inner shaft of the sprocket, which would stop the other one from moving out of position. In other words, have two O rings next to each other. It's interesting however to see how much side to side play there is from the chain which is pushing the O ring out of place. I suppose there always needs to be a little wiggle room for the chain, but perhaps a sprocket designed slightly wider may help.
I am still waiting to hear back from a 3D printing workshop to get a 3D printable file of the 12T sprocket and hopefully a prototype sprocket to try. I fear however it could be a long expensive road having a CAD file made that could be adjusted to try differing sprocket widths and designs, and then also trying out differing printed materials.
 
Hi everyone,
i am owner of a LMX 64 now, and i want to share my feelings with this bike. The idea of the bike is exactly what i want and i'm looking for a LMX since the first pictures of the LMX81. Fortunately LMX sold the demo bikes, so it was affordable for me too.
The demo bike is used heavily but i was told that the electric and motor components are similar to the serial product. I like this bike but there are a view things that suprised me. I tested the bike on gravel trails and urban obstacles so far.
At driving on flat ground (10-35 km/h) it is impossible to assist the engine with your legs. If i put just a litte breeze of torque on the pedals, the bike accelerates to topspeed 42km/h. Between 10-42km/h on flat ground the human/engine ratio of power feels like 1/100. Moving your legs is just pointless. I observed the average current at 25km/h with PAS only and trottle only and there is nearly no difference. So i see no options for range extending by pedaling. Modes 1-3 just change the max acceleration but not the general behaviour.
Second and realy confusing thing is the time lag between pushing the pedal and engine support and vice versa - stoping pedaling and engine stop. Objectively its about 0.5-1s delay but it feels like infinity in critical sections. Thats similar to my old frontweel hub ebike :wink: .
I do not know if this is just a individual case or not. Maybe a serial bike rider can compare my experiences.

bye, Scav
 
Hello, what you describe does not seem normal.
Looks like some issue with the torque sensor. We had two cases where over thightening the cranks arms caused the crank arm to contact the sensor body, thus limiting movement and resolution between both parts.
Changing the right crank arm may be neccesary.

Regarding the delay, it is not one second but half a turn of the cranks. It is used for torque averaging on the controller. Riding in a faster spinning gear reduces the delay.

Can you send me an e-mail with order details?
Best regards Adam
 
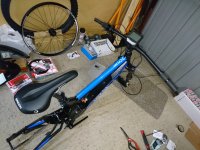
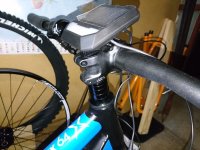
Finally made a bit of progress building my bike up. Seat and dropper fully mounted. Forks and bars on to see how it fits/looks.
DSC_5553.JPG

Then I realised I only had the one headset spacer spare. :|
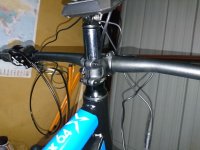
DSC_5554.JPG

So I've ordered some spacers. I think I'll set the bars up pretty high as I like the more relaxed riding style for doing longer trips, but I definitely need to cut them down a bit.


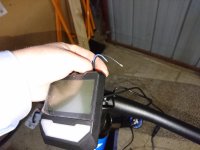
Does anyone know what these two wires are coming out the back of the display?
DSC_5555.JPG

Are they another on/off button?

Cheers
 
e5p8gj.jpg


How long will it last? Place your bets!
I’ve now got a CAD file of the 12t cog. Got a prototype print, as you can see in blue. The other is the original. Done in a toughened resin, as this was all that was offered at the printers.

The CAD file could now be altered to add a shoulder on the outer and inner edge (either side of the teeth) to hold a cushioning O ring on both sides for the chain to make contact with as it passes over the teeth.
 
Hi,
It is a casting? I see the original sproket has been covered in release agent.
The pressure on the keyway groove is way to high to be workable IMO.

http://www.tribology-abc.com/calculators/key.htm

Here you can run some numbers, the keyway is 4x4mm, peak torque close to 45 N.M at the shaft.
It gives pressures close to 150-200MPA with 4 X 4 X 12mm keyway.
The stock material and keyway can handle 400MPA.
 
bzhwindtalker said:
Hi,
It is a casting? I see the original sproket has been covered in release agent.
The pressure on the keyway groove is way to high to be workable IMO.

http://www.tribology-abc.com/calculators/key.htm

Here you can run some numbers, the keyway is 4x4mm, peak torque close to 45 N.M at the shaft.
It gives pressures close to 150-200MPA with 4 X 4 X 12mm keyway.
The stock material and keyway can handle 400MPA.

It was a 3D scan. The sprocket was covered to be able to scan it easily.
You are totally correct about the keyway. This is the weakest point by far and it is where the resin sprocket cracked when installed ☹️
Due to the surface covering of the original sprocket the fit onto the motor spindle was also too tight. Which I think caused the initial fracture when mounting.
I may pursue this a little further as time goes on. The main thing is I now have a printable CAD file that can be adjusted and added to.PM me if you think the file could be useful to you.
I am considering a soft polyurethane next. But this time I do have some numbers... thanks. Should have done my homework before the first print🙄
Here’s a company who will print some interesting materials if I send them a file..... https://www.shapeways.com/partnership/carbon
 
Looking at the pressure strength needed in comparison to the steel sprocket keyway, its not looking too likely that a suitable material will be found.
 
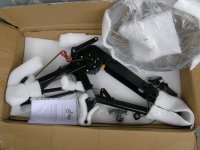
Finally I have joined the club too 8)
Thank you guys at LMX, everything is as ordered.
Now it is time to build my dream bike!

kit.jpg
 
Hi,
I have the same problem with the delay of pedaling and the torgue sensor. I have contacted LMX and we are working on a solition. For me also pedaling is useless and shifting to a lower gear because the bike is always on top speed.

Other question does anyone know how to save settings of the display when you are in the menu of devices/nucular controler/save settings, it is off and nothing works to get it on. Thanks if someone knows how.
 
are you guys most using 11speed cassette? What is the reason you need so many ratios on this kind of high performance bike?
7 - 9 speed setup is rather cheap and light , once you go 11-12 speed it gets much more expensive. 11-12 speed gives you the higher gear like 46T / 52T, but why you need that torque when you have a motor.
 
Cowardlyduck said:
Finally made a bit of progress building my bike up. Seat and dropper fully mounted. Forks and bars on to see how it fits/looks.
DSC_5553.JPG

Then I realised I only had the one headset spacer spare. :|
DSC_5554.JPG

So I've ordered some spacers. I think I'll set the bars up pretty high as I like the more relaxed riding style for doing longer trips, but I definitely need to cut them down a bit.


Does anyone know what these two wires are coming out the back of the display?
DSC_5555.JPG

Are they another on/off button?

Cheers
Hey CD,
Just curious, why don't you use a pipe cutter and shorten the fork tube down to fit with just a few spacers? Plus it will look better.
 
Well I kinda did both. :D

I bought a 1" spacer set thinking I would use some, but not all of them. Then I ended up using them all and cutting the steerer to that length. :roll: :lol:
I only took about an inch off the steerer, but that may be ok...I'll see how I go.
DSC_5571 (Medium).JPG
I also cut down my bars by about an inch total which is still plenty wide so I may need to cut them down further still.

Next is to try and do my tubeless tyre mounting. Never done it before, but gonna give it a crack. :p
Any tips?

Cheers
 
without the inner tube, tire bead can be more difficult to bead seat for inflation.. if so, a cinch strap around the tire circumference can help press the tire against the rim for inflation.. looking good so far:)
 
It looks like you have your handlebars on upside down. Ie: bending down out of the clamp. That's going to lead to the sweep (rearward bend) being reversed. Plus you've got a much longer steer tube then needed.

Unless you're going for some specific ergonomics I can't figure out.
 
The bars are installed normally...it's just the camera angle/perspective that make it look like that.

Thanks eFMX for the tubeless suggestion. I didn't end up needed to do that, but instead dumped a couple of Co2 canisters into it to seat the bead. Worked a treat. :)
The hardest part was mounting the tyre. I thought the Duro's for my 24" Fighter wheels were tough...these Michelin E-Wild tyres are ridiculously tight. :shock: I had to use metal tyre levers to get the final part of the bead onto the rim.

That being said my first tubeless attempt was still a fail. I failed to stick the rim tape down well enough and all the air is leaking out the spoke nipples now. :x :lol:
So I'm going to have to take it all apart and stick the tape down properly next time. :shock:

Cheers
 
use high quality rim tape such as stans no tubes, install a tube and inflate to help set the rim tape to cure overnight then remove the tube afterwards for tubeless.. also maybe try some hi rise handle bars and if you like the fit can remove more steerer length offset by the added bar rise.. ride measure cut.. can't add it back after all..
 
Back
Top