eBike Master Switch Design

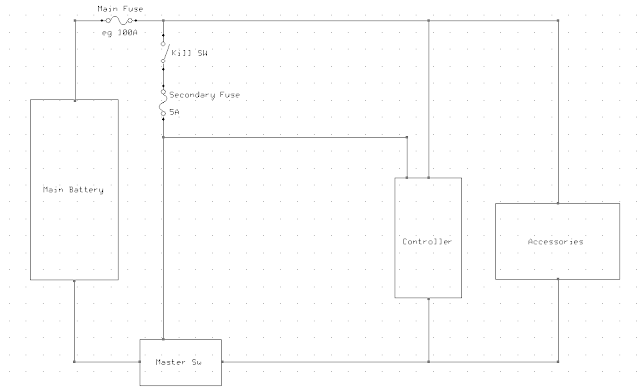
Bad motor phasing would be really tough to catch effectively and easily IMO. Is it a dead stop startup on a steep hill, or bad wiring? The shoot through amp draw in either case would be the same until the motor started rotating and some bEMF built up. In a few years it may be a moot point, as all the new controllers seem to have auto hall sequencing as standard feature.


Good to brainstorm though 8)
 
Alan B said:
Ebike Master Switch Schematic

Ebike%2520Master%2520Switch%2520PCB%2520Schematic.png

Do you have an updated schematic you can share? Comparing the one on page 1 to your PCB makes it look like you changed some things.
 
The only change is adding a third pin to J1 connected to the Controller Negative, as described in the rendering/photo/BOM posting of the rev0 boards on page 1. I'll post an updated schematic soon into the same posting so that one article is complete and consistent.

The next version pc board will also have a J2 for disabling the switch from an LVC or other isolated output.

At the moment that's all the changes I know about, testing of the first batch of 3 boards may yield other changes. :)
 
powersupply said:
Is 1MOhm enough for the (general?) zener diode to start zenering?

I've tested quite a few of them and it seems to work fine. They might come up .2 volt short or so depending on temperature, but even if you only got 10V out of a 12V zener, that would be fine for driving the gates.

I hadn't seen this thread before. Nice that somebody is making boards. I've tested the feedback setup on the gate drive extensively and it gives a nice perfectly linear voltage change when precharging. It has been torture tested by a few people with extreme setups, so other than the thermal considerations, I think it's pretty bullet proof.

One real advantage is you can have some load, like a small dc-dc or the controller logic turned on and the precharge will still work OK.

For sure (this has been tested) you can blow up all those FETs if the turn on speed is too fast from not using the capacitor feedback.
 
Thanks for the comments Richard. As soon as we're certain the boards don't have some flaw we'll make up more and make sure they are available to ES, in a couple of forms, there seems to be some interest. Not quite sure yet how well they'll handle the current, but there are various ways to improve that if necessary. I was glad to find your thread and see you had pretty much the same circuit I had modelled some time back. I didn't get to doing the testing you did, that was helpful to see.

Presently I'm recommending 100K but good to hear how 1Meg works as well.
 
One thing I found is when your turn it off, the dV/dt of the load dropping tends to keep the gates turned on so it takes quite a while for them to actually turn off. Normally this is OK as it only takes a few seconds, but in an emergency you'd want them off instantly. This is why I used a SPDT switch that grounds the gates when you turn off, but in many installs you want to use an existing SPST kill switch. One way around this would be to add a small transistor that will pull the gates down when the switch is opened. Just some thing to consider for the next version. As others have pointed out, the gate resistors are unnecessary (but won't hurt).
 
Yes, in that configuration the controller would be off instantly. If the controller started smoking or shorted out, you might want a faster off. The other common configuration would be for guys running RC controllers that don't have a key switch line to kill the power.

Maybe I'm worried about it for nothing, as in most cases a sort of slow turn off is not an issue. If you had some kind of hefty load (say the dc-dc or accessories) if the turn off was really slow, the FETs might get really hot for a short period of time. When they are dissipating the most is when they are most likely to fail.
 
Got mine in hand today. Nice size, good layout. I'll get it assembled with two 4110s and get it on my DD bike with a fast wind BPM on 36v in a 700c wheel. Good commuter bike test for heat soaking a "20a" setup. If two makes any heat, I'll double it up and call it macaroni.
 
I will proceed with caution.
But one question: How did you plan to connect the sources and drains? They got big holes in the board. But all of them have to be connected in a chain. If you put a 12# cable in one through hole, there is no space for the interconnection to the hole next to it left.
 
The posting on page #1 near the bottom of the page that has the BOM, schematic, etc should be consulted, it mentions the plan and other details, though it may need more detail. Would be good to add some photos when you folks get them built.

My plan was to use four short pieces of #12 wire coming off the board that join in the connector for battery negative, and another four for controller negative. That is assuming four FETs. The four wires will crimp nicely into a connector designed to take #6 wire. The wires in each set should be the same length.
 
Alan B said:
The posting on page #1 near the bottom of the page that has the BOM, schematic, etc should be consulted, it mentions the plan and other details, though it may need more detail. Would be good to add some photos when you folks get them built.

My plan was to use four short pieces of #12 wire coming off the board that join in the connector for battery negative, and another four for controller negative. That is assuming four FETs. The four wires will crimp nicely into a connector designed to take #6 wire. The wires in each set should be the same length.

ah ok. that makes sense. i read the first post of course :) sure soldering one wire to each hole, and then crimping those together is possible. still i think it would be nicer to have one soldering joint where you can solder your battery wires to. this could be acchieved by making two holes for each drain and source for inner fets. so you could daisy chain one fet's drain/source to the next one. then connect the battery wires between the second and third fet to get an almost even load path to each fet.
but for now i'll do it as you planed it to be and make pictures. as i don't need #6 wire but #10/#12 i'll use thinner wire for interconnection.
 
i wanted to start soldering now, but encountered a minor problem. this switch should be used with a 24s lifepo4 setup - 85v hoc.
so i have a 100v 1u cap. those are quite large. if you want to make the board as small/flat as possible, you'd want to bend the cap and lay it flat on the board. this is not possible as there is a resistor in the way, and c1 is to near to r2 as well if you don't want both to touch (just a cosmetical issue of course).

i still will start with 2 fets to see how hot the become, as my motor has does "only" 4.5kW.
 
OK on the cap size. What type of cap is that?

You might consider putting it on the bottom side laid flat, or use a physically smaller cap, I was planning for a ceramic and they are quite small, but I wasn't planning on laying it down.

Also if you use a jumper wire for R4 you could lay the cap quite nearly flat on top of that.

I have spice modelled the design a couple years ago. I was focussing on soft turn-on, there have been some discussions about slow turn-off, but I have not reviewed the model in terms of turn-off. The load should be low when turning on and off, if the load is high the FETs will get hot while the soft turn-on and off cycle is occurring. Using the system wiring I suggest will turn off the controller right away so hitting the kill switch while the motor is on should drop the motor load quickly as system voltage ramps down. During turn-on there is no protection against the motor being turned on aside from the controllers low voltage setting, if properly set this should prevent the motor coming on until the soft start ramp is close to the full value. Similarly a BMS should prevent the controller from coming on via either ebrake or throttle clamping until the voltage is within the normal battery operating range. Still I would not recommend turning the bike on with the throttle open, it may cause extra heating in the master switch FETs and is a bad practice for other safety reasons.
 
I would guess turn off will be slower than turn on for the reasons fechter mentioned.

I'm used to designing for the worst case scenarios, so the idea that the user could potentially damage the device by turning it off under load would make me nervous. You could probably adequately warn people to not turn it off intentionally, but accidental shut-offs will be harder to handle. That said, I realize you're just testing the design out right now and it may change. If you haven't already, you might simulate it using circuitlab.com. They cut you off after 20 or 30 minutes of use, but it's dead simple to use and still helpful for simple circuits.
 
dmwahl said:
Have you calculated turn on and turn off time for the FETs in this design?
no. i just used values given by alan. but i afair i have used the same values in my first self made switch and turn on/off where almost the same. between 0.5 to 1s. but i will take my iphone and clock the correct time ;)
 
Back
Top