Kingfish
100 MW
Part 5: Extending the Bag
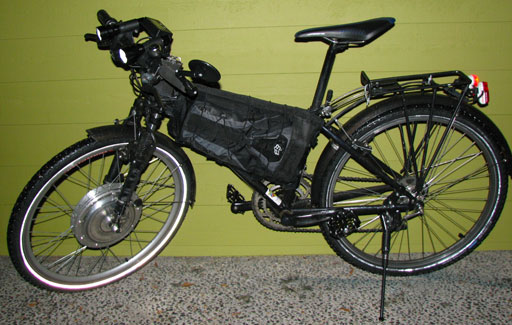
In this segment we’ll add about 3 more inches of usable length to the bag so that it can handle up to 9 batteries. The extension is very heavy duty, and serves as both expansion and structural addendum that is required to survive the dynamic rigorous loading.

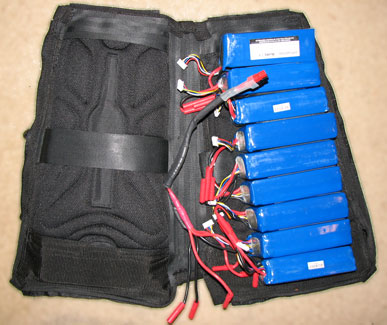
In the image above we have two bags: Fully modified on the left, and our ripped-up work-in-progress on the right. BTW - the bag on the left has 9 LiPos packed inside; the balancing plugs are just slight peeking out of the unzipped flap.
Step 1: Add the front half of the extension
Let’s grab our unit and flip it over. Pin the bottom-side of the newly exposed material back out of the way; it’s kind of tricky and moderately inflexible – take your time.
With the sewing machine, run a single stich across the top of the front material face close to the edge. In the image below the bag is rotated so the top points right which is the natural direction for stitching on the machine, with the green line indicating the path. This action will secure the front flap to the front face, and when completed we can remove the staples.

Next, we cut a length of 4-inch PPE webbing about ½ inch longer than the width of the bag at its’ top ~ roughly 11 inches.
Denote the center of this length at the edge with a pen or chalk by making a small tick-mark. Flip the bag over. Center the webbing about the center of the bag very close to the plastic emblem and pin it in place as indicated in the image below. Now secure both the left and right ends so they are aligned horizontally across the top. Take care to get this piece temporarily secured and ensure the mating material is flat, stretched out uniformly, and not pinched. (The first time I did this I had some buckling on one side and had to rip the seam and re-do it; the second time I flattened it fine but the alignment was slightly crooked. Take your time.)

Flip the bag over and check the backside. Take a pen or chalk and with a straight-edge mark the edge of the webbing from one side to the other as indicated in the image below; this will be our visual guide when sewing the next path.

We’ll make two passes with the machine; one near the left edge of the webbing, and another near the right edge of the front face. With the Tacsew this was a challenge as the machine is very powerful and some skill was required to slow the beast down to prevent runaway stitching.

Notes: I tried to stay within an 1/8-inch of the edge for the left side; the right stitch alignment is not as critical. One could stitch this from the front side for a cleaner more accurate line, however the stronger material should be placed on the bottom with the weaker material in view so as to prevent puckering. With that in regard, perhaps the right inside stitch should come first… hmm, I’ll need to try that for the next set of saddle bags.
Step 2: Add the back half of the extension
This next step is essentially a rinse and repeat of the previous, being applied this time to the back side.
With the front extension completed, unpin the back side material. Then pin back the new front extension as indicated in the image below.

Step 3: Secure the left and right edges of the Extension.
With the back extension completed we are now ready to begin closing up the bag.
The front and back extensions should be nearly aligned if all went swimmingly well with our sewing. Misalignments up to 1/8 inch are not a big deal, however any more than that becomes increasingly cumbersome to resolve. Apologies; there are no pictures to describe the next series.
Run at least one stitch along each side from the point just below where the Grosgrain Ribbon ends to the top of the bag. The stitching should roughly align with the inside seam and not increase or decrease the available inside width of the bag. We are creating the pocket and that is all.
Step 4: Inspection
I recommend stopping here and examining the bag, at least for the first bag here, and testing the workmanship by loading the batteries into the bag with the open end to ensure the fit is good and proper. This will be the last opportunity to make adjustments before closing it off. Below are a couple of views of what this should resemble.

Step 5: Wrap it up.
If all looks swell, remove the batteries, lay the bag flat, and make two passes with the machine to close up the end. The excess material can then be trimmed back, and the corners rounded. Try to keep the edge of the new extension in alignment with the rest of the bag; it just makes application of the future trim pieces much easier. When completed it should look similar to the image below.

We’re done with this part; the bag has been extended.
Tips:
I struggled at first with the machine running away and wandering off the path, and if it did I was forced to stop, rip the threads, and try again. Take your time, go in short segments, check and re-check, breathe. The glove really worked out to slow the beast down.
Also I had a small covet of bobbins loaded and ready to swap out: There are few more irritating moments than crafting what you think is a perfect pass over a long area only to discover the top-thread pulling out all the way back to near the beginning. Perhaps one day a clever inventor will figure out how to provide a warning or display the length of bobbin thread remaining.
In the next part we will focus on reinforcing the bag and its’ seams in preparation for mounting.
Question: Has this information been useful? Are you bored to tears? Should I be shot at dawn?
Industrious, KF
In this segment we’ll add about 3 more inches of usable length to the bag so that it can handle up to 9 batteries. The extension is very heavy duty, and serves as both expansion and structural addendum that is required to survive the dynamic rigorous loading.
In the image above we have two bags: Fully modified on the left, and our ripped-up work-in-progress on the right. BTW - the bag on the left has 9 LiPos packed inside; the balancing plugs are just slight peeking out of the unzipped flap.
Step 1: Add the front half of the extension
Let’s grab our unit and flip it over. Pin the bottom-side of the newly exposed material back out of the way; it’s kind of tricky and moderately inflexible – take your time.
With the sewing machine, run a single stich across the top of the front material face close to the edge. In the image below the bag is rotated so the top points right which is the natural direction for stitching on the machine, with the green line indicating the path. This action will secure the front flap to the front face, and when completed we can remove the staples.
Next, we cut a length of 4-inch PPE webbing about ½ inch longer than the width of the bag at its’ top ~ roughly 11 inches.
Denote the center of this length at the edge with a pen or chalk by making a small tick-mark. Flip the bag over. Center the webbing about the center of the bag very close to the plastic emblem and pin it in place as indicated in the image below. Now secure both the left and right ends so they are aligned horizontally across the top. Take care to get this piece temporarily secured and ensure the mating material is flat, stretched out uniformly, and not pinched. (The first time I did this I had some buckling on one side and had to rip the seam and re-do it; the second time I flattened it fine but the alignment was slightly crooked. Take your time.)
Flip the bag over and check the backside. Take a pen or chalk and with a straight-edge mark the edge of the webbing from one side to the other as indicated in the image below; this will be our visual guide when sewing the next path.
We’ll make two passes with the machine; one near the left edge of the webbing, and another near the right edge of the front face. With the Tacsew this was a challenge as the machine is very powerful and some skill was required to slow the beast down to prevent runaway stitching.
Notes: I tried to stay within an 1/8-inch of the edge for the left side; the right stitch alignment is not as critical. One could stitch this from the front side for a cleaner more accurate line, however the stronger material should be placed on the bottom with the weaker material in view so as to prevent puckering. With that in regard, perhaps the right inside stitch should come first… hmm, I’ll need to try that for the next set of saddle bags.
Step 2: Add the back half of the extension
This next step is essentially a rinse and repeat of the previous, being applied this time to the back side.
With the front extension completed, unpin the back side material. Then pin back the new front extension as indicated in the image below.
- Cut a length of 4-inch wide PPE webbing about 11 inches long; the key factor is that it overhangs the width of the bag slightly.
- Center, align, and secure the webbing to the back material.
- Mark the hidden edge of the webbing for use as a visual guide.
- Make two passes with the sewing machine, and inspect for completeness.
Step 3: Secure the left and right edges of the Extension.
With the back extension completed we are now ready to begin closing up the bag.
The front and back extensions should be nearly aligned if all went swimmingly well with our sewing. Misalignments up to 1/8 inch are not a big deal, however any more than that becomes increasingly cumbersome to resolve. Apologies; there are no pictures to describe the next series.
- Unpin the front flap and lay it flat against the newly-minted back.
- Check the alignment; if both pieces of the webbing are the same length this task will be made easier.
- Check the path where this ribbon would go if it were put back in place and remove any over-stitching that would interfere. Admittedly this is a bit cumbersome nit-picky work, and as a “completionist†it is what I did. :? However hindsight is 20/20 and I suggest an alternative: Just cut the material away at the point where the stitching ends; we’re going to be covering up the exposed seams anyways with new materials and it’s just one of those pesky time-sync details that don’t add a lot of value at the end of the day.
Run at least one stitch along each side from the point just below where the Grosgrain Ribbon ends to the top of the bag. The stitching should roughly align with the inside seam and not increase or decrease the available inside width of the bag. We are creating the pocket and that is all.
Step 4: Inspection
I recommend stopping here and examining the bag, at least for the first bag here, and testing the workmanship by loading the batteries into the bag with the open end to ensure the fit is good and proper. This will be the last opportunity to make adjustments before closing it off. Below are a couple of views of what this should resemble.
Step 5: Wrap it up.
If all looks swell, remove the batteries, lay the bag flat, and make two passes with the machine to close up the end. The excess material can then be trimmed back, and the corners rounded. Try to keep the edge of the new extension in alignment with the rest of the bag; it just makes application of the future trim pieces much easier. When completed it should look similar to the image below.
We’re done with this part; the bag has been extended.
Tips:
I struggled at first with the machine running away and wandering off the path, and if it did I was forced to stop, rip the threads, and try again. Take your time, go in short segments, check and re-check, breathe. The glove really worked out to slow the beast down.
Also I had a small covet of bobbins loaded and ready to swap out: There are few more irritating moments than crafting what you think is a perfect pass over a long area only to discover the top-thread pulling out all the way back to near the beginning. Perhaps one day a clever inventor will figure out how to provide a warning or display the length of bobbin thread remaining.
In the next part we will focus on reinforcing the bag and its’ seams in preparation for mounting.
Question: Has this information been useful? Are you bored to tears? Should I be shot at dawn?
Industrious, KF
")