GNG, 1000W 48V BB-drive, $400

This will be my next build, so I'ld like to buy a set. How do you want to be payed? I live near Toronto, Canada, so I'll have to give you my address for a shipping price. Thanks.

LightningRods said:
I just picked up the prototype adjustable BB sheets and I am VERY pleased with them.

BBSheets3.jpg


BBSheets4.jpg


BBSheets5.jpg


BBSheets1.jpg


BBSheets2.jpg


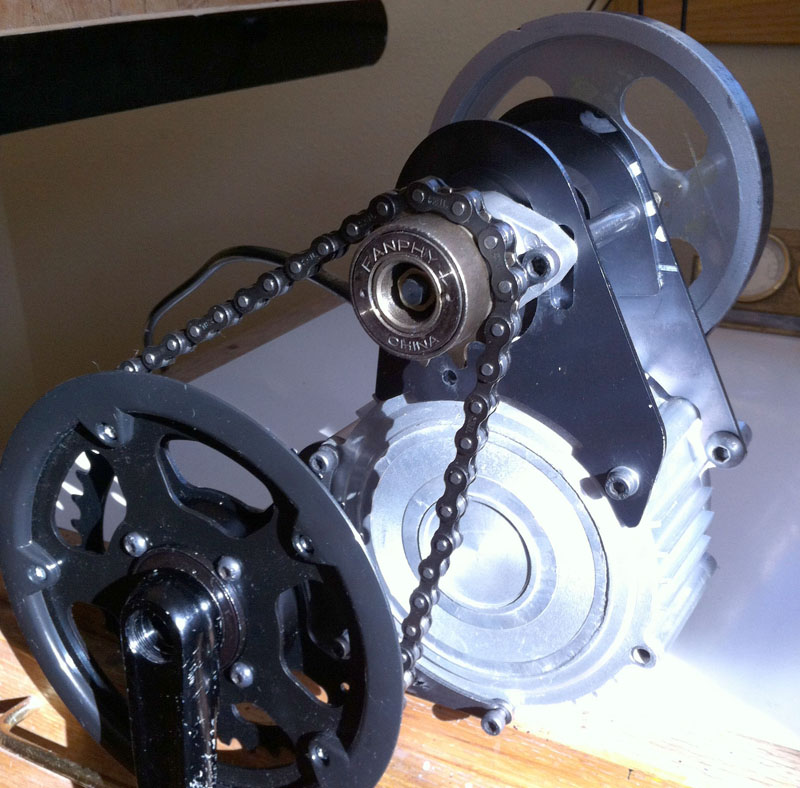
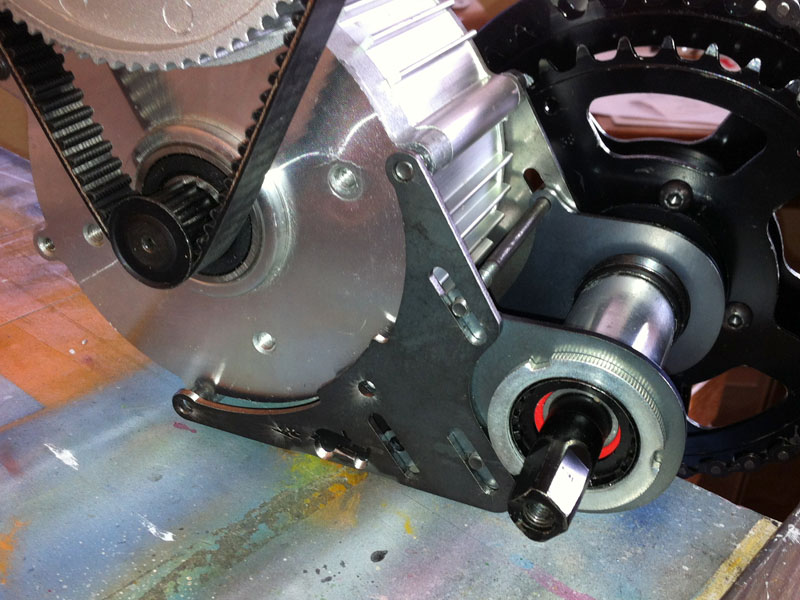
Everything fits perfectly and the chain adjuster is in the middle of it's travel with the stock belt and chain properly tensioned. The stock allen bolts are too short now because these brackets are two sheets of 12 ga. steel wider. I'll need to source those. Because these sheets bear the weight of the motor I retained cross plates in between the bottoms of both parts. There is zero slop between the inner slide and outer bracket. The metal brake operator nailed the bends. I was very fortunate to find this shop locally.

I'm going to approve this as ready for production. I will have a run of 20 available this week. $30 + shipping including longer allen bolts and tube spacers cut to size.
 
And on the pulley adapter front....

I asked my CNC laser man what they could do for us on the pulley sleeve/adapter. He showed me some gears that they had cut out of 1" (25.4 mm) steel. The finish was very good but had the typical mild laser striations. I told him that we need a smooth finish and the response is that they can laser cut oversize and CNC to as smooth a finish as you want. As luck would have it 25.4 mm is wider than we need the pulley to be for a 20mm belt. They can cut the pulleys in one piece from one plate of steel.

I noticed Miles' questions about kerf and taper and asked the same at the shop. The kerf is .008" and the taper is .005" from the centerline of the material where they focus the laser. Not only could we live with that, it will be CNCed off on the finish phase anyway.

I sent my drawing for the 14/18T adapter over for a bid.
 
briogio said:
This will be my next build, so I'ld like to buy a set. How do you want to be payed? I live near Toronto, Canada, so I'll have to give you my address for a shipping price. Thanks.

Replied PM. Anyone interested in a set please PM me and I'll hook you up.
 
Fantastic, Lighteningrods!!

I bought new balls for the freewheel that unscrewed. Since i dont want this to happen again: What could be the bulletproof solution?
Someone loctited it, but it still was unscrewing. Maybe an little hole and screw? Or is the shimstack ment to be what the nut should press against? Another shim would make it possible to tighten it really hard. I dont know.
WP_001162.jpg
 
it should tighten down hard on the shims & not the balls.....(that didnt sound quite right LOL)
if there is any tightness in the freewheeling (binding on the bearings) you need an additional shim.
 
one small spot weld from a mig welder should do it, just make sure your ground is to the part that will take the initial strike of the welder so you are not passing an arc through the balls to achieve ground, one spot should not heat things up enough to destroy the grease.
if done in the right spot it could be ground off for future service
 
christerljung said:
Fantastic, Lighteningrods!!

I bought new balls for the freewheel that unscrewed. Since i dont want this to happen again: What could be the bulletproof solution?
Someone loctited it, but it still was unscrewing. Maybe an little hole and screw? Or is the shimstack ment to be what the nut should press against? Another shim would make it possible to tighten it really hard. I dont know.

If you ever decide to use that BikeMotive M30x1.0 jackshaft freewheel adapter, while servicing your GNG 12T freewheel, I'd suggest picking up some Fastenal 30mm snap rings.
 
Another shim would make it possible to tighten it really hard. I dont know.

Mine had 6 of the thin shims in it. I mentioned earlier that I had left it a little (too) loose because the bearings were binding up. Turned out one bearing from the inside set had gotten out of place during assembly and was wedging against something inside. All is good now.
 
bee said:
How the heck do you guys take off that freewheel to install the adjustable plates? I couldn't figure it out so I took it to a bike shop but they were just as stumped!
I didnt have to take the freewheel off, just take the pulley off, then the pulley side bearing block and slide the shaft with everything else on it out the other side, reasemble just the opposite
 
Denisesewa said:
bee said:
How the heck do you guys take off that freewheel to install the adjustable plates? I couldn't figure it out so I took it to a bike shop but they were just as stumped!
I didnt have to take the freewheel off, just take the pulley off, then the pulley side bearing block and slide the shaft with everything else on it out the other side, reasemble just the opposite

Exactly right. Thanks, Denisesewa. The large driven pulley is just held on by a nylon lock nut. It comes off easily. Two allen bolts for the jackshaft bearing blocks and the entire jackshaft is free.
 
I had to use a puller tool to get my bearing off.
 
rp3 said:
I had to use a puller tool to get my bearing off.

If by "puller tool" you mean "hammer" and "bashing it good", then I did too.

I removed the nylock nut on the pulley side, but when I did the whole lot up again, I used a socket on each end and I think I may have stripped the nut or shaft thread on the freewheel end, but I'm not sure it matters too much. That opinion may change if I hear the clatter of bike parts on the road once I get the thing up an running.
 
I would like to gently suggest that any more discussion about 3D-printing of a plastic pulley, or water-jet/laser-cut steel sections to make a small pulley...it would be great if it migrated over to an existing older thread that already has a lot of useful links and pics. Breakthroughs in this area have a much wider application than just the GNG kit...

"Belt drive pulleys on the cheap" 14 pages
http://endless-sphere.com/forums/viewtopic.php?f=28&t=26122
twopulleys_preview_medium.jpg
 
Has anyone else had a problem with the freewheeling chain ring becoming tough to move after tightening the crank arm on to the BB spindle? Me and my buddy are both puttin these together and have had problems with both kits.
 
gestalt said:
Has anyone else had a problem with the freewheeling chain ring becoming tough to move after tightening the crank arm on to the BB spindle? Me and my buddy are both puttin these together and have had problems with both kits.

It could be the support bearing adapter thingy that's sandwiched between the chain rings.
 
gestalt said:
Has anyone else had a problem with the freewheeling chain ring becoming tough to move after tightening the crank arm on to the BB spindle? Me and my buddy are both puttin these together and have had problems with both kits.
It might be due to eccentricity between the freewheel mount and the axle?
 
I wouldn't expect any presure to be put on the chainring by tightening the bolt on the crank arm unless something is bent. There was plenty of clearance on my kit.

Earlier I put a Sick Bike Parts freewheel crank on my trike and the original axle was too short and it would bind against the BB shell. Eventually I replaced the axle, but first I got it going my grinding the freewheel removal tabs of the ENO freewheel, which is where the clearance issue showed up.

But again, you should not be putting any strain on the freewheel parts since all you are doing is securing the crank arm to the mating tapered part of the axle. Maybe there is a burr or something that needs to be filed off to maintain clearance, such as my original freewheel removal tabs. Even though I put a longer axle on I am still using that original freewheel. Will have to dissassemble it and probably use a pipe wrench if it ever needs to be removed, which will probably ruin the ENO.
 
The axle is 5/8", the ID of the support bearing is 16mm. Tightening the bolt might be forcing the crank to seat properly but, if the eccentricity is greater than the 'clearance' between the axle and support bearing, also be applying an angular force on the freewheel?
 
Picked up a new bike and finally put it all together. The adjustable sheets work great!


Had to grind down the motor casing a bit and added a piece of wood to fill a gap in the hose clamp


This thing has a hilarious amount of torque at 14s and was a blast to whip around the basement on. My gf couldn't get going on it, the front end would just immediately lift up and throw her back. Exactly what I was looking for as an alternative to my 70cc 2-stroke scooter for commuting! Can't wait for the snow to melt so I can try out the upper gears :D

Thanks for all the advice guys! Next I'll need to start experimenting with more volts and the upgear adapters. Has anyone tried 21s? Does the final gear ratio need to be increased or decreased when increasing voltage? I haven't paid enough attention to the efficiency discussion but what I gather is that this thing does not have the best gearing for efficiency?
 
^ nice bike. Hopefully your chain doesn't fall off when the rear suspension compresses. I'm testing the Bionicon C.Guide. I'll be taking it down a flight of stairs in about 20 minutes. :wink:

IMG_20130221_165618.jpg


Failed the stair test. :(
 
Back
Top