Hi-Efficiency Recumbent Commuter Conversion

Find it all in the link below - including a link back to E-S!

http://www.recumbents.com/wisil/e-bent/
 
After checking and re-checking all connections and fasteners, making sure the torque arm was secure and the battery fully charged, the Recumbent Commuter was taken on a short 1/2 mile test run and a longer 5.1 mile test run. Specs are:

Total distance: 5.6 miles.
Total power consumption of 97.3 Wh,
Current Consumption: 1.3Ah
Estimated Energy usage rate of 17.3 Wh/mile (used pace car to measure distance - this function not working yet on the bike)
Voltage Hot Off Charger: 73.2
Ending Voltage: 70.2
Battery Config: three 6S1P LiPo in serial 18S1P configuration, 5Ah capability
Peak Current Draw: 33A
Front Tire: 20" Kenda Kwest @ 100psi
Rear Tire: 26" Schwalbe Marathon @ 90psi

Ride Impressions: the bike was no more-or-less stable than without the motor/battery installed. The thumb throttle could not be located "above" the shifter and brake on the handlebar, so I removed one of the non-functioning rubber grip pads and installed the thumb throttle "below" the front derailleur twist shifter on the left hand side of the handlebar.

Speedometer function is not working, but a pace car following on the 5.1 mile ride indicated a top speed of around 40mph and at no time a lower speed than 20mph.

An interesting feature discovered during the test run is that you can hear the motor going into current (flux) saturation as a kind of vibration or rattle. I used that "feature" to try to stay off the motor during the test and preserve power from the battery.

Pedal assist was visibly effective: I could watch the current measured by the CA before and after pedaling up an incline and I could always cut the current flow by at least a couple amps simply by vigorous pedaling assistance.

17Wh/mile is similar to what has been reported by other recumbent riders on the forum. Using a conservative estimate of 100 Wh/5.5 miles from a 3-brick LiPo battery, an estimated total range of 22 miles to LVC shutdown is possible. Another 3 bricks in parallel would provide a theoretical maximum distance of 44 miles, well within the one-way 30 mile mission planned for the bike before recharging.

Below, see the current "test" configuration - this will change as the bugs are worked out and a viable battery is built. Battery location and size need to be settled on. Brakes need adjusting. The freewheel that's installed doesn't work properly with the indexed shifting on the bike. There is no ebrake/regen switch. Plus the cables need to be adjusted, shortened and enclosed for weatherproofing - they are just zip-tied to the rack.

View attachment 2

A closer look at the 2810 on a 26" rim. You can see the SunForce freewheel and the torque arm in front of the motor.

View attachment 1

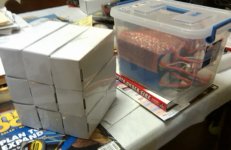
Here's the rear of the bike showing motor, some wiring and the battery in a cardboard box bungeed to the rear rack. It's tempting to build a battery box and just attach it to the rack, much like the commercially-produced bikes from Schwinn and Trek. But that puts all that battery weight up high - it's more stable to suspend the battery as low on the bike as possible.

Rear of Bike.jpg
 
This has been a difficult build but finally I can see some progress. Many problems manifested in the purchased parts that I've had to work through. But the performance of the motor, controller, CA and batteries have all been impressive. I just might be able to commute with this vehicle.

Pros:

1) An 18S LiPo battery allowed me to reach desired speed goals with the 2810 motor on the 26" rim. The bike can cruise efficiently on flat road at 20mph and reach 30mph on the flats (at much higher current cost). You can do a maximum of 40mph (downhill). Maximum powered speed on level ground is 31.5mph. Cruising at 20-25mph with the 18S battery takes about 100 Wh to go about 5.7 miles.

2) The recumbent seems efficient - I understand from others that 17Wh/mile is pretty good, even if it does fall short of what I wanted (15Wh/mile).

3) (As might be obvious to most) Using three series bricks with 5Ah provides ample power, but not enough energy storage. Another 3-brick set at a minimum is required. The real question might be, whether or not I can get away with just one other 3-brick set or if I need yet a third 3-brick set for a total of 9 6S bricks.

4) The seat and riding position are definitely comfortable compared to an upright bike.


Cons:

1) There is a fault in the controller-side female JST-SM connector to the CA that prevented speed and distance measurement on the CA from working. Working on fixing this, but it could be days before I get repair parts.

2) Both the motor wheels I bought are badly out of true. Will have to true them myself or take them into the bike shop to be trued.

3) The bike, like all recumbents, is a challenge to balance and ride. The motor actually helps with that over the stock bike.

4) With the tires fully inflated for maximum efficiency, the ride on this non-suspension bike is harsh. Road vibration still gets through the padded seat. I'll have to find a happy medium between maximum tire pressure and a lower tire pressure that offers some comfort.

Build Notes:

I can't find any better place to install the batteries than on the top of the added rear cargo rack. I could do two series stacks like small panniers, but I need to keep that space open for use with actual panniers. I wanted to attach batteries to the back of the seat, but there's not enough room there either. I wanted to suspend the batteries below the main boom tube of the frame, but there's not enough room there either.

The 25A controller modded for 40A is sufficient for a road recumbent. I think an upright bike where you need greater than 25mph needs a 40A or better controller.

Schwalbe Marathons and Big Apples are HUGE tires. Beware before installation whether or not they will fit on the bike at all.

Next:
Build up a little bigger battery
True the wheels
Fix bad connector
Add front fender, headlight, taillight, mirror.
 
Awesome Build!

Check below my youtube velo build on my catrike.
It could give you some ideas. You don't even feel the headwinds!
Let the wind leave you at 12degrees ;)

Tommy L sends.....
 
I think your rear torque arm is on backwards. It is tending to pull the wheel in the opposite direction from the direction of travel of the wheel - that is, the same direction as the torque force. It needs to oppose the torqueforce which acts in the opposite direction (ie. is "equal and opposite" to the main wheel direction). Opposing an opposite means it need to pull in the same direction as the main wheel direction which is down, when the arm is on top of the fork, not up when the arm is under the fork. This might not be so easy to accomplish. Your frame is at risk now.
 
chvidgov.bc.ca said:
I think your rear torque arm is on backwards. It is tending to pull the wheel in the opposite direction from the direction of travel of the wheel - that is, the same direction as the torque force. It needs to oppose the torqueforce which acts in the opposite direction (ie. is "equal and opposite" to the main wheel direction). Opposing an opposite means it need to pull in the same direction as the main wheel direction which is down, when the arm is on top of the fork, not up when the arm is under the fork. This might not be so easy to accomplish. Your frame is at risk now.

(Refer to the prior photos showing the torque arm placement on the bike...)

Dude, thanks a ton for your feedback on this, much appreciated.

To the reader: What he means is that the torque applied to the rim of the wheel will act downward from the front in the photo. (clockwise) The torque on the motor armature will act upward, and be transferred to the axle as well. Therefore the axle will want to spin counterclockwise in the dropouts. So it will "push" the torque arm upward.

I didn't have any other choice given the way that torque arm was made - the construction of my rear forks mandated I use it that way. If I rotate it, you can see that it'll stick down and back, lower than parallel with the rear forks. It can't do that because the derailleur is in the way. Plus, here's no place I can anchor it once I do that.

Also note that if I flip it and make something to anchor to, it'll stress the anchor member - the "spar", downward, not taking advantage of the shear strength of the rear forks on the bike. Nothing I can add to the frame will be any stronger than the frame itself, so I made the executive decision to do it the way I did.

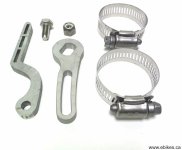
The new, recently released torque arm from Justin at ebikes.ca is designed so it would stick upward, off the end of my forks, and I could use that cool new torque arm "spar" to get over the attach point and strap it down, almost in exactly the same spot my pipe clamps are right now.

new_torque_arm.jpg

So I'm mulling over buying that torque arm right now. What bugs me is, I spent that much already in two of the torque arms like this one already. If there were a way for me to make my own piece so I could just flip the "spar" over and use it, I would....

JKB
 
I did a similar modification on my trike, and fashioned an extension "handle" in steel which could go from the end of the torque arm up to one of the fender eyelets for bolting on. I also used two arms on each side, with one of the pair the same as yours (for regen forces), and one for the normal torque force. Its really immobilized now, with a pairs of opposed arms on each side. That's a lot of hardware though, and conflicts with things like Bob trailer nuts. Anyways, it will be interesting to see what you come up with. I'm also interested in the new rear arms from Grin. There's always some way of doing it.
 
Here's my take on it:

Wheel torque is clockwise (in the photo above), motor axle recoil torque is counterclockwise, so the torque arm end is trying to move upward toward the fork. If the torque strut was rigid (welded) on the arm it would press upward into the fork and that would be pretty good (except for part 2 below). If it pivots at the bolt (which it will at some force level) it will push the hose clamps away from the axle, and the angle is poor so there will be force increase due to this and likely bend/slide the hose clamps and scratch the forks.

I would consider making a custom block that fits vertically between the torque arm's end and the frame directly above. This would transmit the forces much more directly to the frame. But there is another problem, so I wouldn't do that.

Another concern is the fact that the residual force on the axle due to the torque arm is downward and out of the dropouts. I always try to make sure the residual force is upward or into solid material as then a loose axle nut won't cause immediate ejection of the axle from the dropout, or even a tight one might allow drifting out over time.

If the torque arm is flipped over 180 degrees so the arm is above and to the rear of the axle, and a custom strut taken from there upward to one of the bolt holes above the axle the residual force on the axle would be upward and you would not have to mess with hose clamps. This would require a simple straight strut with two holes, a very easy thing to make. I've done similar things on both my mountain bike and my recumbent builds, linked in my signature below.
 
Hey!

I just noticed that chvidgov has an Actionbent, which is same brand of bike as my recumbent. Can you post a pic of what you did with your torque arms? It would help immensely to see them. And, did you remove the connectors to install your other torque arm? I thought about that and decided against it because I didn't want to touch the connectors - I've already had problems with the connectors on my ebike parts.

Two comments:
1) Alan - good suggestion about the block. I have the tools to do that work. You also gave me an idea for an alternative that uses a simple aluminum L extrusion, and another alternative that uses a simple aluminum square tube.

2) I think I need to either copy or buy the new torque arm from ebikes.ca. It's extremely beautiful. Holy smokes it's big money though.
 
Ah yes the fabulous Actionbent T1 trike...my favourite ride - even better than the Catrike.

http://endless-sphere.com/forums/viewtopic.php?f=6&t=26148&p=475758&hilit=actionbent#p475758

There's a decent shot of the torque solution there...not sure if it is the same type configuration of dropouts though...

I'm running sensorless so there are only three phase wires, using Anderson connectors. I've found I prefer the ease and determinism of soldering the Andersons rather than crimping them.
As I recall I could feed the triple Anderson through, after separating them into individual connectors, without removing them.
 
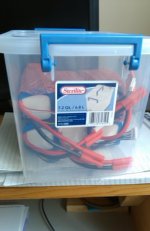
Final prep this weekend. Getting the wheels trued up (they were badly out of true) and building up a bigger pack. Looking to make a full-power test if weather permits. The tote is flimsy, but will work for testing the full-power battery. Any suggestions on how to box an 18S3P lipo pack welcomed - need something much stronger and weathertight than this!

IMAG1567.jpg

The good thing is that you can see through the tote and keep an eye on the pack. But it's not waterproof nor is it very strong. If you pick it up by the handle, it strains the lid badly.

IMAG1568.jpg
 
You might consider other arrangements of the batteries to fit. Find some candidate boxes and then see how the batteries could pack. Build the harness to suit the arrangement of the batteries.

The SeaHorse SE300 case is a great case that is a bit tight but can work for 18S 15AH. It will fit 8 of these Turnigies easily enough. For the ninth one you can fit a pair of 6S 2650maH in parallel. So one "bank" consists of two 5AH and two 2.65AH packs. This is not a problem, it just gives one bank a slightly higher capacity than the other two. The challenge is to fit the wiring harness in the remaining space. It should be easier than the Zippy packs which are longer. I have figured out a way to do it for the Zippys.

The other option I'm looking at is vinyl downspout material. 2x3" is a great fit for Zippys but the Turnigys are 2x2, so there is a lot of room for wiring. But if you have linear space the downspout material is appropriate. A ten foot length is about 8 dollars.
 
Alan - I'm watching your threads daily to see how things go with the downspout and the SeaHorse case. I definitely need something watertight or nearly so. WalMart has a "marine storage box", but I don't think it's wide enough.

In a perfect world, I'd make a flat case - something like the eZee flat, silver LiMn battery that could be slipped underneath the rack. Even better, something that could sit behind/below the seat or in two boxes like little saddlebags. (without obstructing actual saddlebags).

No hurry: I'm down to the nitpicky things right now: fix the speedo wire on to the CA, fix the CA so it quits slipping downward in the bracket, build the battery harness. I'll put it all in the tote and strap it down hard to the rear rack. I gotta see what the battery does over the full length of the commute - if I can use less LiPo, I will, and if it takes more, then I'll have to use more. Either way, if I have to change from a 3x3 to a 2x3 or 4x3, that'll give me options I don't currently have with the 3x3 arrangement.

Oh, wait. There is one more thing that's not quite so nitpicky: I'm waiting on a bulk charger from BMSBATTERY.COM. That's a big deal, as I'd intended to bring that charger to the office. Hmmm. Don't know if I can actually make it 60 miles on a single charge or not. Into the great unknown!!!

JKB
 
You might want to do what I did - break the commute into parts and do each part on a weekend, measuring with the CA. Add up the numbers and know what will be needed power-wise before you make the run the first time.

I also staged a 12V ps at work, if I need to I can carry the RC balance charger with me (or stage one of those as well).

The vinyl downspout tube batteries are built. I'll probably mount them on the bikeE tonite. Each is 6S 24AH so about 1KWH total. Should be adequate for up to about 50 miles. Probably more like 30 miles with margins. Each tube is about 10 pounds (estimated). 24" long, 2.5 by 3.5 inches. They could be made pretty waterproof, only the ends need to be sealed up.
 
Alan B said:
You might want to do what I did - break the commute into parts and do each part on a weekend, measuring with the CA. Add up the numbers and know what will be needed power-wise before you make the run the first time.

I also staged a 12V ps at work, if I need to I can carry the RC balance charger with me (or stage one of those as well).

The vinyl downspout tube batteries are built. I'll probably mount them on the bikeE tonite. Each is 6S 24AH so about 1KWH total. Should be adequate for up to about 50 miles. Probably more like 30 miles with margins. Each tube is about 10 pounds (estimated). 24" long, 2.5 by 3.5 inches. They could be made pretty waterproof, only the ends need to be sealed up.

Holy moly Alan, that's a great suggestion. I'm swimming in PC power supplies, so I could carry only the balance charger on the first trip. Shoot: I have two or three laptop power supplies I could choose from too - just change the connector to match the little port on the charger.

Your motor - it must be able to make good speed on low voltage? 6s is teensy to me, I'm not sure the 2810 could do 10mph on that?

JKB
 
Alan B said:
I use a Y connector on the bike to series the two 6S packs to 12S for the motor. It makes about 30 mph on 12S. Batteries are mounted, quick test run completed. Looking good so far for launch tomorrow.

Side Note: Alan has since done a full-power successful commute test of his BikeE. See his thread for more information.
 
LiPo bricks are charged up. Things remaining to do are:

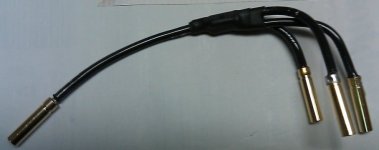
- finish and install the paralleling harnesses. I finally have a design that I can live with
- form the LiPo batteries into "bricks" and tape them together. I have coroplast for that.
- get a tail light installed
- get a flag installed
- install mirror

There's a bulk charger on the way - that will go to the office after it arrives.
A front fender has been ordered, but dry weather is forecast so that's not show stopper.

parallel.jpg
 
Holy Moly....I actually BROKE my "automatic stripper". Found a good one (Klein Tool) this morning at Home Depot, we'll see if that one works out OK:

http://www.homedepot.com/h_d1/N-5yc1v/R-202282851/h_d2/ProductDisplay?catalogId=10053&langId=-1&keyword=wire%20stripper&storeId=10051
 
how do you "break" a tool like that? a little hungover from St. Patty's day?

I actually bent my wire stripper trying to cut like 5 wires at a time (DOH!).

Id have to agree that your torque arm isnt mounted correctly but dont have a better solution other than going to a good metal shop and getting something fabricated for you. Which, of course, would be the ultimate solution.
 
Kinni420 said:
how do you "break" a tool like that? a little hungover from St. Patty's day?
I actually bent my wire stripper trying to cut like 5 wires at a time (DOH!).

I broke it....with the power of my mind... :shock: :shock: :shock:
Well, actually, it was 20 year old pot metal. I think that had more to do with it than anything else. :wink: :wink: :wink:
So you went all "Arnold" when stripping wire, eh?
 
I just got back from a successful 25 mile test run on the recumbent. It was epic! Here's a photo from the far point of the trip: a convenience store that's the turnaround point for this route when I'm riding lycra:


(Kin - you will recognize this sign if you've ever been out US-98 toward Creedmoor Rd.)

Performance is GREAT - exactly what I was aiming for. I easily cruised at 20-23mph and if I "goosed" it, I could maintain 25-27mph. 30-31mph on even a slight downhill. 30mph is plenty, plenty fast for a non-suspended bicycle. I felt comfortable in the 23-25mph range.

The 9c 2810 motor ROCKS. No, it ain't the fastest thing on the block, but let me tell you, it sipped power and hauled my butt down the road at 30mph when I asked it to. The LiPo held up great. It's an incredible battery.
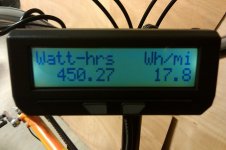
watt-hrs.jpg

450Wh to go 25 miles. 17.8Wh/mile, close to what I got on earlier test runs. I pedaled what I'll call a "fair" amount, always working to keep power under 1Kw. I'm happy about that also - it's been my intention to get exercise on the bike - when I got back home, I felt I'd worked, but it's not at all like when I get into the lycra and pedal hard. I feel tingly and invigorated. I definitely think I'd be OK for the day in the office with a tee-shirt change on arrival.

I am a little concerned: I'm not sure if I have the capacity in my pack that I thought I had. After that 450Wh, the pack was sagging into 68v territory. I calculated I have a 1KWh pack and I didn't expect to go below 69v before using half that.

The opposing wind (the normal wind from the southwest here) was fierce. I gained an acute appreciation for what everyone's been saying about wind resistance being far more important than weight.

The important gears on the drivetrain were:
- "very low" using middle front sprocket to get started
- at speed, the highest gear to assist the motor

I would climb through the low gears, enable the motor, then shift up to the large 52T up front and the little 11T in back for cruising. It was a lot to keep up with, but it really helped me stretch out the battery. It's a strange feeling to pedal a bike going 30mph!

The motorized recumbent isn't any more stable than before, maybe less. I already had a "feel" for a recumbent, but the added weight and speed intensify that feeling of instability. It's something I'm going to think about a little more before I decide to do this as a routine commute.

I'm a big boy using a big motor with a big battery. With me on it, I bet the entire rig was 330-340lbs. When I got back home, you could hear the spokes "pinging" on that little 20" front wheel. Probably the next ebike upgrade is for me to lose some lb's... :oops: :oops: :oops:

More Work To Do

The test run showed up several problems:

My battery harness came loose in the battery box at one point, so I know I have more work to do to improve how my wiring survives the vibration.

My rear fender sucks - it won't stay lined up with the tire. I think I need to twist it with some heat.

My lights suck. They are ordinary AA and AAA powered bicycle lights. They worked, but they don't cut it. I want to make something way more powerful and use a DC-DC converter as the power supply off the main traction pack. This little battery action doesn't cut it.

It got dark on me before I got home, showing me that I should add more reflective materials to the bike.

The front wheel spokes started "pinging" by the time I got back - so the wheel will need to be trued.

I want real regen - I got a little bit, but I want to add brake levers with the regen switch. There were at least six points on the ride where I could have really used some regen.

The 8 speed freewheel just doesn't work with this bike. I need to drop down to the 7 speed freewheel (with the 11 tooth "tiny gear")

JKB
 
Good to see a test ride and it working. Put that battery under your lower back area for better handling. Your recumbent isn't a particularly aero one, so that is something to keep in mind.
 
Back
Top