Hillzofvalp's 29er Thread... now with custom 63T (cromotor)

hillzofvalp

100 kW
Joined
Dec 25, 2010
Messages
1,887
Location
Somewhere over the rainbow, Canada
Update 3: I really need to update this first post to reflect my project at this point in time. GIST cromotor in too big of a wheel at 4.3kW. Fun. Want to move to 24" wheel with huge tire (26" diameter) to increase efficiency. I'm waiting for some linear boards to transition from balancing with hyperions because it isn't very practical in my design and living situation. I'm also exploring a cooling situation for the motor and am considering reconfiguring my 5p20s pack to 4p25s for more power.

Update 2: the bike is about done with 100 cells of A123 at 20S. My 2807 limits me, but it's been fun for initial testing... But havent tried on 20S yet. Getting everything sealed up well and making new enclosure for 12 fet controller. I have decided to try to get my hands on a greyborg (edit: and by that I mean cromotor....oops...). :)
.
update: this thread was originally discussing the panel fabrication, but now that I'm finished with that I wanted to get more into the rest of the build...

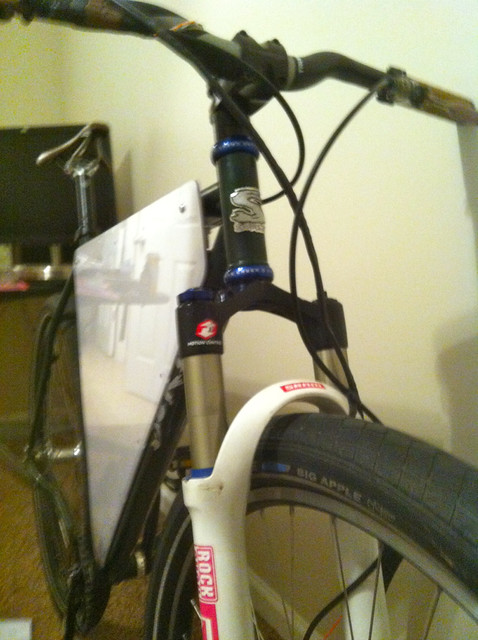
9x7 is being laced to a black velocity chukker rim. The rim has angled drillings from the factory (I think), to cut back on some of the sharp angle at the spoke nipple.
panels will get some logo treatment.. possibly LED treatment as well..
21s5p A123 M1 pack. 50A 12 FET. 70-75 lb-ft torque max. 2000W max

I'm not sure I can live with 2000W full throttle at around 20mph... that has been my average speed on 14s5p and I'm geting 12 miles range electric-only.

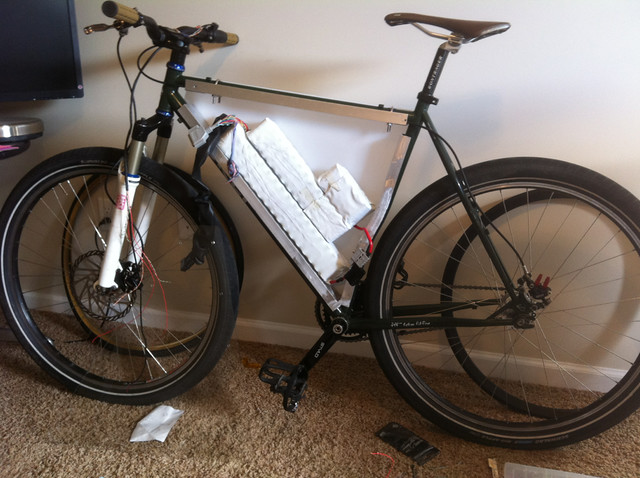
enclosure is made from 2" aluminum u channel I welded up.. It is removable. Bottom section is one piece which is help in place by water bottle mounts for positioning. Then the top piece of u bolted on the top tube. Lastly, some brackets secure the top corners of the framing, allowing it all to be removed easily.

6242907326_b2301c509d_z.jpg


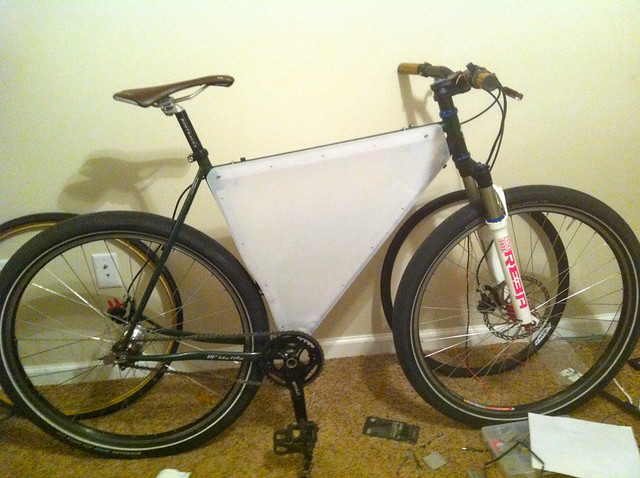
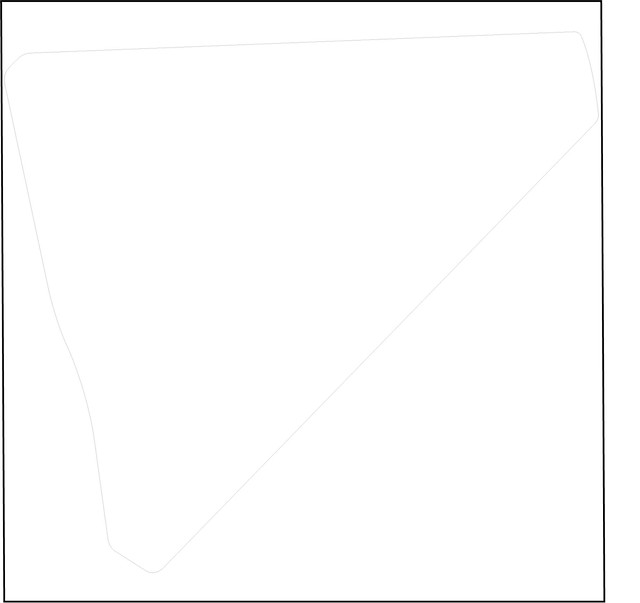
I am making a triangle pack which is covered with 1/8" polycarbonate panels on each side. I am designing the shape to cut out with a cnc gantry router, but I feel like I need to incorporate some special shapes in... With something more intricate, I'd feel more justified using a $50k machine. For example: a high voltage symbol sticking out underneath down tube. I rather not engrave into the surface of the polycarbonate... rather would like to make "stencils" or modifications to the contour. Any ideas are welcome!

I am working with 24x24" clear panels.. I do not plan to paint the plastic.. Rather I'll just slide in whatever posters or color schemes inside.

I have not finalized the edges or anything in this picture...

6157672870_ff37544c1a_b.jpg


24x24" artboard:
6157708056_1773dca4a3_z.jpg
 
Led glow inside?

A pair of female legs in high heels? Or hairy legs in lederhosen?

Some line-art flourishes?

A nice big battery icon?
 
i totally get the desire to make the thing less boring than the prototypical weird shape suitcase on wheels look.
but i think your humpin a dry hole here expecting too much from a bunch of engineers.
the whole purpose of engineering school is to crush the creativity out of you so there's a clean slate to build upon.

to ask your average engineer to get creative about aesthetics, that's like placing a paintbrush in an elephant's trunk to have at it.
"it's a non-functional element, why should i waste brain-cells worrying about that??"
it's why a lot of the bikes on here wind up looking like the LEM lunar lander.
a 'doc'-tape type of engineer-pretty that only a mother could love.

whenever i contemplate how i would form the suitcase, the only thing i've come up with to date is to ask myself 'why be constrained by letting the triangle dictate the shape?'
that's not very creative at all, simply tracing out an existing line.
i would blow past the top tube and down tube.
near the head tube i would bulge out over the top tube & to the sides slightly, enclosed saddle bag style.
picture the gas tank on a motorcycle but integrated & flowing together into the main triangle compartment.
also drop below the down tube maybe for maybe half it's length towards the bb for room as a belly tank.
the limit of it's shape dictated by wheel clearance which there's also some motorcycle examples of what i'm talking about.
now how to actually fabricate it so it can be mounted, that i have yet to figure out.
maybe not what you're after but i hope you stimulate some stream of consciousness input.
 
nice comment...

I tried bulging it inwards and it looked like a bat-mo-bike. Outwards just a tad isn't a bad idea, but I feel like it makes the bike even more like a boat.... the other issue is that it's clear polycarbonate.. so anything outside the frame I will have to treat with some paint or something..

I was trying to go for modifiable paint schemes
 
the "Power On" symbol has always appealed to me. Could be taken to mean 2 things, your switched on, and your "powering-on"

if you catch the drift.

Would be cool if it lit up when you were "on"

power on.png
 
Toorbough ULL-Zeveigh said:
i totally get the desire to make the thing less boring than the prototypical weird shape suitcase on wheels look.
but i think your humpin a dry hole here expecting too much from a bunch of engineers.
the whole purpose of engineering school is to crush the creativity out of you so there's a clean slate to build upon.

Good thing I'm not an engineer. Here's my kinda oddball idea I came up with last night.

Remember the TV show Kung Fu? When he was finished with his training he had to exit the monastery. To do that he had to pick up that big heated pot with his forearms thus getting branded with these images:

Tiger.jpg
View attachment 1
How about one on each side and they glow orange. Congratulations grasshopper you have learned how to build an ebike. :wink:

Gary
 
it's fairly easy to make any image glow any color with this translucent polycarbonate. I just put in the transparent/translucent filter of my choosing with a mask for the shape behind the polycarbonate. I think I will go with my original design as a prototype.. if 1/8" polycarbonate doesn't work out for some reason, I can always try again later with a different shape..

What I like about my original design is that it covers up the ubolts/wiring on the top tube and it is easy to fasten to mill/fasten.

Thanks for your input, guys, keep more picture insert ideas coming... I'll probably do an ES logo.

OH--- I can always try printing images onto overhead projection transparencies--!!!
 
cool, but paid. Say, I wonder if there is a company on campus that would pay me to put a huge ad on the sides of my bike. Y aknow what I'm saying? bookstore? it's like 3 square feet each side.

getting some sort of reputation with jimmy johns delivery might earn me some extra tips, especially if I can get there twice as fast as a normal, already-fast cyclist
 
I like it. What if a solar company gave you a free panel to charge with in exchange for advertising?
 
yeah, I'll have to look around for a solar sponsor.. solar fenders would be cool.

So here's a little update. I went ahead and went with a boring shape.. it looks larger than it will be when it has a 1cm transparent edge all the way around. I am hoping that I can shine some leds from inside that will illuminate the edges. Even still, it could've been smaller but I was too lazy to cut off up to 3/4" of the u channel legs. MAybe for a summer project.

all in all I think this will allow me to change battery chemistries fairly easily. Maybe will need shims for certain lipo.. but it will work well to keep them a little bit compressed. Also have an arduino I want to cram in here... and needed a place to mount the balance connector.

Any recommendations for sealing it up? I was thinking some kind of silicone strip... you guys probably know just the ticket

6242907326_b2301c509d_z.jpg


6242389441_f989b588f1_z.jpg

pack won't be shaped like this.. it will be 20s-21s.. this is 14s5p.
6242904670_fac8742a19_z.jpg
 
I love the colour combo - something about black and tan. Hey wouldnt solar fenders be cool. Perhaps you could put some hinged ~12 inch square photo voltaics on the side of your enclosure and fold them up to be horizontal when you're stopped.... Might get stolen I spose.

For seals? Perhaps - this. I just used this self adhesive window seal strip here to drop my power bill a packet. There are several brands and it seems to be available globally. Most of the local hardware stores here stock it. Available in various gauges and widths. Cheap. And the silicine rubber is nice and soft..
http://www.raven.com.au/domino/rave...ip (Self Adhesive Foam Tapes)&type=door seals

I really like the aluminium mounting method there - you've given me good ideas!
 
Hey rather than an image what about a great quote relating to ebikes.
http://www.quotegarden.com/bicycling.html
"When I see an adult on a bicycle, I do not despair for the future of the human race." ~H.G. Wells

Maybe Use wordle.net to generate the image, and use a pdf generator such as pdf 995 to make a pdf print-to-file of it. Then give that to your signwriter...
 
hillzofvalp said:
yeah, I'll have to look around for a solar sponsor.. solar fenders would be cool.


I was thinking of solar fenders, actually. I like the blue a lot too. My rear wheel will be all black with blue nipples... Thinking about spraying the seat post.

If your try this mounting method, only do it on steel bike.
 
Samd said:
For seals? Perhaps - this. I just used this self adhesive window seal strip here to drop my power bill a packet. There are several brands and it seems to be available globally. Most of the local hardware stores here stock it. Available in various gauges and widths. Cheap. And the silicine rubber is nice and soft..
http://www.raven.com.au/domino/rave...ip (Self Adhesive Foam Tapes)&type=door seals

I really like the aluminium mounting method there - you've given me good ideas!

Used inner tube? I need something thin and reusable
 
Hi HOZ,
they usually only have adhesive on one side, so if you stick the adhesive side to your aluminium tube,you could reuse them indefintely. or the other way around for that matter.

How is your build going? I keep checking every few days to see if there has been a change!
 
Well, I've been waiting on 13-14 spokes for my velocity chukker rim. They guy I originally ordered them from (John Kovachi, a BMX legend) recently passed away. The order was placed over a month ago. I ordered another set from holmes.. which gives me reason to run dual 2807s in the future (with an extra set of spokes sized for 9c)!

I got my calipers used, and the pads are somewhat worn.. I think that is why I'm not getting good braking pressure after installing 203mm rotor and even after re-bleeding lines. So I think those are $15..

Other than that, I routed RFID wires through the frame. I drilles a hole straight through one water bottle screw... then took an hour feeding them through. Intitally I had frocked up the seatpost by drilling a hole at too much of angle.. removing lots of the carbon from the inside. I filled it with epoxy, drilled in the right place... and now I'm machining a 40mm aluminum insert to reinforce the area that may or may not be much weaker.

I'm also trying to obtain a $50-80 arduino with a built in wifi chip, so I can charge my bike in the garage beneath my apartment complex and still monitor the charge. (or monitor it anywhere with 3g for that matter). I plan on running temperature sensors from both the pack and the psu (4x hp esp114). I figure the best security option will be this charger. For example, I can have it post to a web page when it's been unplugged. I obtained a few relays and a 60A cont. contactor as well as a hall effect sensor that works well for more constant, low current measurements less than 50A (it can measure up to 200A though).

On the theft issue, I'll probably also have a lot of big High Voltage symbols as well as a semi-professional looking warning label (with instructions)

So those are things I'm still pondering. I also need to find a good solid box to mount all my esp 114s in.. they are over 130mm square and probably 2.5x that long each. They would be pretty sheltered from the weather (open air parking garage), but I'd like to add elements of security and safety, while not getting too expensive. I am after all leaving this thing parked in the corner of a public parking garage. There are things I can chain it to, and I have a parking permit so my landlord doesn't care.

I also am wondering if I should use a 4-channel digital pot to alter the voltages on each supply as a unit, so they are all sharing equal loads. I don't really understand yet exactly what I need to do with arduino to accomplish what I want with a CC-CV psu bank.. I'll certainly have a funciton that determines the interval at which the resting voltage is checked, but I may just do it manually and find out a charging current at which it is almost charged... and trip the contactor then. Though I wonder how much I need to get accustomed to winter weather, and whether this will effect my charging program as well as the operation of the psus themselves.

The other thing is I haven't decided whether I should have an isolated battery to power the arduino in the psu. This way I could have a separate relay that triggers the AC off after it disconnects pack contactor. I'm unsure what kind of load this circuit sees, but hopefully it's on it's own auxiliary power circuit and it is okay seeing 12-20A. If I tripped it it would be a pain. might ask landlord.

If I get a Mega arduino board, I may have enough pins to read individual cell voltages and post those to the web page as well.. But this is all functionality that is likely at least a few months out.

Currently need to get it running! Give me spokes! How's that for an update?
 
Back
Top