Hillzofvalp's 29er Thread... now with custom 63T (cromotor)

Back to your ideas about selling advertising space and going solar. You could get one of these Extrawheel Advert trailers and tow paying advertisements some of the time and solar panels the rest of the time.

http://www.biketrailershop.com/extrawheel-advert-bike-trailer-p-1375.html?gclid=CKSN19TEgqwCFQY1hwodqjKaNw
 
HAha I would never pay $300 for that. I could make that without even welding for much less: 8020 aluminum extrusion.. and be able to repurpose it later on.

GOOD IDEA though. Every beginning and end of semester, the bookstores run around campus pulling huge advertisements on trailers.. for buying back students books etc. I will have to speak with their manager sometime.. I could definitely get more looks than a pickup and trailer~--! I can go right in the heart of campus.


RE: wifi charger monitor:

I found some code online that does not require hosting a webpage.. Rather, I can now simply gather the data on the arduino and have it upload it to twitter every so often. (hopefully at least every 30 seconds. Just have to make sure the netowrking code doesn't cause a hang up towards the end up the charging cycle... I wouldn't want to have a network problem and an overcharged battery pack. On second thought I'll probably include fewer updates towards the end of the charge... I may be able to figure out through experimentation just how long is left before charging completes and output this (then I could stop uploading to twitter say 5-10 minutes before end of charge cycle and wait till end of charging).
 
Finally got some spokes (thanks, holmes, for being quick).. have everything at the bike shop ready to build when I have the time. I just made final grinds to aluminum enclosure and tapped all the mounting holes (30 of them).. Looking sweet, just need to find a place on campus that will allow me to do some big prints for free... :)

Already thinking about a belt RC drive and I haven't even used my 9c more than 100 miles.

This picture turned out cooler than expected.

6300611398_a77c2606ee.jpg


On the charging front, I picked up some scrap 80/20 aluminum from work to enclose 4 hp esp114 power supplies. I am getting a 25A draw at 50% SOC, so I wonder if it would reasonable to set LVC low enough to get reasonable capacity from pack but high enough that it doesn't blow the breaker. I may be able to get away without using a current modded meanwell, but just a microcontroller cut off (based on charging current and safety timer).

It'll be a pretty huge supply (26"x8"x11"), but it will allow me to grow with it (80/20 is easily reconfigurable)
 
It's done. At least the GIST of it. Need to polish everything off to make it look like a finished product (decals/light mounting/security/rfid, etc.). I LOVE IT. Well balanced. 2.35" Big apples.. Reba fork at 160psi. Hauls ass up hill. Much faster than it was when I had thrown everything on a rack.

Rear wheel build to velocity chukker rim on first ride was stiff. No annoying sounds.. I have the spoke tension at like 95-110 units (whatever they are).. or 19-25 on the park tools meter. Probably unnecessary with this stiffer rim.. but hopefully I don't need to true it very much.

Some of the EV guys on campus like how it turned out. I let my friend ride it and he said he would easily ride this instead of a car.

Next project is to augment the pack from 14 to 20S and move the controller outboard for cooling... maybe even try a matching 2807 front wheel for 2WD. I was thinking about doing some programming to have traction control and to prevent motors from fighting each other. This could be done by comparing the rpm of each wheel and have controller adjust throttles independently

6334008388_9c4118d366_b.jpg


6334008226_87dc7e09ce_b.jpg


6334008088_5e091f116a_b.jpg
 
hillzofvalp said:
Next project is to augment the pack from 14 to 20S and move the controller outboard for cooling... maybe even try a matching 2807 front wheel for 2WD. I was thinking about doing some programming to have traction control and to prevent motors from fighting each other. This could be done by comparing the rpm of each wheel and have controller adjust throttles independently

If both wheels are on the ground, wont they always be spinning at the same speed. Otherwise the front of the bike would run further away from the rear.
 
Awesome! Nice to thinkof next steps, but I am sure it's great just to enjoy!
 
hillzofvalp said:
.. maybe even try a matching 2807 front wheel for 2WD. I was thinking about doing some programming to have traction control and to prevent motors from fighting each other.

you are over thinking & over complicating it.
The motors wont "fight" each other, all they will do is drive or slip if there is not enough grip, just like a single wheel drive...and few see the need for traction control on those !
...of course, both wheels "slipping" as on ice could be interesting :lol: ..but that is what the throttle is for !
 
Not really over complicating it. Other forum. Members report having to tune down the front hub for a ratio of 30-70.. And yeah having it work this way winout variable throttle asjustments would cause more spin out and more likely crash. If one motor is over working all the time there Is also an efficiency loss
 
I have now covered the windings and lam edges with epoxy to hopefully solve the short issue. In the process of removing the nut to take motor covers off, I rubbed off some of the insulation on the sensor harness, which I believe shorted one hall. So I have one replacement hall on the way, cause I can't find my spares... If you use magnet wire for hall sensor wires, make sure there isn't a huge jut in the splice between the 12 gauge deans (in my case) and the cheaper wire from axle to motor. got to be able to clear the axle and washer over the joint.

Also just received 35 more A123 cells for 20s5p or 21s5p. I would like to hear your advice in regards to whether or not I should cycle the new cells twenty times before supplementing my current pack which has minor use. I suppose cycling them is the best option, though only ~.22% of their expected 10-12% life diminishment over 1000 cycles has been achieved. (11-15% decrease over 1000 cycles multiplied by 20/1000). I don't know the realistic cell-gap that will develop, and I rather not have to balance them all the time cause I only have 14S with my hyperion..

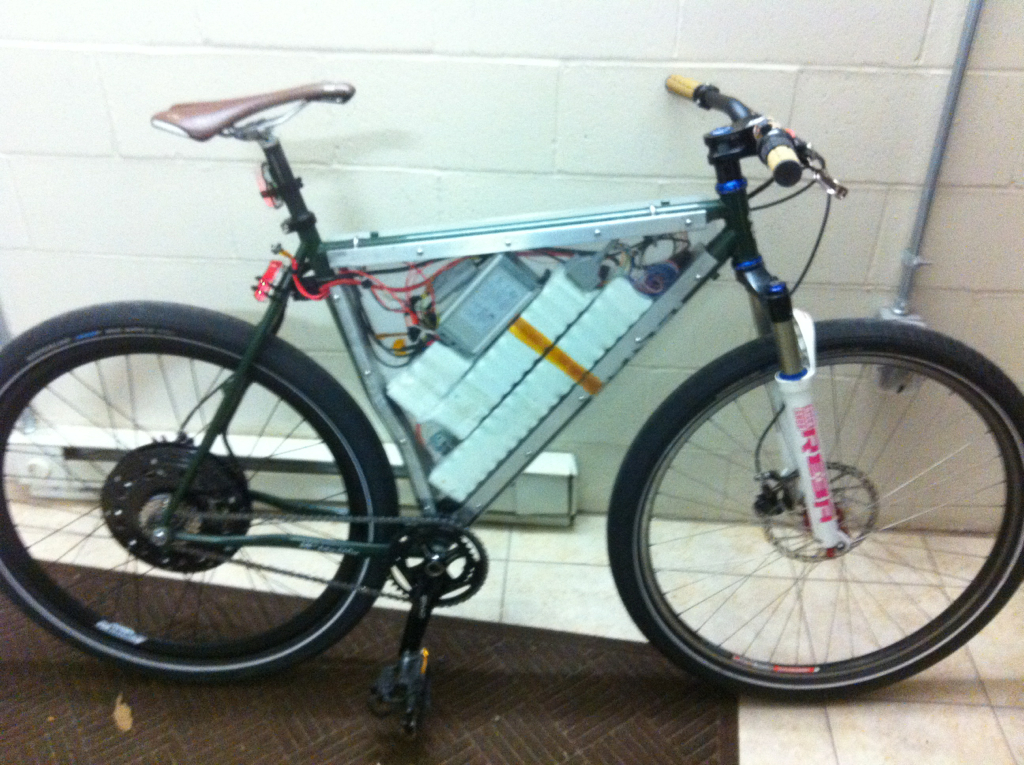
Adding more cells will require moving the controller out of the enclosure. I haven't decided whether it will be mounted on the downtube or rear rack, and have not figured out how to weather proof the controller.
 
Nice build!
I love the superthin triangle storage - and the design simplicity is beautiful.
I also like that you can change your graphics as desired under the acrylic.
2thumbsup!
 
Nice build. Which Surly frame are you using?
 
THanks guys. Just ordered more nickel to add more cells to the pack.. My 1420i charger does cycling, so I should be able to break them in the same amount as my used cells.

The heat shrink is from Batteries plus +. I don't know how big of a chain they are yet.. But they told me no one ever needs the largest heat shrink size, so they just gave me a bunch of it..

Just extracted some fets from a dead rc motor controller. Each fet is rated for 94A peak... and I have 17 good ones. Should be good enough for my tab welder. The aluminum chunk you're looking at is actually my stator puller..
6374268929_e644d647e4_z.jpg


this is the beginning of my bulk charger.. currently 3.2kW 48-52V. Won't work with new pack.. Hope to add a 24V meanwell on for current control and 20S
6374268259_d95d4e1273_z.jpg
 
worked great.. now tearing it apart to add 35 more cells.. doing some sealing work with clear silicone. Machined low profile water bottle bolts and aluminum anderson charge port mount. I have a tab welder build underway.. which is also giving me reason to work on other things until I can assemble pack how I would like to myself

just enlarged a hole on my surly chain tensioner to fit my axle.. now I'd like to make a single speed adapter so I don't have to run a derailleur for chain alignment

milled a chunk out of controller so I can fit in another 1s5p group. enclosure will be sealed.. so in reality I could probably run without a controller enclosure and just heatsink it on the u channel... but not just yet.

mill work from scratch and from scrap
6480387911_fac615e87e.jpg

Recycled electrodes.. Cam
6480389171_04ce60bf28_b.jpg

6480388243_8738d21f30_z.jpg
 
TonyReynolds said:
Nice build. Which Surly frame are you using?

It's an XL surly karate monkey.. sorry I missed your post. It's a pretty big bike by most people's standards.. fits someone 6'2"-6'8". I have a L surly karate monkey as well, but it wouldn't have been able to fit 105 cells (70 pictured in XL). Maybe a better lipo candidate if you're going for 2.25" wide. I have learned that I could've fit in a few more cells if I would've staggered the cells a little bit... as they sit they are ~1.92" wide.. leaving a small gap in the 2" space

Putting the a123 in the easier, wider configuration would make this build 20-25% wider (2.8-2.9"), but you could fit as many cells as you wanted. however, using u channel you would have to go up to 3" which would then be increased by 1/4" for two sheets of paneling..

In the spring for another bike, I hope to cnc a wooden enclosure for A123 cells.. one that is in the wider config of 2.8-2.9".
 
I CNC'ed a splined coupler that lets me mate a standard 11T or even 10T cassette cog to my White Industries freewheel. The two main reasons for making this were that I wanted to both avoid a derailleur because with horizontal dropouts it is redundant to have a derailleur AND to run a much smaller gear with a nice freewheel mechanism. It also let's me adjust chain alignment more easily and have arguably cheaper maintenance ($10 cog).

Aluminum is just a prototype.. but should work out well. I got the spline pattern very snug the first time around. The last cog on a cassette has much more surface area, so I'm not too worried about stripping the splines.

If anyone one wants one, I have the CAMing done and can spit another out in less than a couple hours, so let me know if you want to do business ;). If I ever did an RC build I would easily add the mounts for 130bcd road rings...

The reason the splines have rounded grooves is that the smallest endmill I had (1/8") would not get all the material if I didn't overcut. Worked out splendidly. Again, if anyone wants one.. maybe I can make a business out of it.
6536157687_70a130a73c_z.jpg

6536156395_e69fc7df7a_z.jpg

6536156999_a164200fab_z.jpg


Pretty soon I'll have my welder done so I can finish my pack. I just got the weld pressure sensor working, but I have yet to finalize the main circuitry.

6536169101_a1bb965112_z.jpg
 
update: the coupler works very well. I'm very pleased with it. Solved all my issues with drive train.... AND I can pedal and contribute up to and probably beyond 30mph. Good ratio with the 11T.. perfect alignment.. no play (at least yet).

Welder is sorta working.. going to fix it when I come back in a week. Got a second hyperion 1420i for balancing the larger pack.. but I was disappointed to find that compared to the other 1420i I have, this one is reading a .1V difference from the same supply. That's a lot, especially for balancing. We'll see if it holds true for balancing. The other big disappointment is that I will have to split my pack to charge both packs. I figure now I won't be doing balance charging very often (since my pack is enclosed in)... and I'll have to finish up the 72V bulk charger project and stick with that for the time being.

OR I can put in contactors and shit.. yeah right.
 
http://www.flickr.com/photos/30556588@N07/5738257011/in/set-72157626761104334/lightbox/

Pics above. Just lost my 500 word post typing on a IPad. Gist is that I she tested well at 14s in the snow... Working on finalizing everything with 20s.
 
I machined a lower profile controller (1.2-1.25x5.893x3.1") so that I can squeeze in another 5p block or two into my enclosure. Sounds like a lot of work, right, to just fit in 5-10 more cells, doesn't it? It is. Don't do it.

Side benefit is that I will get better heat transfer to my aluminum u channel framing, and the is more aluminum near the fets for more thermal mass over all.. I haven't decided between running a heat pipe to the outside of the frame, or making a specially shaped wedge that will allow me to sink it to its mounting position on the aluminum u Chanel. Also, i may consider oil cooling, as now I have better control over getting a good seal.

The nice thing about working with the 2 inch u channel is that there are a lot of materials already sized for it. I bought some Velcro for keeping the batteries from sloshing around (not tying them down because the snug fit keeps them I'm place. I also got some 2 inch 1/16" thick rubber adhesive backed strip to line the downtube and other areas to protect the battery shrink from contacting the frame and potentially eventually wearing off and causing a short (though the 100A fuse should take care of that).

I also got some grommets and very soft reusable waterproof seals for weather proofing.

I'm excited to have the pack balanced and wired-- I just got to think less about the cromotor!!!!! Need to make lid for controller enclosure and run 10 or 8 gauge instead of the stock crap. I'm also thinking about some graphics underneath the the clear polycarbonate...I want to make it cool to offset the stupid bulkinees


Does anyone know if there is a brake light trigger pin on the lyen 12 fet? I thought I read about it once but can't pinpoint a location
 
Back
Top