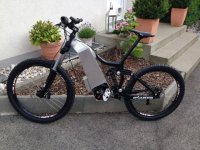
KONA Entourage Build Thread - middrive (pic heavy)

it fits really nice to the frame and does look good :)
yeah, efficiency when climbing steep hills with a gearable middrive will be always far better than any hub motor can be. you can always gear to the sweet spot of the motor and use WOT.
 
crossbreak said:
nicely done! You think now that you really need a 42T? Mean.. if it wheelies already like hell?

Lower your phase amps to >80 and you will see another increase in efficiency. Also your chain and gears will like that
we will see. i was not able to do some hard core testing. just riding around in the neighborhood. phase amps should be around 95 right now. we'll see how it performs if i lower that to 80. we will finish welding on wednesday and then i will do a full install with batteries, controller mounted etc.
btw: i did what you said and turned the igh gear around. now the distance between the two chain got bigger. and i moved the bb gear from the inner side to the outer side, which moves it around 5mm to the ouside. so there is almost no chain problem anymore. i still will need to install some chainguards as the chain rubs on the bb.
 
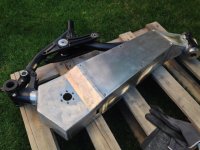
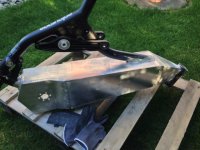
so now the frame is done welding. i did pay 450.- for the work. quite a lot, but i was many hours work and done by a full-time pro welder. all is cleaned up, side covers fit nicely, and i will install all parts asap to see where the idle roller needs to be installed.
i also made some differently wide alloy spacers for the freewheel and the cranks. so i can adjust chain lines quite easily.

this is the frame, will sure looks nice when powdercoated.

IMG_1086.JPG

IMG_1087.JPG
 
do you know how the surface area must be prepared for powdercoating? I think you have to grind off all the paint for a good finish and the bearings must be removed..
Are you also going to paint the parts for the damping mechanism?
 
madin88 said:
do you know how the surface area must be prepared for powdercoating? I think you have to grind off all the paint for a good finish and the bearings must be removed..
Are you also going to paint the parts for the damping mechanism?
no special requirements so far i guess. but now that i think of it ... it has to be conductive. so i hope they can remove the paint (grit blasting, acid ..) and i don't have to do it. but it can be done. i'll call them on monday.
of course all the bearings have to be removed and the seats have to be covered as well as the threads.
see this (german): http://www.gso-gmbh.com/PDF/GSO-20_Punkte_Plan-Version2-2.pdf
 
this axle is crap. ok. the problem is, that the freewheel is on the "wrong" side (the side with the hole for the cables). but still it shouldn't break that easily. it just fell off when i wanted to lift off in 3rd gear. so not even a very high load.
this of course makes the decision easier if i should make a new axle or not ;) i still have a spare one. so i will see which one of those is done earlier.

IMG_1093.JPG
 
got a little update. today it's electronics. been working on the shaft last weekend, but i didn't finish it. hopefully i'll be done this friday.
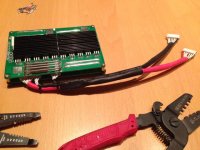
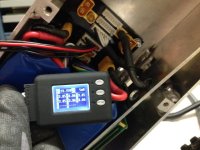
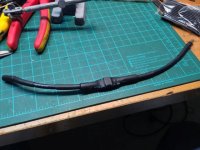
so i made the new jst-xh connectors from the bms to the parallel board. sorry for the picture quality, but the iphone was not up to the light situation.

IMG_1117.JPG
IMG_1118.JPG
IMG_1120.JPG
you can see that there are 6 balance plugs, each of the 4 packs per side goes into one connector, one is used for the bms, and the 6th one can be used to check voltage or balance with a bc168 charger.
the 10awg wire you see goes to the other side for serial connection to the other 4 packs. it holds a 60a fuse. so in case there is a short, this serial connection is the weakest link and will open the connection.

IMG_1092.JPG
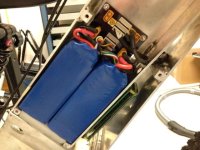
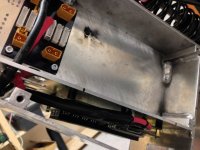
here you can see the bms installed on the down side. 5mm spacer to have a save distance from conductive material. there will be a layer of this isolating paper/plastic sheet so there can't be any short in case you slide eg a screwdriver or a key in by accident.

IMG_1119.JPG
 
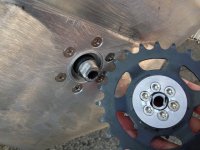
i had access to the lathe yesterday so i made a new shaft. i didn't re-assemble the motor yet and hope that the bearings fit. atm it's a very strong fit, so the shaft is in the freezer right now :)

i wanted to cut the thread on the lathe (would've been better) but one gear was missing and i couldn't set it to the correct thread pitch. so i cut it by hand, and now the thread is not 100% straight :( but it will work, and if it doesn't i cut the thread down to m8.

View attachment 1
looking good, isn't it? much stronger than the original one, and it's not hollow.

 
Wow! well done. You may have answered this already but were you able to keep the triangle geometry the same?
 
stuntmanmike said:
Wow! well done. You may have answered this already but were you able to keep the triangle geometry the same?
thanks. and to answer your question: yes i did. i followed the suggestion to leave as is, and install the battery/motor box in the lower tube. doing this i made the frame 9cm longer (to make an l-size from a s-size). but other than that everything remained the same.
 
assembled to motor now. the bearings and the "clutch" do fit extremely nice. but still there is some noise coming from the motor which i can't eliminate. there is some serious imbalance of the magnetic bowl, and some klonk-klonk noise.
i guess i will have to order a new mac motor. they are quite cheap anyway.
 
Completely crazy! But i like it :eek: .
Im thinkin of converting my mac to, but time is not on my side with two babies and housebuilding so i dont have time cutting new frames in half etc.
Do you maybe sell axles izeman? I live in the eu area
 
thanks. yes. it's a time consuming hobby. i can't count the hours i invested in this bike. and quite pricey as well. welding alone was over 500.-. aluminium was an extra 120.-. but it's a hobby.
if we can't find a deal on the motor, and i got plenty of time i can think about selling a shaft. but that's only the beginning. you will need a heat bridge as well, and this is hard to make if you don't have the right tools.
 
sorry, i dont want to complain.. but it would have made sense to "reinvent" my sprocket adapter so that it fits a self made shaft :? The double-D joint was born from pain, since i did not want to make a new shaft.

If you use a new shaft anyway, i'd rather use parallel keyed joint since this is a lot easier to make... to give space for the key in a 15mm axle, you could simply drop one of the 6 bolts... or even 3 of them.

Still, i think your new shaft will last a lot more than the old one... not only since it is solid, but it has shorter threads... the section that broke had threads i guess?

BTW: I designed a new bearing-> adapter spacer, which is a lot large in dia. it is now 24mm outer dia and can conduct bending loads much better to the bearing/relieve the shaft at the threaded section. Was really simple to make on the lathe.. not more than a "pipe"... 8mm thick, 12mm inner dia, 24mm outer dia. Fits the bafang BPM, should be equally simple for you MAC

For lower contact pressure between adapter and said spacer, i now only use 3 bolt instead of 6. 3 Do the job just fine... they can still last more torque than the shaft can last
 
you're absolutely right. for sure, a key joint would be better and may be the next evolution. making a new shaft was 30min of work. making a new type of shaft that includes makes modifications to your adapter adds some more work and things to take care about. so i'm better taking baby steps.
finishing this takes too long already ;(
 
got a little update.
due to generous spinningmagnets who sent me a MAC for free!!, i was able to rebuild the motor, and this awful klonk-klonk noise is gone now.
i was never sure about the winding count of my old motor, now i know it was an 10T (corrected) because spinningmagnet's one is a 8T (corrected) and SO much faster. i got a no load speed in last gear of 82km/h!!. that's definitely geared too high. it's got a 23t primary gear and i can go down to 16t. i hope the smaller one will fit and not make the chain line too complicated.

so here is a short video of the high speed. 32km/h in lowest gear is totally useless. this is more then half the no load speed i got with the mac in the rear wheel (55km/h), and it need this to be 20km/h to be a reasonable hill climbing gear.

[youtube]s5edZuKlOb8[/youtube]
 
wow, this is a nice gesture from Ron :)
is the 10T MAC really faster than the 8T or is this a typing error?
the rear wheel seems to run very true without any wobble. this is good.
 
madin88 said:
wow, this is a nice gesture from Ron :)
is the 10T MAC really faster than the 8T or is this a typing error?
the rear wheel seems to run very true without any wobble. this is good.
yes. very generous. i owe him a lot.
it was a typo of course. the 8t is faster than the 10t. i edited my last post.
 
had my first longer test run today. not really long. pulled like a bull for 6km and then suddenly the bike stopped. pushing it back was very hard so i suspected shortened phase wires. i disconnected the wires from the controller and it could push it back as normal. so i think one or more fets in the 9fet lyen controller are blown. probably 2.2kw peak are too much for a 9fet. it took 1.5kw for ages. maybe i'll have to go for the 12fet.
@crossbreak: now i understand what you mean by "hard to control throttle". it's REALLY aggressive. the bike jumps around like cracy from a full stop. i think i can go up vertically with that power and in the first gears. but i can't controll the power. riding difficult passages at low speed are very hard to master. i will install the throttle tamer and hope that it helps.
but even with those issues i must say it's a lot of fun to ride. it's really powerfull, nice 170mm shocks, superb brakes and a plush ride. of course the motor is audible all the time. but you may get used to it after some time ;)
now fine tuning starts.

IMG_1234.JPG
 
took the controller apart. testing all mosfets. one of them was a closed circuit. took one from a broken controller and replaced it. hard work, as i added a lot of braided wire to the board which made removing the fet quite difficult. but it was all finished nicely again, and the controller is working again. i guess i just will reduce battery and phase amps. maybe 40a battery and 70a phase. the controller should be able to do this.
 
something strange happened today. i wanted to optimize the throttle and so i pedaled around a bit and thought: strange ... why is it so hard to pedal? easy answer: the clutch/freewheel seems to be stuck and so pedaling turns the motor. so now i have a dd mid drive. :( but with all the disadvantages. heavy pedaling but no regen because of the freewheel to the rear wheel.
i will have to disassemble the motor and change the clutch/freewheel. maybe those 2kw was too much for the old type clutch.

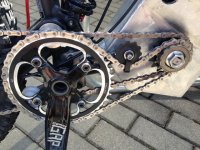
here is a pic of the finished drivetrain with bigger sprocket (now 42t instead of the 34t which gives a better cadence, needed because of the 8t motor). the chain tensioner works perfectly nice, and the idle roller is doing a great job as well.

IMG_1253.JPG
 
izeman said:
something strange happened today. i wanted to optimize the throttle and so i pedaled around a bit and thought: strange ... why is it so hard to pedal? easy answer: the clutch/freewheel seems to be stuck and so pedaling turns the motor. so now i have a dd mid drive. :( but with all the disadvantages. heavy pedaling but no regen because of the freewheel to the rear wheel.
i will have to disassemble the motor and change the clutch/freewheel. maybe those 2kw was too much for the old type clutch.

here is a pic of the finished drivetrain with bigger sprocket (now 42t instead of the 34t which gives a better cadence, needed because of the 8t motor). the chain tensioner works perfectly nice, and the idle roller is doing a great job as well.

bmx half link chain would eliminate the need for the chain tensioner if you have enough space between the sprockets on the motor.
darren
excellent work mate.
 
Back
Top