
If you're really keen, this is the original test I did on this back in 2015. 
[youtube]1S0WSt_dZWk[/youtube]
Cheers
[youtube]1S0WSt_dZWk[/youtube]
Cheers
john61ct said:What does Grin rate the Phaserunner for continuous motor amps?
Found it:
The use of extra finned heatsinks thermally linked to the Phaserunner base can increase this continuous phase current to nearly 70 amps, while the current limit if placed inside an insulated cavity or bag with no airflow at all will be much lower, around 30A.
Cowardlyduck said:Yeah, if you're really keen the '1500W' Leafmotor can take a lot. I pushed over 8KW peak through mine and regularly held it at 4-5KW continuous for long periods up hills.
Only thing that really impacts pedalling is the FF. The more you add the worse it gets. I added around 10ml from memory and it was barely noticeable.The Toecutter said:I intend to modify mine in a similar manner at some point in the future. How much extra weight and pedaling difficulty did the cooling fans, ferrofluid, heatsinks, and vents add while riding unpowered, if it was even noticable at all?
Sure, any of my later ride videos on my Fighter show what it was like. I sold it since though.neptronix said:I'm really impressed that you found the maximum of what the motor could take. I was limited by a short wheelbase that threatened to throw me off the bike at 6kw.. got video of your crazy power levels?
Thanks!raggertje said:Nice video Cowardlyduck, good to see people really using their bikes instead of only tinkering with it :wink:
I'm planning to make a new battery with max 213 cells. Based on your experience with te leaf what would you recommend for only offroad: 16S13P, 17S12P or 18S12P? For me torque is more important then speed...
Cowardlyduck said:If you get the standard 4T leaf and run it in a 26" rim you should get over 70kph at 16S. That is more than enough speed IMO.
Cowardlyduck said:If your after more torque, then decrease your wheel size and increase your phase amps. If you want less voltage sag, and/or more range go with the higher parallel cell count...so 16S13P.
Whatever you do, don't get a 'high torque' motor and cheap controller. Better to just get the standard 4T and a better controller like the Nucular or similar.
I didn't know about the voltage sag vs. parallel cell count so that is clear and I better go for a 16S then... I did order the Nucular 12F but in the meantime I ditched the 22amp KT controller and setting up a Kelly 7218S to get the amps flowing by amberwolf » Feb 09 2021 12:38am
If the axle nut came off during regen, then it was already very loose, ready to fall off.
This usually means, assuming it was tightened enough to start with, that the axle is rocking back and forth in the dropouts, even just a tiny bit, which eventually works the nut loose, and then vibration can unscrew it further depending on circumstances.
amberwolf said:If the axle nut came off during regen, then it was already very loose, ready to fall off.
This usually means, assuming it was tightened enough to start with, that the axle is rocking back and forth in the dropouts, even just a tiny bit, which eventually works the nut loose, and then vibration can unscrew it further depending on circumstances.
I would recommend first setting up either clamping dropouts / torque plates, or using sufficiently-precise-hole torque arms that they cant' move on the axle, and then snugging up the left side arm clockwise and the right side counterclockwise, so that any tiny slack they do have is now cancelled out, so the axle can't rotate at all.
Then use something like Nordlock ramped lockwashers under the nut to ensure the nut isn't going to back off from other circumstances (vibration, temperature changes, etc).
For the replacement nut, as long as the threads match your axle, and it's hard enough metal to not be deformed when tightened, then it's probably better quality than what came on the motor axle to start with. The threads on the axle itself are the limiting factor on tightness, usually, becuase they are discontinuous (because of the axle flats), and they may not be cut precisely (not really matching any threads on any nut, too shallow or too deep, etc.).
For the washer, a round washer works fine, unless you are looking for a torque washer with the little "tongue" that is bent to stick into the dropout...I've found TWs to be useless for much more than a couple hundred watt systems and then only if the bike dropouts are hard metal (cheap bikes can have their dropouts bent or spread over time even by those systems!).
The Toecutter said:I lost an axle nut today. I have the cassette version and while executing regen, an axle nut on the drive side came loose
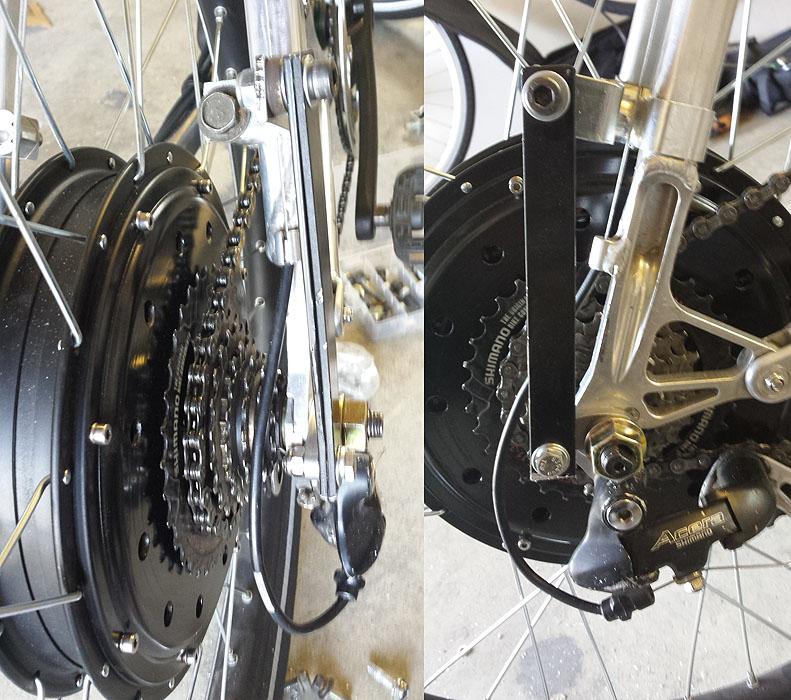
neptronix said:The cassette version of this motor has a smaller axle on one side, correct?
if so, it's even more critical to use tight fitting torque arms!
I would make your torque arm even stronger than this. You can see i had a long aluminum bar in one pic. A shorter distance would have been preferable. But the thing held up to ~100ft-lbs of torque.. the bolt holes were all drilled and then hand filed to ensure as close to zero play as possible before the assembly was bolted together.
Ifyou mean that the dropouts are spread far enough that they have to be "squished together" in order to put the hardware on...my first recomendation is to, with the wheel out, squeeze them together with an old threaded axle and it's regular hardware, until it reaches the point that it's "permanently" bent them inward as far as you need them to. That will take experimentation and repeated applications, most likely, releasing tension and checking distance, retensioning, etc.The Toecutter said:Another part of the problem is that on the drive side axle, I can barely fit what I have. It is extremely difficult to tighten a nut onto a washer because there is almost insufficient axle threading to get the nut on. It is only when it wants to cooperate and tighten down that I have enough axle length to fit the nut, washer, and torquearm on the drive/cassette side.
I had a similar thing happen to me years ago with a Crystalyte HS4080 motor. It used 1/2" UNC threads and I tried my damdest to make them work...till the day my rear wheel FELL OFF during a ride while regen braking. Managed to get home using duct tape, zip ties and a tow strap with a mate. That was a funny day.The Toecutter said:I think the replacement nut stripped my threading on the cassette side of the axle. The odd thing is that it did not show any indication of cross threading when I installed it with a small crescent wrench and took very little force to turn. I was mostly able to turn it by hand. The nut was still tight when I attempted to loosen it, but did not require much force to loosen.
Does anyone know the precise type of nut that the cassette version of this motor uses on the cassette side? Or how to replace the axle or restore axle threading? I'd like to not destroy it beyond repair. The threading is sort of still usable as it is, but there's not much left.
if your motor from our company.
We have washer and nuts to replace. (Put 2 nuts per side,will not loose)
Our 1500w rear cassette version is fit for min 135mm ~ 155mm rear dropout. (Very good fit for 140mm dropout.)
Total length of this shaft is 220mm
One shaft is M14 nut
Cassette side shaft is M12 nut.
The Toecutter said:I ordered the cassette version because at the time I could not readily find 7 speed freewheels with an 11T small cog, and it appeared as if the only one on the market, the DNP Epoch, was being discontinued