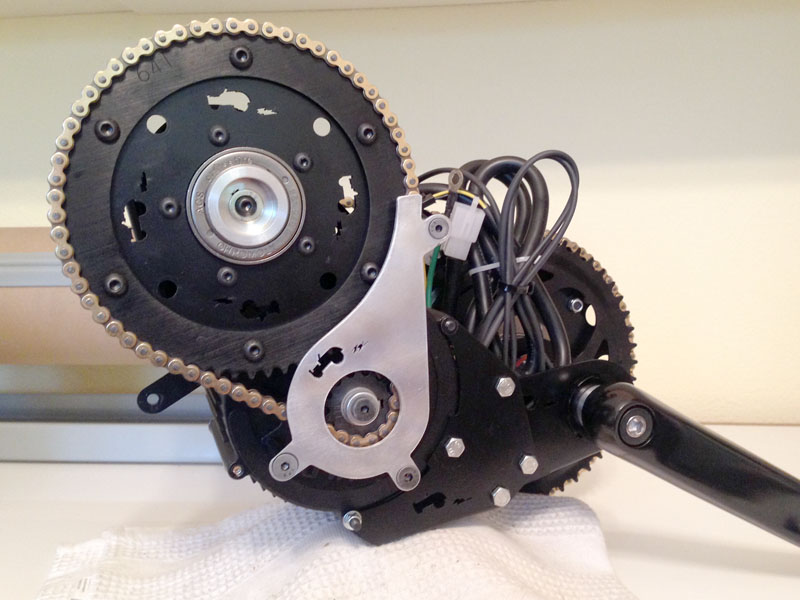
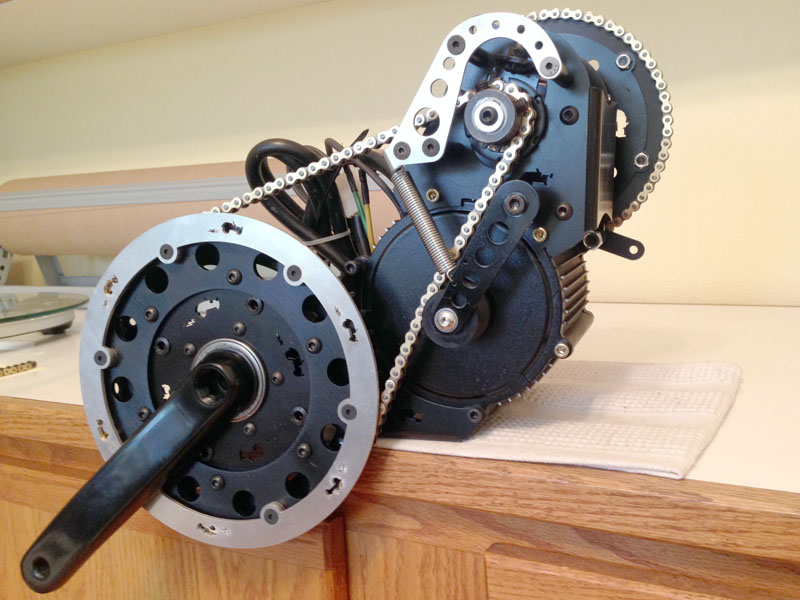
LightningRods mid drive kit

Archer said:
Marin said:
Mike you've really made my day with this update, the way the motors are coming and the torque sensing possibilities. I can see my Luna project is going to be something special. Todd

Hi Marin,

Hey would you be able to make some decent videos of your Luna when its all finished and to your liking?

There isnt enough videos out there of the different applications for LR's kit.

Thanks Mon.

Tim.
I'd be happy to do that, this unit will be built up over the coming winter months. On the Lunacycle site where the frame is for sale there is a like to a whole photo album of Eric's builds.
 
Hi all,

I recently bought a Giant Team DH for my small block GNG. Because of the belt skipping problem with my last bike, Im planning to use the LightningRods pulleys on this build. I will make the upper and lower sheets on my own. Im also trying to source as many of the components as possible within the EU to avoid customs (I live in Finland). I will be buying at least the pulleys + adapter and the #219 driver sprocket + adapter from LightingRods.

Now to my questions:

  • 1. What should the min/max center-center distance between motor and jackshaft be with the LightningRods pulleys and belt? What is the length of the belt?
    2. How many links is needed for the #219 chain? This will probably be different on my build, but at least it gives a hint on how long chain I will need.
    3. My bike came with a 100/143mm ISIS BB. Do you think I will have to buy a 148mm BB? I don't think I have seen anyone using a shorter BB than 148mm

I hope the information I am asking for isn't confidential. :)

Don't think I ever posted a picture of my last bike when it was finished. I used up three belts in quite short time and then got tired of it. I then went back to human power only, but it was fun while it lasted. :roll: :lol:

WP_20140410_001.jpg


WP_20140329_001.jpg
 
1. What should the min/max center-center distance between motor and jackshaft be with the LightningRods pulleys and belt?
113mm
What is the length of the belt?
535mm
2. How many links is needed for the #219 chain?
Approximately 112 links. A normal DID box chain is 114 links.
3. My bike came with a 100/143mm ISIS BB. Do you think I will have to buy a 148mm BB?
A 144 should work for the small block motor. The big block barely fits between the crank arms with a 148mm.

Don't think I ever posted a picture of my last bike when it was finished. I used up three belts in quite short time and then got tired of it. I then went back to human power only, but it was fun while it lasted. :roll: :lol:

The original GNG belt drive ate belts constantly because it used a HTD instead of GT belt pattern, it was 15mm wide instead of 25mm, the 'tensioner' was garbage and did very little to tension the belt, the center to center distance was too short, and the design of the driver pulley was completely incorrect. It was about as botched up a mess as you can imagine.
 
LightningRods said:
1. What should the min/max center-center distance between motor and jackshaft be with the LightningRods pulleys and belt?
113mm

Is 113mm the nominal distance? Basically what I am asking is between what distances should I make the sheets adjustable? Do you think 110-120mm is enough?

LightningRods said:
The original GNG belt drive ate belts constantly because it used a HTD instead of GT belt pattern, it was 15mm wide instead of 25mm, the 'tensioner' was garbage and did very little to tension the belt, the center to center distance was too short, and the design of the driver pulley was completely incorrect. It was about as botched up a mess as you can imagine.

After reading the complete original GNG thread + most of this thread (30 pages left) I am very aware of the bad design. You have done an excelent job on developing this kit. It has been interesting reading about how the feedback have lead to more improvements of the kit. You rarely see this kind of cooperation between customers and manufacturer.
 
_Tommy_ said:
Is 113mm the nominal distance? Basically what I am asking is between what distances should I make the sheets adjustable? Do you think 110-120mm is enough?

113mm is the nominal distance for that belt operating on those pulleys. The travel of my adjuster is 27mm. The longer travel is very helpful for installing the belt over the pulley flanges. There is very little belt stretch to adjust for. Much less than with a chain.

After reading the complete original GNG thread + most of this thread (30 pages left) I am very aware of the bad design. You have done an excelent job on developing this kit. It has been interesting reading about how the feedback have lead to more improvements of the kit. You rarely see this kind of cooperation between customers and manufacturer.

I'm not really a manufacturer. I don't think that I want to be. I'm a small builder who makes a very few mid drives to the highest standard that I can. When I get feedback from customers that there is room for improvement I make changes immediately, or at least a soon as possible. I don't have 1,000 or 10,000 units finished and sitting in a warehouse. I typically order the parts for 15 or 20 drives at a time. I still have a large box full of discarded parts from making design changes before I sold out of that part.
 
I'm just busy. I'm fully assembling the mid drives before shipping now. It adds to the build time.

Here is John B's 219 primary Big Block all assembled and ready to ship. The bottom bracket has to come off to install the kit on the bike so I take it back off to make the drive more compact for shipping. Otherwise the kit is fully assembled and ready to run.

219BB-2.jpg


219BB-1.jpg
 
A work or art!

At this point, I'd like to remind everyone that Mike purposefully designed shaft adapters and #219 chainring spiders so that after the buyer installs and tests the ebike out...the end user can swap the sprockets and chainrings with affordable off-the-shelf Kart parts, to fine-tune the gearing ratio. Chains and sprockets on high-powered systems wear out, and when you go to buy replacements...again, you can get them fast and cheap from your favorite web-based supplier.

Compare that to the Chinese "take it or leave it" proprietary interfaces that save them $2 on the production line.
 
Thanks Mr. Magnets!

I actually really love completely assembling the mid drives before sending them out. I can do a lot of little things to make parts fit better and quickly solve small issues that could be frustrating for a customer encountering the drive for the first time. Once you've designed something, and assembled it a few hundred times, it becomes difficult to imagine what it would be like to hit the thing cold and have to put it together.

The ability to change the reduction gearing is more important than most people realize. Something as simple as running different voltage to the motor completely changes the ideal reduction gearing. How can you possibly use the same reduction at 72V that you used at 36V? The motor is spinning twice as fast.
 
LightningRods said:
Thanks Mr. Magnets!

I actually really love completely assembling the mid drives before sending them out. I can do a lot of little things to make parts fit better and quickly solve small issues that could be frustrating for a customer encountering the drive for the first time. Once you've designed something, and assembled it a few hundred times, it becomes difficult to imagine what it would be like to hit the thing cold and have to put it together.

The ability to change the reduction gearing is more important than most people realize. Something as simple as running different voltage to the motor completely changes the ideal reduction gearing. How can you possibly use the same reduction at 72V that you used at 36V? The motor is spinning twice as fast.

I know a lot of the thread is spent discussing these ratios. Maybe a Wiki of sorts can be added to the first post such like below

Small Block
Voltage - Recommended Chain Ring - Recommended Sprocket 1 - Recommended Rear Sprocket
36v - X tooth - X tooth - X tooth
48v - X tooth - X tooth - X tooth
60v - X tooth - X tooth - X tooth
72v - X tooth - X tooth - X tooth
84v - X tooth - X tooth - X tooth

Big Block
Voltage - Recommended Chain Ring - Recommended Sprocket 1 - Recommended Rear Sprocket
36v - X tooth - X tooth - X tooth
48v - X tooth - X tooth - X tooth
60v - X tooth - X tooth - X tooth
72v - X tooth - X tooth - X tooth
84v - X tooth - X tooth - X tooth
 
Maybe it would be more useful to create a chart showing voltage x reduction = pedaling cadence. "Recommended" is tough because people have very different preferences regarding pedaling cadence.
 
LightningRods said:
I'm just busy. I'm fully assembling the mid drives before shipping now. It adds to the build time.

Here is John B's 219 primary Big Block all assembled and ready to ship. The bottom bracket has to come off to install the kit on the bike so I take it back off to make the drive more compact for shipping. Otherwise the kit is fully assembled and ready to run.

219BB-2.jpg


219BB-1.jpg


Yee ha! I'm very excited in deed, absolutely beautiful sight, thanks!

EDIT
3 questions

Is there a spring loaded tensioner on the primary side or another device or is there no need being so close?

Is the bicycle chain ring 36t in that pic? looks big

Any chance you can weigh the lot?

cheers
 
John Bozi said:
Yee ha! I'm very excited in deed, absolutely beautiful sight, thanks!

2 questions

Is there a spring loaded tensioner on the primary side or another device or is there no need being so close?

Is the bicycle chain ring 36t in that pic? looks big

We discussed putting a spring tensioner on the primary side. What I ran into is that there isn't room for the DH roller behind the chain guard. I can't move the guard out because it's already a gnat's pube away from the crank arm. I could use a noisy rattly plastic wheel like some people do, but I hate those. This chain run is short and you already have an efficient and easy to use tensioner on it. If you really want a chain tensioner I'll figure something out later. I didn't want to hold your kit up with further fussing.

The chain ring is not a 36T. I have 44T and 32T in stock. My kits use a standard 104mm BCD chainring. I can deduct the price of the 'ring if you want to pick up a 36T in Oz.
 
I'll take the 32t (probably what I meant but forgot the number) and the kit as it is now looks perfect, no need for extra primary tension dongles..... Time to get the xmas tree out.

Final payment sent - stay tuned for youtube videos of summer riding in Oz while you guys dig snow out of your driveways :wink:
 
Raymond G. sent his beautiful Surly Moonlander frame to my shop so that I could get everything fitted just right. Up until now I've been relying on customer feedback to try to get the sprocket sizes and offsets correct. Having the frame here was a huge luxury and made the install a cinch.

You can get a good look at the new spring tensioner with ball bearing Blackspire DH roller. Compared to the cheap, rattling plastic sprockets these rollers are nearly completely silent and do a much better job of holding and guiding the chain.
Moonlanderkit1.JPG


The small diameter driven sprocket doesn't allow crank arm clearance for my usual bash ring so I designed a separate guard to keep body parts out of the sprocket.
Moonlanderkit2.JPG


This shot shows the challenge of installing a mid drive on a fat bike. The bulging chain stays necessary for the fat tire intrude into the space normally allowed for the chainwheels. The largest driver chainwheel that will fit here is a 32T. The 219 driven sprocket is a 64T instead of my usual 75T. Sharp eyed existing customers will also notice the countersunk stainless cap screws on the rigid lower mount. No more adjuster bolts interfering with the chainwheel bolts!
Moonlanderkit3.JPG


The assembled kits pop onto the frame in about 15 minutes. You will spend more time getting your old bottom bracket off of your bike than installing the mid drive.
 
LightningRods said:
John-

It's a deep ISIS socket. I have them for $15. They work great. Much better than an blade screwdriver and a hammer.

Mike
I knew I forgot something from the order.... :oops:

Hopefully there is something like that in my town. :cry:
 
I'll visit a couple of LBS today as I was hoping to get this thing spinning by the weekend....

I think the tool would be an essential mandatory addition to every kit you send out, and a mention in the instructional videos of the tool and any other washers that might be necessary to put this bb together.

Also the part that uses the tube clamps to the tube, is about a cm off the tube because of the motor bulge / screw... Do I fill that space up with some plastic?

thanks
 
Mike was nice enough to sell me his personal pedro tool a while back (sorry if that's why some kits took a bit longer, HAHA, jk). I initially managed without it, but sure did some cosmetic damage and it's much better with one. I've basically got everything worked out in regards to the tools needed for this kit, and now a few of my lucky friends are getting them and of course I've got everything they need (and wish I had in the beginning). I do seem to get a lot of free beer :)

Here are the tools I've found you cant do without:
a bike stand
Chain breakers (I need 3: standard bike one for 3/32 chain, one for the #219 and I use a moto one for my 3/16 KMC)
a WB freewheel removal tool
a sprocket removal chainwhip and cassette lockring tool
Crank puller
any other annoying bike-specific tools i forgot?


(not to mention a quality soldering station and multimeter. I even have a small propane solderer I bring in my tool kit)
 
If I include a bunch of tools with the kit and just add it to the bottom line, many people would never get past the price. I think that what I will do is list all of those tools along with the mid drive on my e-commerce site when I get that up and running. I also want to give people the option of upgrading items like freewheels and chainwheels.

There is a reason that auto makers have a base price and then available options and packages. You can buy a new Mustang for $17k or you can buy a new Mustang for $55k.
 
Mike, I'm not having a go at you, my language might sound negative in text, but I am very excited to get this going, consider me a bit of a boy who has just seen and touched his christmas present but now has to wait to play with it.... :cry:

I intend to offer constructive feedback, which has shaped your project here in the past and I got the product of that process. I only feel it is the duty of all LR blockers to keep the feedback coming for future buyers.

Essential tools to put your BB on is not really an upgraded version of the kit. (I believe I am already going to be running the best version of it) I don't believe it is necessary to include the other tools such as freewheel removal or removing existing BBs on the users bike... Just enough to get the 15 minute install happening.

cheers

PS maybe a list of ES members by city? I could PM and borrow something for a one-off. And as mentioned beer and rides - maybe not in that order exactly.. ..

EDIT

sorry about the man boobs
[youtube]TenswCNzuNM[/youtube]
 
Back
Top