Motor perhaps overextended?

Cyclomania

10 kW
Joined
May 22, 2022
Messages
516
Location
Northern Europe
I have a bike with a 250 watt motor.

I have overvolted this bike quite a lot. So I have a controller with max current of 25. And a 48volt battery 17AH.

When going up a slope earlier today. The motor then started making all kinds of strange noises. At least I am 80% sure this sound comes from the motor.

The battery connections still shows me 48 volts so I don't think the battery or controller have taken any damage. But the motor gave me a lot of strange sounds. It still runs but with a strange sound. Any idea what this is or how I can fix it?
 
H'mmmm ... we used to use a hammer and a impact screwdriver on Honda Motorcycle case bolts. Something like this: https://www.amazon.com/dp/B000NPUJYE

Those had Phillips heads that would not take much torque without stripping the heads. You get a an impact along the axis of the fastener as well as in the rotational direction around the axis.
 
LewTwo said:
H'mmmm ... we used to use a hammer and a impact screwdriver on Honda Motorcycle case bolts. Something like this: https://www.amazon.com/dp/B000NPUJYE

Those had Phillips heads that would not take much torque without stripping the heads. You get a an impact along the axis of the fastener as well as in the rotational direction around the axis.

Aha good tip thanks. How do you use one of those? Have a video or something?

I don't currently have Amazon where I live. But what do you think about this one? Kind of similar right?

https://www.biltema.no/en-no/tools/hand-tools/screwdrivers/screwdriver-sets/impact-screwdriver-2000030859
 
E-driver_ said:
Aha good tip thanks. How do you use one of those? Have a video or something?

I don't currently have Amazon where I live. But what do you think about this one? Kind of similar right?

https://www.biltema.no/en-no/tools/hand-tools/screwdrivers/screwdriver-sets/impact-screwdriver-2000030859
Yes that looks similar. First install an appropriate bit (may require socket). Fit it firmly into (or around) the fastener head. Rap it sharply on the ass end with a hammer. Unlike pneumatic or electric impact wrenches, it is generally only used to loosen the fastener.
 
From your photo it looks like the inhex part of the screw (where the hex wrench fits into) is filled with gunk, which can prohibit full insertion of the wrench. Try again after cleaning out the gunk with a paperclip or ice pick.

Are you using a good quality hex key? What size? Is it a tight fit into the screw head?
 
LewTwo said:
E-driver_ said:
Aha good tip thanks. How do you use one of those? Have a video or something?

I don't currently have Amazon where I live. But what do you think about this one? Kind of similar right?

https://www.biltema.no/en-no/tools/hand-tools/screwdrivers/screwdriver-sets/impact-screwdriver-2000030859
Unlike pneumatic or electric impact wrenches, it is generally only used to loosen the fastener.

Does that mean it is only supposed to loosen the Loctite?

I will have to Google this and watch some videos to understand it. Right now, I don't have the time to attack this motor. But I will come back to this thread in time.
 
Unlike pneumatic or electric impact wrenches, it is generally only used to loosen the fastener.

Does that mean it is only supposed to loosen the Loctite? Or what ever is in there around the screw to keep it harder in place.

I will have to Google this and watch some videos to understand it. I have bought the impact tool. But right now, I don't have the time to attack this motor. But I will come back to this thread in time.
 
99t4 said:
From your photo it looks like the inhex part of the screw (where the hex wrench fits into) is filled with gunk, which can prohibit full insertion of the wrench. Try again after cleaning out the gunk with a paperclip or ice pick.

Are you using a good quality hex key? What size? Is it a tight fit into the screw head?

I will try this later too. Before I go about with the impact screw. I am not sure if it is good enough. But it was bought cheaply so my suspicion is that it is not that good. Any idea on what to look for when buying good hex-keys? In my experience they often get stripped in the top when you are trying to screw out something using man-handle force.
 
E-driver_ said:
Unlike pneumatic or electric impact wrenches, it is generally only used to loosen the fastener.

Does that mean it is only supposed to loosen the Loctite? Or what ever is in there around the screw to keep it harder in place.
Simply means that type of impact driver is only able to unscrew a screw-- it is not able to tighten a screw. It twists incrementally only in the counter-clockwise direction with each hammer blow.

E-driver_ said:
Any idea on what to look for when buying good hex-keys? In my experience they often get stripped in the top when you are trying to screw out something using man-handle force.
Good hex keys should be made of high-quality material, and machined to exact size. Cheaper ones are often too soft, and fit loosely, distorting themselves and the screw heads.

You are in Scandinavia, no? Some of the best handtools in the world come from your area! Buy local! :thumb:

Bahco brand comes to mind.

More examples: https://www.garagejournal.com/forum/threads/tools-from-nordic-countries.474036/
 
You should buy a freewheel remover tool (Park FR1-3) and take off the freewheel before you try to remove the cover,

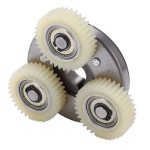
Gears for some of the more common motors are available, When I bought the 250W Bafang SWXH, I bought an extra set of gears, as they were only about $12. Never needed them,

gear.jpeg
 
docw009 said:
You should buy a freewheel remover tool (Park FR1-3) and take off the freewheel before you try to remove the cover,

Gears for some of the more common motors are available, When I bought the 250W Bafang SWXH, I bought an extra set of gears, as they were only about $12. Never needed them,

gear.jpeg

Same here. I ordered gears for every BBSxx motor and my TSDZ2 and never needed them. Better safe than sorry. But one single blog put panic into thousands of users...
 
E-driver_ said:
docw009 said:
You should buy a freewheel remover tool (Park FR1-3) and take off the freewheel before you try to remove the cover,

Hmm ok. Why is it important to remove the sprocket/freewheel before I attempt the rest?

Might be another screw under it. It might prevent you from lifting off the cover, if it is a cover. If half the motor lifts out with the screws gone well then I was wrong,
 
docw009 said:
E-driver_ said:
docw009 said:
You should buy a freewheel remover tool (Park FR1-3) and take off the freewheel before you try to remove the cover,

Hmm ok. Why is it important to remove the sprocket/freewheel before I attempt the rest?

Might be another screw under it. It might prevent you from lifting off the cover, if it is a cover. If half the motor lifts out with the screws gone well then I was wrong,

Perhaps I will try with the sprocket on first, because it was a pain in the ass to try to get it off :) .

Or another possibility I have checked out is using a very long pipe around a screwdriver. Because this one was really, really, really stuck on hard there when I tried to get it off:)
 
Okay

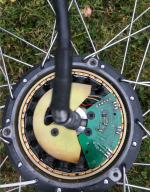
I have now removed the sprocket and the cover. Here is a video on what it looks like inside below. Any idea on what to do next and what to look for in there?

https://www.veed.io/view/97f93aaf-17e8-4dd6-822d-e38429d0414b
 

Attachments

  • Skärmavbild 2022-11-06 kl. 13.47.27.png
    Skärmavbild 2022-11-06 kl. 13.47.27.png
    2.5 MB · Views: 196
Hmmm here's a random google pic of healthy windings next to cooked ones.
DSCN5012.JPG

yours look a little like the latter.
 
E-HP said:
Hmmm here's a random google pic of healthy windings next to cooked ones.
DSCN5012.JPG

yours look a little like the latter.
Just to be clear: coils 17, 18 and 1 are 'well done'.
 
E-HP said:
Hmmm here's a random google pic of healthy windings next to cooked ones.
DSCN5012.JPG

yours look a little like the latter.

Haha agree. Mine looks totally fried compared to those. So they should be more like coppery looking like those ones then I guess?

Are they easy to change?
 
E-driver_ said:
Haha agree. Mine looks totally fried compared to those. So they should be more like coppery looking like those ones then I guess?

Are they easy to change?
Not easy, but it can be done.
However enough excess heat can also damage the magnets (and your magnets look to be deep fried as well).
 
LewTwo said:
E-driver_ said:
Haha agree. Mine looks totally fried compared to those. So they should be more like coppery looking like those ones then I guess?

Are they easy to change?
Not easy, but it can be done.
However enough excess heat can also damage the magnets (and your magnets look to be deep fried as well).

Aa ok. Perhaps best to just throw it away then.

But would be interesting to change it as a side project though. But perhaps when the magnets too are fried a motor is pretty much beyond saving?
 
Magnet heat damage lowers their strength. If the heat damage is even, then all magnets are just weaker, making them less capable of creating torque.

If damage is uneven, some lost more strength than others, so torque may be uneven; you probably won't feel that but it may affect a controller driving the motor.


If you want to try rewinding the motor, I'd recommend looking around at the various threads about that--start with not removing the existing windings until you're ready to document the process in detail, as you will need to know which winding is on which tooth, which direction it is wound in around that tooth, and which phase it connects to, and in what order, etc.
 
amberwolf said:
Magnet heat damage lowers their strength. If the heat damage is even, then all magnets are just weaker, making them less capable of creating torque.

If damage is uneven, some lost more strength than others, so torque may be uneven; you probably won't feel that but it may affect a controller driving the motor.

I have read that a particular copper wire is needed for this? Insulated copper wire right? And it should preferably be the exact same thickness as the old one?
 
Anyone knows how to get the exact same copper wire? Should I just look for "insulated copper wire"?

I guess if it is only the copper wire that needs replacing it could be a fun project. But if the magnets also needs replacing it could be a pain.

But shouldn't the magnets tolerate a bit more than the copper wire? So perhaps they can be kept there in place ? And I just replace the copper wire.
 
To find the exact same wire, you'll need fairly accurate calipers to measure the diameter of the wire currently used. Then you could go online and find the same wire. Keywords will be enameled copper wire, or perhaps "magnet wire" Or if you're looking for a fun salvage project on the cheap, something I always like:

Go to craigslist, find a broken or dirt cheap hoverboard, theyre a dime a dozen and there's always some spoiled kid who got one for christmas 2 years ago that doesn't want it anymore, cuz they're kinda useless toys. Pull out the two motors. Disassemble, and CAREFULLY unwind, so as not to scratch the wire. Reuse that wire for your motor rewinding project. I can confirm that it's both a tedious and mind numbing task, as well as an extremely rewarding project once it's done. I recommend that if you're reusing wire, which increases the chances that you'll scratch it as you wind, check the wire's continuity in between winding each pole. That way, if you did screw up and short the windings, you'll only have to backtrack 1 pole, rather than 7 or 8.

I can't guarantee that the wire that you'll get from a hoverboard (or any other salvage motor, doesn't have to be a hoverboard) will have the exact correct size wire that you need. But it should be close, and chances are if you rewind a motor by hand, it's not going to have the exact same specs as it did before, due to human hands being less precise than machines. Bonus, if you get lucky, a hoverboard motor may even have the same size magnets that you would need, if yours need replacing. And reusing ewaste is always a bonus in my book.
 
Back
Top