Mantas
10 mW
- Joined
- May 16, 2013
- Messages
- 24
Ttw said:Does the batteries stay connected to ESC while charging ?
No, I disconnect battery from ESC and connect to charger.
Ttw said:Does the batteries stay connected to ESC while charging ?
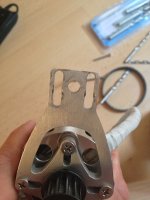
bluemc said:That's an awesome battery pack enclosure. What material did you use and where did you buy it? What did you use to cut it? What are you using to fasten/connect it to the board? How is it holding up.
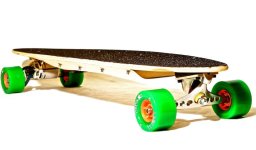
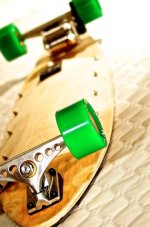
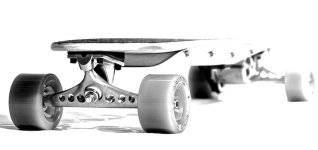
The design is sleek and thin, I like the style a lot.
How much batteries do you have connected there?
bluemc said:Mantas - Thanks, yeah I like the look it's sleek and thin. How does it hold up since battery isn't connected to the board? What kind of screws did you use and did you just screw them into the board itself?
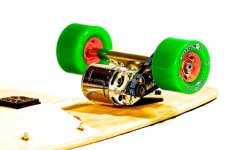
You are just running the 1x SK3 - 6364-245kv motor on 6s? How fast do you think your board goes and are you climbing hills with it?
How much mah total are you running on your board and what's the distance?
Thanks!
") especially with out brakes. So I have 5000 mah and I did a 10km distance , but that was not limit, i will try to go next time to see that is a limit.
especially with out brakes. So I have 5000 mah and I did a 10km distance , but that was not limit, i will try to go next time to see that is a limit. Mantas said:Yes I am running 1x SK3 - 6364 - 245 kv on 6S, with this setup I was going 30km/h, but that was not full speed , already too much to feel comfortable on a skateboard
bluemc said:@mantas - does your eboard have brakes?


tarwin said:This is really awesome!
Any very nearly like the board I just bought all parts for.
Another question about the battery, did you run into any problems with the long connector cable to the ESC?
Do you use additional Capacitors to ease the strain on the ESC?
-Tarwin
shaneisme said:Did you make those gears or where did you get them?
Mantas said:Here is a source code for Wii Nunchuck Library that works with Arduino mirco ( Ardunio UNO is a different one)
/*
* Nunchuck -- Use a Wii Nunchuck
* Tim Hirzel http://www.growdown.com
*
notes on Wii Nunchuck Behavior.
This library provides an improved derivation of rotation angles from the nunchuck accelerometer data.
The biggest different over existing libraries (that I know of ) is the full 360 degrees of Roll data
from teh combination of the x and z axis accelerometer data using the math library atan2.
It is accurate with 360 degrees of roll (rotation around axis coming out of the c button, the front of the wii),
and about 180 degrees of pitch (rotation about the axis coming out of the side of the wii). (read more below)
In terms of mapping the wii position to angles, its important to note that while the Nunchuck
sense Pitch, and Roll, it does not sense Yaw, or the compass direction. This creates an important
disparity where the nunchuck only works within one hemisphere. At a result, when the pitch values are
less than about 10, and greater than about 170, the Roll data gets very unstable. essentially, the roll
data flips over 180 degrees very quickly. To understand this property better, rotate the wii around the
axis of the joystick. You see the sensor data stays constant (with noise). Because of this, it cant know
the difference between arriving upside via 180 degree Roll, or 180 degree pitch. It just assumes its always
180 roll.
*
* This file is an adaptation of the code by these authors:
* Tod E. Kurt, http://todbot.com/blog/
*
* The Wii Nunchuck reading code is taken from Windmeadow Labs
* http://www.windmeadow.com/node/42
*
* Conversion to Arduino 1.0 by Danjovic
* http://hotbit.blogspot.com
*
*/
#ifndef WiiChuck_h
#define WiiChuck_h
#include "Arduino.h"
#include <Wire.h>
#include <math.h>
// these may need to be adjusted for each nunchuck for calibration
#define ZEROX 510
#define ZEROY 490
#define ZEROZ 460
#define RADIUS 210 // probably pretty universal
#define DEFAULT_ZERO_JOY_X 124
#define DEFAULT_ZERO_JOY_Y 131
class WiiChuck {
private:
uint8_t cnt;
uint8_t status[6]; // array to store wiichuck output
uint8_t averageCounter;
//int accelArray[3][AVERAGE_N]; // X,Y,Z
int i;
int total;
uint8_t zeroJoyX; // these are about where mine are
uint8_t zeroJoyY; // use calibrateJoy when the stick is at zero to correct
int lastJoyX;
int lastJoyY;
int angles[3];
bool lastZ, lastC;
public:
uint8_t joyX;
uint8_t joyY;
bool buttonZ;
bool buttonC;
void begin()
{
Wire.begin();
cnt = 0;
averageCounter = 0;
// instead of the common 0x40 -> 0x00 initialization, we
// use 0xF0 -> 0x55 followed by 0xFB -> 0x00.
// this lets us use 3rd party nunchucks (like cheap $4 ebay ones)
// while still letting us use official oness.
// only side effect is that we no longer need to decode bytes in _nunchuk_decode_byte
// see http://www.arduino.cc/cgi-bin/yabb2/YaBB.pl?num=1264805255
//
Wire.beginTransmission(0x52); // device address
Wire.write(0xF0);
Wire.write(0x55);
Wire.endTransmission();
delay(1);
Wire.beginTransmission(0x52);
Wire.write(0xFB);
Wire.write((uint8_t)0x00);
Wire.endTransmission();
update();
for (i = 0; i<3;i++) {
angles = 0;
}
zeroJoyX = DEFAULT_ZERO_JOY_X;
zeroJoyY = DEFAULT_ZERO_JOY_Y;
}
void calibrateJoy() {
zeroJoyX = joyX;
zeroJoyY = joyY;
}
void update() {
Wire.requestFrom (0x52, 6); // request data from nunchuck
while (Wire.available ()) {
// receive byte as an integer
status[cnt] = _nunchuk_decode_byte (Wire.read()); //
cnt++;
}
if (cnt > 5) {
lastZ = buttonZ;
lastC = buttonC;
lastJoyX = readJoyX();
lastJoyY = readJoyY();
//averageCounter ++;
//if (averageCounter >= AVERAGE_N)
// averageCounter = 0;
cnt = 0;
joyX = (status[0]);
joyY = (status[1]);
for (i = 0; i < 3; i++)
//accelArray[averageCounter] = ((int)status[i+2] << 2) + ((status[5] & (B00000011 << ((i+1)*2) ) >> ((i+1)*2)));
angles = (status[i+2] << 2) + ((status[5] & (B00000011 << ((i+1)*2) ) >> ((i+1)*2)));
//accelYArray[averageCounter] = ((int)status[3] << 2) + ((status[5] & B00110000) >> 4);
//accelZArray[averageCounter] = ((int)status[4] << 2) + ((status[5] & B11000000) >> 6);
buttonZ = !( status[5] & B00000001);
buttonC = !((status[5] & B00000010) >> 1);
_send_zero(); // send the request for next bytes
}
}
// UNCOMMENT FOR DEBUGGING
//byte * getStatus() {
// return status;
//}
float readAccelX() {
// total = 0; // accelArray[xyz][averageCounter] * FAST_WEIGHT;
return (float)angles[0] - ZEROX;
}
float readAccelY() {
// total = 0; // accelArray[xyz][averageCounter] * FAST_WEIGHT;
return (float)angles[1] - ZEROY;
}
float readAccelZ() {
// total = 0; // accelArray[xyz][averageCounter] * FAST_WEIGHT;
return (float)angles[2] - ZEROZ;
}
bool zPressed() {
return (buttonZ && ! lastZ);
}
bool cPressed() {
return (buttonC && ! lastC);
}
// for using the joystick like a directional button
bool rightJoy(int thresh=60) {
return (readJoyX() > thresh and lastJoyX <= thresh);
}
// for using the joystick like a directional button
bool leftJoy(int thresh=60) {
return (readJoyX() < -thresh and lastJoyX >= -thresh);
}
int readJoyX() {
return (int) joyX - zeroJoyX;
}
int readJoyY() {
return (int)joyY - zeroJoyY;
}
// R, the radius, generally hovers around 210 (at least it does with mine)
// int R() {
// return sqrt(readAccelX() * readAccelX() +readAccelY() * readAccelY() + readAccelZ() * readAccelZ());
// }
// returns roll degrees
int readRoll() {
return (int)(atan2(readAccelX(),readAccelZ())/ M_PI * 180.0);
}
// returns pitch in degrees
int readPitch() {
return (int) (acos(readAccelY()/RADIUS)/ M_PI * 180.0); // optionally swap 'RADIUS' for 'R()'
}
private:
uint8_t _nunchuk_decode_byte (uint8_t x)
{
//decode is only necessary with certain initializations
//x = (x ^ 0x17) + 0x17;
return x;
}
void _send_zero()
{
Wire.beginTransmission (0x52); // transmit to device 0x52
Wire.write ((uint8_t)0x00); // sends one byte
Wire.endTransmission (); // stop transmitting
}
};
#endif
Spooky1 said:What a great e board, I love the slick design and the way you've adapted the batteries, congratulations!
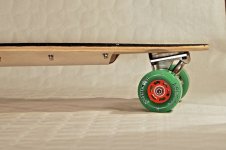
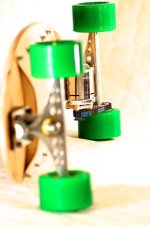
To speed up, hold the paddle up and release at the new speed. To slow down, hold the paddle down and release at the new speed. To disengage the speed control (coast) with speed memory, tap the paddle toward you (also disengages with memory by tapping the brakes or depressing the clutch). To resume to your last speed, tap the paddle up. Slick setup.Mantas said:About the hills, I am having one problem that do not allow me to go into steep hill - motor belt is slipping through a smaller cog. I am trying to make this belt mote tight but Alien drive kit is little bit not ok for my cog, cause I have a very small one (12 tooth). so now I am trying to adjust this kit, but maybe it is better just to order a 15 tooth cog. Maybe someone is experiencing the same problem ??? and have a solution...
;rf said:Mantas said:About the hills, I am having one problem that do not allow me to go into steep hill - motor belt is slipping through a smaller cog. I am trying to make this belt mote tight but Alien drive kit is little bit not ok for my cog, cause I have a very small one (12 tooth). so now I am trying to adjust this kit, but maybe it is better just to order a 15 tooth cog. Maybe someone is experiencing the same problem ??? and have a solution...
Sounds like you need a shorter belt. Or lengthen the adjuster slot.
torqueboards said:@Mantas - Question regarding your battery case.
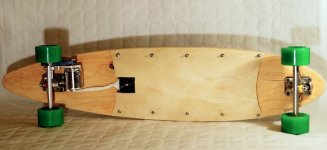
I like your battery case, it's real sleek. I see that, you used 1.22mm plywood. Used a sharp razor to cut it. Using 10 screws, which are 4mm screws screwed into the board from the top with a closed nut on bottom.
Mantas - Can this board support 5-7 lbs?
* Where did you buy the screws? Were the screws sticking out on the top or where they flat? - I'm thinking a screw like this would be best - http://www.boltdepot.com/Machine_screws_Slotted_flat_head.aspx
* How long are the screws when screwed in from the top?
* Would a washer help with stopping the screws from becoming loose?
* What did you use for the caps for the nuts? Looks like an acorn/cap nuts? - List of nuts here - http://www.boltdepot.com/Nuts.aspx?nv=l - I'm thinking maybe a wing nut would be best as you can hand tighten it, although it wouldn't look the best.
* Anyone can chime in have any better ideas on how to bolt a battery case to the board?
Maybe, you can use one of these to stop the bolts from loosening http://www.boltdepot.com/Metric_washers.aspx.
if you ask what is a weight of the board , so its 6Kg.