My kick scooter project

In the last couple of months I have replaced the motor, controller, brakes and added lights. Other than spinning up the back wheel I have no idea how much improvement I have made. I have 3 inrunners that are identical. I think I will rewind one of them with 14 awg wire. Too bad an inrunner is such a pain to rewind! The motor I have in mind was really poorly wound to begin with so it's a good candidate. I'll start looking for wire pretty quick. It would be cool to rewind this 1500w 5600 RPM motor for 3000 watts and similar rpm's. I've never wound a brushless motor personally, but it can't be overly difficult.
 
ElectricGod said:
I've never wound a brushless motor personally, but it can't be overly difficult.
famous last words.
I will say two things on this..
1. it cant be too difficult, plenty of people do it.
2. it requires more patience than I apparently have.

I tried doing it over and over.. the only conclusion i have is that I suck at it. :lol:
 
MrDude_1 said:
ElectricGod said:
I've never wound a brushless motor personally, but it can't be overly difficult.
famous last words.
I will say two things on this..
1. it cant be too difficult, plenty of people do it.
2. it requires more patience than I apparently have.

I tried doing it over and over.. the only conclusion i have is that I suck at it. :lol:

I think most people do outrunners because getting to the windings is easier.
 
ElectricGod said:
MrDude_1 said:
ElectricGod said:
I've never wound a brushless motor personally, but it can't be overly difficult.
famous last words.
I will say two things on this..
1. it cant be too difficult, plenty of people do it.
2. it requires more patience than I apparently have.

I tried doing it over and over.. the only conclusion i have is that I suck at it. :lol:

I think most people do outrunners because getting to the windings is easier.

oh, i was trying to do an outrunner.... see midway on the first post here: https://endless-sphere.com/forums/viewtopic.php?f=35&t=67812
total pain in the butt.

on the inrunner motors, I like how the newer car motors are made... "hairpin" rods inserted, and then welded at one end. seems like a better way to build them.

Looking at Thuds motors, they are definitely neater, but since this is your first attempt, did you really expect perfection on the first try? Luke posted on a motor thread, that how tight the windings were didn't really matter so much as having them there. He also said that many small wires is the same thing as a few large wires. What matters is total cross section. Or at least that's what I interpreted as what he said. I think tight windings get you the possibility of more wraps on a tooth. If total cross section is what matters, then it wouldn't be hard to calculate what several small wires (easy to bend and therefore easy to wrap neatly) would equal in say 14 awg. I'm wondering if you used several thin strands (like 20 awg) in place of a single 14 awg strand if you would get the same results? Does twisting the strands together improve results or even matter?
 
I'm working towards going to 72 volt packs and have been pretty active on another ES thread about batteries. After much input from others and finally taking the blinders off I am going to use a hybrid battery solution. I have my existing LIPO packs that are still in good shape. It would be a travesty to just set them aside and no longer use them in some way. I also like to NOT spend money if I can. I have been thinking I will need to buy all new batteries to make my new 72v packs. As a result I have been asking about LIPO and LION cells and what is the best choice...etc. One person posted the idea of going hybrid and referenced another thread on ES. I read the other thread and was immediately convinced that the guy who started the thread just hadn't planned for the current loads he was drawing and as a result had to supplement his LION pack with some LIPO R/C bricks. As a result I immediately dismissed the idea. The problem is that it's a great idea!!! I have 50 or more 18650 LION cells that I know are all good just sitting in a box and I have my existing LIPO packs. Why not use both cell types to power my scooter? I'll still end up buying some more 18650's if I can't scavenge them from somewhere, but between my existing LIPOs and the scavenged 18650's I'm already 60% to my minimum capacity requirements. I will be building up 18650 battery holders into 20S2P packs in the near future. More to come later...

On the dual loop key front...
I got bored with it and haven't moved beyond making the charge key. LOL! It's not like I am waiting on parts. I have everything I need to finish it! I'm probably going to drop the charge key idea and go with an inexpensive barrel lock that has a switch on it. I'll integrate the lock and the high current loop key into a small aluminum plate. There will still be some LED's to show status like in the charge loop key, but this way it uses a small switch instead of a separate part that is easily lost. THe large loop key once plugged in wont fall out easily and takes a good bit of effort to get it plugged/unplugged so I'm not concerned about it falling out somewhere. The barrel lock key, can be inserted for charging and then removed once the main loop key is inserted. That way the key always stays on my key chain which will be in the ignition or my pocket.
 
Very cool idea. I wanted to use the 18650 battery holders on eBay to make a pack for my kids 6v quad, but haven't done it yet (he's only 1). It will be interesting to see what you come up with.
 
shortcircuit911 said:
Very cool idea. I wanted to use the 18650 battery holders on eBay to make a pack for my kids 6v quad, but haven't done it yet (he's only 1). It will be interesting to see what you come up with.

The battery holders are on order and should be here middle of next week. I'm actively harvesting 18650 cells from laptop battery packs. I already had 50 cells and just yesterday, was given 12 laptop batteries so last night I tore them apart to get at the cells. I didn't care if the batteries were new or old...just get at the cells!!! I harvested 80+ cells last night and I'm sure some of them are bad, but that's just a matter of testing to find the duds. I looked at my supplies and need to get more XT60's
 
I've been a battery testing maniac today. I took apart all these battery packs and harvested all the cells from them. I've got 3 chargers going non-stop. Once everything is charged, I'll start testing for bad/weak cells. So far I have 3 cells that are totally dead and 20+ that at least take a charge.

Laptop%20batteries_zpsx0bgfssu.jpg
 
It took a while, but this is all the "good" cells recovered from those laptop batteries. I haven't had the chance to do any capacity testing on them yet. There were quite a few that were dead or wouldn't charge. This is what's left...not a bad harvest for free cells.

Lion%20battereies_zpsmrqje6f9.jpg
 
Here's some bullet connectors to look at...
From left to right 3mm, 8mm short, 8mm long and 10mm. I used the 3mm originally on my motor and later upgraded to 8mm short. My power connections are currently 8mm long.

Bullet%20connectors%202_zpsyjudvrr7.jpg

Bullet%20connectors%201_zpssywhhzux.jpg
 
The battery holders got here today. I took the ends and roughed them up a little with my circular sander and then super glued them together into 20S lengths. It worked pretty well.
18650%20battery%20holder%203_zpspygrgl0r.jpg

18650%20battery%20holder%204_zpsznvx8rcr.jpg


Here's the cross connects on one of the 20S sections. The negative ends are in the lower half of the connections. I bought 15 feet of 18 awg wire thinking it would be plenty, but that's going to do like 3 or 4 of them so I have ordered 60 more feet of wire. I'm still waiting on the balance connectors to get here so I can't complete one until then. In discussion on another thread I presented what I am doing here and so I'm going to change my wiring a little. It will mean the cells alternate. with this wiring scheme, all the plus ends of the batteries are all facing the same direction. With alternating the orientation of the batteries, the cross connect wires will be much shorter which will minimize wire resistance. I'll need to label each battery slot for the correct cell orientation. I'll also have to make sure to combine left and right sides that are wired as mirror images so the cell orientations are always in parallel.
18650%20battery%20holder%205_zpsz1e1vkf1.jpg
 
I've rewired the battery slabs. This uses 1/3 or less the interconnect length as the previous way. Less wire length means less resistance. The cells will now alternate direction. The previous way kept all the positive ends facing the same direction. This is a left and right side. I am waiting for more 18awg wire and for 5S balance connectors and then I can complete these battery holders.

18650%20battery%20holder%206_zpsstb9ot7b.jpg
 
14 slabs of battery holders is a lot of soldering. All the interconnects are done. That's 532 solder connections! The middle of next week the 5S balance cables will be here and 532 more solder connections and then I can finish soldering up the slabs into complete packs. Once the packs are done, I'll build a box for the back deck to put them in. I'm unsure if I want a lift off lid or one that is hinged. I have an 8 fuse holder coming so each pack can be on its own fuse. That's all thats holding up completing these packs. As soon as that happens I can try out how well they work. I'm really curious to see how many cells are worth keeping and how many are mostly used up. That first run on them will tell me a lot. I think the battery holders are plenty robust...or will be once complete. Probably the first time I'll just bungee them to the back deck. I can't wait to try out 72 volts!!! Everything else is ready for it. I can do 32mph on 48 volts with my current gearing. I'll probably put a different sprocket on the motor tomorrow after I test everything out as it is right now. 72 volts ought to get me another 10-15mph. The weather has finally gotten nice around here and I have the time to go on a decent ride to make sure I'm solid for commuting on it again. Over the winter I have redone all the wiring, replaced the motor and speed controller, added hydraulic brakes and several other smaller upgrades.
 
The 5S balance cables will arrive today which is great timing. I've rebuilt my existing 12S LIPO packs into 20S packs this weekend. All they lack is the balance connectors. I've also finished all the other soldering I can do for now on the battery holders. Two 20S packs fit across the space that is filled by the 3 12S packs in this picture. It's almost like the battery bay was designed for my lipo packs. The cardboard spacer is a perfect fit for holding them snug too. The space in the middle where the single pack sits is big enough for another 20S pack configured as 2 rows of 10 cells. I have ordered 20 more LIPO cells for that spot as a result. I should have configured my 2 existing reconfigured 20S packs the same way. They would have taken up exactly the same amount of space and then all 3 packs would be identical. They are built except for the balance connectors so that's not going to happen. Since I was taking my packs apart, I checked my existing cells for bulging and other issues. I was pleased to see that everything was in great shape. I'm short 5 5S balance cables for the new LIPO batteries when they arrive. I ordered more of them too. The packs in the below picture have 12S BMS on them. I'm going to run without built in BMS and simply set the output voltage of my charger to 82 volts so I can charge the LIPOs and LIONs simultaneously. I'll balance charge as needed via my R/C chargers of which I have 4.

Battery%20box%20Final%20install_zpszkmnbxmh.jpg


Since I have made a lot of changes over the last few weeks and the weather has been crappy for so long I haven't had the chance to get out for a ride to test everything out. I left the 11 tooth motor sprocket on until I could test things out. I had so much more torque with the new motor and speed controller that I immediately went to a 15 tooth sprocket which is the largest I could find for my motor. I'm currently running a 60 volt motor at 48 volts so actual top speed is still an unknown, but I was able to get much more torque and stronger acceleration even with the 15 tooth sprocket than I ever had before. Looking at current draw, the old setup would average 30 amps during acceleration and top out at 40 amps. I'm still running at about those numbers which is totally cool. Also the larger motor sprocket has really reduced chain noise. Currently I am able to go as fast as before with the weaker setup (32mph) at 48 volts, but I get there in about half the time. I have also ordered a 54 tooth rear sprocket to possibly replace my 64 tooth rear sprocket. More options are better and it should get me even more speed. I have 9, 10, 11, 12, 13 and 15 tooth motor sprockets so I have options to play with to get the optimal setup. At 72 volts I have no idea what that will be like, but it ought to be fast!

The other big thing to test is the hydraulic brakes. The old cable driven mechanical brakes when optimally adjusted would never give me maximum braking. IE: Allow me to lock up the wheels. I was able to lock up the rear wheel and brake much harder on the front wheel. I think I reduced my stopping distance by 30%. The weight of the scooter which is still less than it was when I got it is simply too much for the cheap mechanical brakes to handle reliably.

Well damn! I woke up this morning to everything covered in 4" of snow and it's still coming down. Ah well, I have no completed batteries to run on right now anyway.
 
(Checking into this thread here.)
OMG. EGod Guy! A kick scooter on steroids! Hehe... My first experience with "ebikes" was a bare-bones stand up kick scooter which I mentioned on ES here:
https://endless-sphere.com/forums/viewtopic.php?f=10&t=26968#p389309

... and by June 2010 I was formulating plans and accumulating parts for my own design of new one:
https://endless-sphere.com/forums/viewtopic.php?f=35&t=19001

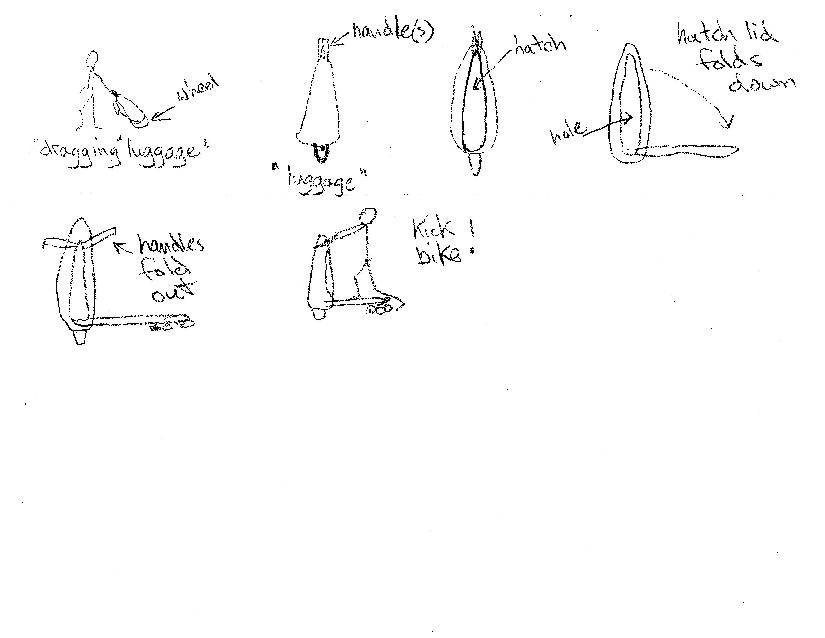
... based on my experiences over many thousands of miles of urban commuting. That "Dray" build thread was toasted a bit when ES system had a crash of some sort, but my "back of a napkin" sketching still exists on ES:
4374319603_0c11a21d42_o.jpg


`Cause I realized I had saved it in the ES thread "the great napkin exchange":
https://endless-sphere.com/forums/viewtopic.php?f=1&t=16413

...where I described my "Dray" as a "20kph bundle-buggy". :lol:

And ES User "gestalt" exclaimed:
genius, it would be the ultimate "no fuss, no muss" solution for taking your e-ride on the train or bus. If you made it out of that really rough textured, durable black plastic, the kind pelican cases are made of no one would ever suspect it wasn't just some weird suitcase. Would make it easy to travel with, I'm seeing this in Hammacher Schlemmer, or sky mall. It would really appeal to the traveling business man and especially business women. I remember watching some talk on ebikes some time ago where they were saying that statistically women are more friendly to the idea of ebikes, so i suppose a red edition is warranted. The casing would actually seem to make a nice fairing for the legs.

And then my life sorta fell apart. Had a tumble down a bunch of stairs (apparently) and ended up in a hospital bed in a coma. Watt I babbled on about on ES here:
https://endless-sphere.com/forums/viewtopic.php?f=3&t=53101

Anyway. Can't really contrib much to your build. Just sayin' Hi. And CONGRATS on "updating" efforts so far. It's fun working with tiny vehicles eh? (Where parts and components costs are NOT "huge". Hehe)

(Insert "But" here.) You'll notice maybe that in my "Dray" build I had added "grocery" space? For cargo? Any thoughts to add same to yours? Maybe a towed trailer might be funky.

Cheers
Lock
 
LockH said:
(Insert "But" here.) You'll notice maybe that in my "Dray" build I had added "grocery" space? For cargo? Any thoughts to add same to yours? Maybe a towed trailer might be funky.

I have a large basket that bolts to the back platform. There's 4 threaded inserts in the back deck that hold the basket down.
 
Damn, that thing is going to jam. I like the 20s set up, and the use of kapton tape on the packs. I can't wait to see what top speed is on that thing.
 
shortcircuit911 said:
Damn, that thing is going to jam. I like the 20s set up, and the use of kapton tape on the packs. I can't wait to see what top speed is on that thing.

Kapton tape...the duct tape of the modern DIYer. hahaha
For the DD style motors, I have the full range of sprockets available. I have ordered a 54 tooth wheel sprocket to possibly replace the 64 tooth one that is currently there. I have also found a 50 tooth sprocket. Between the wheel sprockets and motor sprocket options I have or ar ecoming my way, I should have plenty of speed vs torque tweaking to come.

Another 20 LIPO cells are ordered and on there way to me to make a third 20S1P LIPO pack to fill that hole. My hope is they will be 100% good. The original batch, I ended up ordering 58 cells even though I only needed 48 cells because there were a few that were not great. I had 3 cells that arrived to me pre-bulged. GRRR! About 2/3 of the 18650 battery holders have 5S balance cables on them now. I'll finish up the rest tonight and then secure the balance wires with hot glue so they can't move or possibly get in the way inside the packs. Like the LIPO packs, the balance connectors will protrude out of the top of the 20S2P packs a little. Once the last few balance cables are soldered and secured, I can solder the 2 halves together, attach power wires and the 20S2P 18650 packs are done. I should check my soldering before I close everything up to make sure I didn't mis-solder a balance wire to the wrong place too. It would be bad to fry a pack before I ever get to use it!

For anyone reading my thread...If there is one thing I strongly recommend for any EV build, it's this. ALWAYS use silicon coated wire. The insulation is a little more fragile than nylon insulation when it comes to cuts or scuffing, but that's minor compared to the advantages. It's the facts that it handles heat so well and the individual wire strands are super fine which means the cable is much more flexible and less prone to flex breakage that make it so much better. All those tiny strands conduct current better than fewer large strands. Those are huge advantages. If I could go back and rewire everything in silicon wire easily, I would totally do it. It's so worth it. Sunday night I was unsoldering all the old 6S balance cables off my LIPOs and they are nylon insulated wires. There were several wires where I had to put heat shrink over the insulation because I had melted the insulation while soldering the wires to the batteries. Last night attaching the new 5S balance cables was so much better. I spent the little bit extra to get all silicon wire this time around. Sometimes you have to apply heat to a connection longer than the nylon wire insulation can endure. When you have a tough joint that you need to have flow together and it can take a lot of heat to get that done, nylon insulation will just melt off the wire. It's never a problem with silicon wire. If you ever have a problem where wires get too hot under load or in a short condition, the silicon insulation will protect you from a much larger wiring catastrophe. Early on in this EV build the factory motor connectors were way too light duty for the job. At that point in time I hadn't done anything other than replace the SLA batteries with LIPOs of the same voltage. There was no reason for anything to be over taxed if it had been designed correctly to begin with. Well the motor bullet connectors which were absolute crap over heated from normal load and melted to some other wires. Fortunately nothing caught fire or created a dangerous short. I would have had burnt motor connectors and no other damage if the wiring had all been silicon. As it was, I had to replace several nylon coated wires that had melted through.
 
I have created a new thread for the 18650 battery holder buiild. I figured getting it out of the HK LIPO battery thread was a good idea and also, this gives the idea more legitimacy and a dedicated thread for discussion.

https://endless-sphere.com/forums/viewtopic.php?f=14&t=76013&p=1148200#p1148200
 
Damn weather! 14" of snow 2 days ago. Everything is a giant mess again.

Friday, I got to finally test my latest upgrades at 48 volts. The brakes are so much better now that they are hydraulic. I had close to 2X torque with the bigger motor and better motor controller at 48 volts. I guess since the weather is crap again, redoing my battery packs into 20S packs is good timing. I haven't even plugged in the the LIPOs yet to see them run.

Oh yeah...need to upgrade my charger to 84 volts too. The parts are coming. I'm going to take a 1000W ATX supply I have and use 4 parallel DC-DC converters to get to 84 volts. I did the same thing as a 48 volt charger and it worked pretty well with a much smaller ATX power supply. With 2 DC-DC converters on the 48 volt version, I needed a fan on their heat sinks to keep them cool. Hopefully with 4 of them, that wont be a problem.

I have nearly completed the 20s2P LION packs too. I need to secure the balance wires on 6 more slabs with hot glue and then solder the slabs together and add power wires. I test everything at each step of the process to make sure it's all working OK. That means putting 20 18650's in each slab and making sure everything is working as expected. That can be 280 battery installs and removals. It takes a while to do! Once that's done, I need to make a box for the back deck to put them in. I'm still waiting for the fuse block and a few other minor parts. I have been looking online for a good vent solution so I can add a ventilation fan to the box. Everything I found cost like $20 or more. Last night I went to Lowes to get some more glue sticks and went over to the vent area and found exactly what I wanted for $1.60. Go figure! Somewhere I have a bucket full of fans and temperature controllers. I need to see what I have that will work for this build rather than buying new parts. This upgrade is getting close to done!
 
Back
Top