My ultra-sufficient semi-recumbent tricycle project

well... off to the village smithy we go!
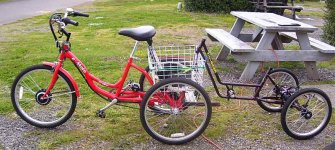
The first time I trailered the project trike over there I apparently caused a bit of a local controversy (WHAT THE HELL IS THAT?) (oh, I know what that is) (c) Steve Martin

the EMoto always gets its' share of curiosity amongst the driving-public and today, while explaining what a hub motor is and no, the battery isn't the motor, it's a battery, the person exclaimed something about seeing me towing the project trike (further amusements etc) (the frivolity never ends...)

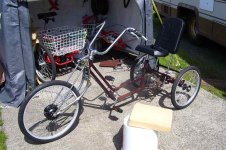
after waiting out a storm, I removed all the unnecessary stuff from the trike in preparation to have the bottom bracket shell relocated on the frame
...but alas the village smithy was closed by the time I returned (he keeps his own hours LOL)
so I took this picture
 

Attachments

  • off to the welders we go.jpg
    off to the welders we go.jpg
    54.3 KB · Views: 1,716
h hi

got a question or any electronically knowledgeable folk on this board.

On an average controller: About how much current do you think the "throttle" +5v pin will source?

wanna build my own cruise control, since the controller came without a PAS port (lol)
and it would be nice if say, 15-20ma of current was available at the +5v line (to power a couple of devices and an led)

gonna ask this question in a separate thread in "technical"
 
terry @highertechbikes
"We do need some work on the manual, especially for the new geared kits. The switch on the controller is the main power switch. The current instructions were written for the Aotema kit which includes an extra packet with cable ties and some shrink tubing. I will send that to you today and start including that in all kits from now on. Any other questions, let me know.
so there you have it...
Both my guesses were wrong (as usual) :lol:
 
ddk said:
h hi

got a question or any electronically knowledgeable folk on this board.

On an average controller: About how much current do you think the "throttle" +5v pin will source?

wanna build my own cruise control, since the controller came without a PAS port (lol)
and it would be nice if say, 15-20ma of current was available at the +5v line (to power a couple of devices and an led)

gonna ask this question in a separate thread in "technical"
I has an answer:
from terry@highertechbikes]...On the PAS, The smaller 15A controller supports it but the larger 20A controller does not, which you have. I can swap that out if you want.
Regarding the throttle current, I am not sure but I would think 20mA would be fine. Usually there is a 74L05 regulator that's rated for 100mA and the controller circuitry probably uses half that.
being a retired electronics design engineer this actually is all the info I need
My intention is simple with the result being a 'push on' throttle being turned off by one on the brake handle switches.
I'm thinking a simple cmos 555 (two of these) hooked up as a set-reset flip flop would suffice, as the truth-table can be adjusted for all situations
speaking of flip flops I accidentally typed "cmos flipflop" into my search engine and the results wre amusing
to wit

I'd really, REALLY like a flip flop in a stylish design :mrgreen:
 
the sun came out again after a few days of stormy weather so...

time to check out stuff.
I HAVE committed to a plan!
no mo' mr. wishy-washy I bought stuff

explanation of my reasons:
neither the Emoto or the project trike can shift through all 6 gears.
It has to do with the location of the derailleur arm mounting bracket, which isn't close enough to the gear cluster.
The Emoto can only be adjusted for 4 gears whilst the project trike is limited to 5 gears. Both can't use the lowest gear sprocket.
So in an effort to stay under budget I decided to use the 36tooth sprocket on the gear cluster as the second motor's drive point
Yes, this does drive the pedals -but only while the motor is operating (only on steep hills over 6%)
The gearing is calculated to drive the pedals between 60-70 RPM (1st and 2nd on the derailleur gear cluster) which is quite comfortable for me.
I'm re-using as many add-on parts I had on the Emoto as possible, leaving the stock Emoto intact.
So...
-new front hub motor - same as the Emoto or, an Aotema geared-front hub wheel purchased through Highertechbikes (previously talked about) They either mistakenly supplied me with a 22amp controller or they gifted it to me because their web page had errors.
I will use the 22amp controller just to see what difference it provides on those long-ish steeper hills in my area- Afterwords, maybe they'll exchange it for the 15amp controller, which includes the PAS port the 22 amp controller lacks.
Because I have my solution for hills with motor #2, the MY1016Y.
-old but perfectly functional MY1016Y off the Emoto Hitch (motor #2 is a Currie 450w brushed motor with gear reduction)
-44 tooth sprocket mounted on a freewheel with a 5/8" freewheel adapter (Sick Bike parts)
-the HITCH (because I can always use a hitch point)
-new parts for a new jackshaft consisting of a 5/8" axle with a full slotted keyway , bearings for said axle, 13 tooth sprocket w/5/8" bore and keyway slot for 40/41 chain (if you read their webpage you might assume the sprockets come with no keyway slot... but they do) bearing hanger plates w/weldable mounting brackets for the bearings (I actually intended to make my own plates but the place I bought this stuff from had pretty good plates for ~$15 a pair) (but I now own a 1 3/8" drill bit I no longer need LOL) and various bits to make things go together like collar stops and key stock. Bought all of it from ombwarehouse.com (The omb stands for "old minibikes")
Via a phone order, as my browser indicated purchasing through their webpage might be less than totally secure.

As soon as the weather is nice, I'll deliver the frame and mounting brackets to the welder guy

Today I stripped the project trike's frame of everything I could
I checked where the best position might be for the jackshaft, temporarily mounting the plates allowing for the 44-tooth sprocket's clearance
I used my *new* $9.95 Harbor Freight grinder to (seriously) grind down the 13-tooth sprocket teeth to a size that accepts BMX bike chain.
(I might grind it down a little more so I can use multi-speed bike chain)


pictureschecking clearence.jpg

edited for goofy spelln errorrrrz
 
today... on a dark and stormy day, the ddk follies continues on

jackshft bracket welding done!

jackshaft welds.jpg


bottom bracket re-location done!

BB relocated.jpg
cost $40
but I didn't have to buy a new tig welder with which I would have likely burned through the tubes LOL

waiting for the next break in the weather...
and I've yet to order my fork... it seems odd, but most the online community that sells lowrider bike parts have been victims of various stuff (too many, to different... stuffs)
but is always a reminder that you have to be careful before dealing with on-line stores you know naught of.
For my own reasons I refuse to use e bay or p ay (an additional pocket) pal... which limits my sources
so I might have to wait until my neighbor makes his next foray to Medford in a couple of weeks
 
a lil bit off topic (as if I've ever stayed on topic) for you cargo trailer pullers

A couple of weeks ago I was browsing a local auto parts store, semi-considering buying a 1 7/8" ball hitch to replace my bolt and nut affair on THE HITCH because the bolt and nut affair is actually a PAIN to use (although it does the job)
anyway I ran across an old and dusty package containing the cutest little 1" ball EVER.
weighs about 1/2 what the 1 7/8" ball does (maybe because it's about 1/2 the size ya think?)
So I brought it up to the counter and asked "do you gots the other half of this here ball thingy (referring to the receiver for the trailer tongue)(and I actually do talk like that)
The counter person looked in his catalogs, made a few phone calls, asked for my number (no, not what you're thinking) and called me a few hours later explaining the manufacturer was either out of business or his company no longer did business with them -rats

anyhoo while surfing the interwebs this morn' I accidentally found a source, likely the source and they're not even that far from me
http://www.messengermfg.com/mini_hitches.html although reading their company history somewhat explains why the auto parts store might not carry their product no mo'.
ef'n you reads between the lines

haven't done my usual webby detective stuff yet but I thought someone, besides myself might be interested in a 1" ball hitch assembly for hauling heavy stuffs in 'murica with their light weight transportation device
 
Very interesting. That big yellow trailer was hooked to my old delta trike with a 1" ball. I got the ball from a trailer supply. They are used on stabilizers between trailers and tow vehicles. Looked all over for the other part and never could find one. Made one that worked out of a piece of 1 1/4" steel pipe with a pair of holes on each side to accept hitch pins to keep it on the ball. Worked okay, but I wasn't very proud of it.
 
I've also used a steering knuckle from a lawn tractor with 3/8" studs. It worked good, but required a wrench to disconnect the trailer. I replaced it with the same sized ball and socket with a spring loaded slip collar for disconnect. These are made to hook a trolling motor to the main outboard so that they steer together. This worked great for a lighter two wheel pusher trailer, probably about 130 pounds total with sla's back then.
 
@Rassy
Big Yellow Trailer's hub motors don't seem to like going slow, but I do, so until I get around to building a more suitable cargo trailer, I've been using the Big Yellow Trailer (TM), un-powered to carry heavy and/or bulky items.
In this way I don't have to use the MH for transport.

I likely will never get around to rewinding the Big Yellow Trailer's MC hub motors but it makes for a a great trailer with those MC hubs/tires.
-I'd prefer a ball hitch or a ring and clamp hitch over other, more bicycle-centric solutions... which is why I've hap-haphazardly looked around or something suitable. I initially used an old tie-rod end but I quickly destroyed it. Currently using a 5/8" hardened nut/bolt.

Another day of solid rain meant I sat on my rear and successfully did nothing useful, other than take a long nap because my interwebs was cranky

I did manage to order the replacement fork from Chubbycruisers.com (might have spelled that wrong) They're physically located in CA
-in this way I don't need to bother my neighbor. (think: old guy on simsons "I don't want to be a bother.")
The fork was shipped today via FedEx so I'm hoping for Friday delivery

(edited for no reason whatsoever)
 
the sun broke through long enough for me to do a quick and ugly paint job on the grind spots
belize redo1.jpg
belize jackshaft.jpg
belize bb relocation.jpg

FedEx indicates my fork gets delivered tomorrow
Hopefully tomorrow's weather will allow me the pleasure of assembling the whole trike. (sans electrical)
 
No Joy- the fork didn't arrive on time so I won't receive it until Monday

oh well, started reassembling what I could.rearend and seat remounted.jpg5 5 inch crank arm mounted.jpg

having the rear done I could measure out and start construction for the new motor mount
:!: good gravy inflation is strong! U-bolts I purchased in December cost twice as much in March
Notice my super-duper precision measurements for the u-bolt slots, allowing for +/- 3/4 chain linksuper high precision cutting guide.jpg

and finally I don't know how I missed this, but I failed to properly isolate he aluminum motor mounts I'd added to The Hitch, although I used stainless steel screws I forgot to use the plastic isolation pad
nothing my wire wheel brush can't get rid of but I'll have to either re-treat The Hitch, or paint it (thinking canary yellow with more brown primer to help ugli-fy the new trike)The Hitch.jpg
 
another day
more whales to watch
grebes doing their mating rituals
and ddk building his tricycle
sometimes taking one step forward, two steps back

motor mount done (needs end cuts cleanup and painting)
jackshaft mounted (after some surgery on the trike's frame)motor temp mount.jpg
Temporarily mounting the MY1018 found this to be in the waythis thing.jpg
:idea: so a little help from my grinder with a cutting wheel and that thing is like, gone man.gone gone gone.jpg
I successfully mounted the jackshaft and can now trim the axle endsjackshaft temp mounted.jpg
 
I got a new fork, as previously discussed.
The epitome of 1930's high tech engineering, the fork is everything I expected... and less :lol:
Needing some minor modifications, such as fender mounts, side-pull v-brake points and re-drilling side arm supports for clearing the motor's axle, the fork otherwise fits over the front hub motor-equipped wheel effortlessly.

I'm also considering making/having made torque arms. But the fork, constructed of relatively heavy steel tubes should indicate it's possible faults before catastrophic failure i.e I might not bother with the additional work **as he eyes the dropouts on his pink monstrosity's frame**

Assuming the fog will blow over today, I'd love to move all the bike parts/tooling and whatnot outside and off my stove top etc. After which, I shall breakfast. :)
 
still waiting for the rain to clear off
-record amounts of water have fallen/falls causing flooded areas and mudslides cutting off roads and highways (waves @ rassy)

I had an emphany today
I'm inclined to use an inclinometer to control the MY1018 motor, as that IS it's only use; climbing slopes the Aotoma geared front hub motor will fail at.
Tilt switches, not of the mercury type, are inexpensive like, $1.50 :8
- where I only have to design some hysterious logic to create a ramp-up and hold for the MY1018's controller
-end results should be hysterical.

when I retired I promised myself to NEVER get involved with electronics or mechanical endeavors for the rest of my life.
Too easy it is, to break a promise.
-esp. when faced with the fact that what I want, nobody makes.
what I need, nobody cares about
and so on

The sun peeked out for about 20 minutes between storms giving me enough time to make a dash to the store and back on the Emoto.
As soon as I returned, so did the rain.
It's so incredibly windy today that riding a 4% grade downhill found me having to use the motor, otherwise I was stopped in my tracks. downhill. on a tricycle.
I am so bored looking at my contentiously growing mountain of tools and assorted bicycle partstools with fork.jpg
 
supposedly no rain forecast for the next 24 hours
I'll attempt to fit the fork and front wheel to the trike.


just to clear up any misunderstanding of my 'hill assist' (and more likely because I was playing with inkscape (TM) )

I made a poorly made diagram of how it works (might wurk LOL)STOKE THE MONKEY.jpg
 
got the chain on (not in this pic)
currently in 'whipped' mode

I think trike looks pretty kool, until I sii on it reducing the cool factor by 420%
 

Attachments

  • wow kual.jpg
    wow kual.jpg
    61.2 KB · Views: 1,585
2nd, or 3rd wind
finds the whole front motor kit (sans batteries) installed along with the handlebar stuff and the all-important chaindual mirrors.jpgView attachment 2tie strapped.jpgvelcro the best zip tie.jpg
 
another rainy day...
otherwise I would be able to test the trike up our local hills today, as all I've left to do for the temp assembly is add the rear supports (two chunks of wooden 1x4 bolted to the tricycle assembly) for my sbs case to hold the batteries.
Will 8 amps make 'the big dif'?
-at least for today I'll still not know.

btw, the turning radius for the trike is right at 10' or, taken from Sun's specs, the same as a USS whatchamacallit trike.
...what limits the steering is that the fork arms make contact with the head tube LOL.
The suspension actually does 'something' but I'm not sure what the real effect will be until I ride downhill after a storm, crunching over broken branches and misplaced pine cones
 
Rassy said:
Yep, I noticed yesterday that your new fork was going to increase your turning radius. One of the nice things about delta trikes with OS steering is their ability to be turned around in their length.

You can still turn a lot sharper than my tadpole. You'll get used to it. :D
Yep
...just lacks the emoto's 160 degree fork turning (+/-~80 degrees) that gives it a 'quasi' reverse.
The sun broke through after I woke up around 5 PM and I just managed to mount the wood slates and solder up some adapters for the battery connection.
Tossed stuff into my instrumentation case packed with foam.sbs.jpg
The new fork does nothing to abate the trike's miserable handling characteristics, but the fork doesn't make them any worse.

I only had time to perform some quick tests and do a run around the (short) block which made me aware of:
-the funny connector (previously discussed and cussed) is parallel of the controller's off/on switch.
-Can't use 'only' one e-brake switch... have to use both or none or the controller won't power the motor
-indeed this motor/controller combination effortlessly approaches 20 mph , maybe more... not sure if I'm comfortable with that with this miserably-handling trike.mo rain soon.jpg

next sunny day: me and the trike takes a trip to check my mail via a ~500' long 15% grade
...backup plan is to use the 1/4 mile long 8% grade, as the emoto has no problems with that one with me pedaling and I can already tell that the trike's motor/controller is more powerful (note that both trikes use essentially the same motor)twins.jpg
 
stuupid schtupid me I need front brakes

...so I rode the trike over to visit my friend (also my mechanic for my MH)
He builds hot rods and sand rails in between the times he has to wait for repair parts delivery. Pretty handy with the metal work.
I should take pictures of his current projects (I never remember to pocket my camera)

any ways he didn't think it would be right to ruin the look of the front fork by brazing on the stuff needed for either caliper or disc brakes
...so off to the webbys we surf...
finding this piece.front brake for bent fork.jpg


on a different note I drink crystal light in loo of diet pop as advised by my health support people.
whilst packing up 5S 20C batteries I noticed that one pack fits nicely into a crystal light container
 
well, this sux

the thumb throttle, like all thumb throttles I've had the displeasure of owning, is already failing i.e getting sticky and operating intermittently.

It just must be me or sumtin'

shakedown baby!
rode the dreaded mail run and the results are... about what I expected:

-some important nuts failed to stay on their respective bolts
-the fork almost fell apart (see above)
-the thumb throttle started getting sticky and intermittent
-Using the front hub motor and my feats, I barely managed the 15% slope with maximum effort on my part in 5th gear, after which the thumb throttle did it's thing forcing my limp home.
-Apparently I failed to adequately tighten the left pedal to the crank arm, as it almost unscrewed itself from it's special place. (a bad thing to have happen when you're being forced to pedal because your throttle has failed it's assigned task)

as stated before,
the frivolity never ends.
 
I must be lucky. Of the ones I've used so far, I had no problems except for one I broke apart physically from repeated knockovers on the bike. The only times I recall that I've ever had stickiness, it's been caused by brake or shifter controls rubbign on the throttle, by mistakenly positioning them against it, or controls or other things (fairings, on DGA) having loose hardware letting them move in use and then rub.

I did run into a problem with a half-grip when I put it too far up the bend in a curved handlebar, so that it caused the core to bend, and rub against the inside of the rotating part, and stick. Easily fixed by moving it back to teh straight part of the bars.
 
amberwolf said:
I must be lucky. Of the ones I've used so far, I had no problems except for one I broke apart physically from repeated knockovers on the bike. The only times I recall that I've ever had stickiness, it's been caused by brake or shifter controls rubbign on the throttle, by mistakenly positioning them against it, or controls or other things (fairings, on DGA) having loose hardware letting them move in use and then rub.

I did run into a problem with a half-grip when I put it too far up the bend in a curved handlebar, so that it caused the core to bend, and rub against the inside of the rotating part, and stick. Easily fixed by moving it back to teh straight part of the bars.
thanks for the reply
the thumb throttle sits between the brake handle and the grip, none of which rubs against the other...

it must just be my *specious* powers of fail
-at least I be lucky with LiPo

speaking of LiPo:
recharging my batteries showed less than an amp used (938ma replaced) after the two mile ride that included the 15% hill climb. @ 36V you can do the math for watts up (Mr Rogers voice "sure ya can") 10S for '36'V initially charged to 41.5 volts
final resting voltage of 39.5 volts

Next on my agenda:
beside waiting for a shipment of 4 each 5S20C Turnigy LiPo packs...
it's time to build the 'dashboard', which will contain the front motor's controller and batteries along with the batteries respective chargers and volt meters. Also in the dash will be the chargers for the MY1018 batteries, although said batteries will be located in the lower part of the fame, closer to my rear end, yet forward it's massive weight. (my rear end's massive weight)
too the bat cave!!!!
 
Back
Top