
You are using an out of date browser. It may not display this or other websites correctly.
You should upgrade or use an alternative browser.
You should upgrade or use an alternative browser.
new cyclone 3000 w mid-drive kit?
- Thread starter emaayan
- Start date
DingusMcGee
100 kW
Skaiwerd,
Hello
No, I have not tried a thumb throttle.
Have you tried a thumb throttle while riding on dense cobbles?
Let's not oversimplify this problem. When your thumb is pushing on a throttle tab it cannot be used to grip around the bar. Wrapping your thumb around the handlebar keeps you hand on the bar much better than gripping the bar with only your fingers. This is rough terrain I am riding. I feel keeping a good grip on the handlebar is quite important.
I do not see thumb throttles on any trail motor cycles. Snowmobile yes, but they travel on a more forgiving media than motorcycles on cobbles.
I see Luna Cycles sells a plug and play thumb grip for $25.
http://lunacycle.com/parts/cyclone-parts/oro-right-thumb-throttle-for-cyclone-drive-with-power-switch-and-led/
Hello
Any thoughts of trying a thumb throttle?
No, I have not tried a thumb throttle.
Have you tried a thumb throttle while riding on dense cobbles?
Let's not oversimplify this problem. When your thumb is pushing on a throttle tab it cannot be used to grip around the bar. Wrapping your thumb around the handlebar keeps you hand on the bar much better than gripping the bar with only your fingers. This is rough terrain I am riding. I feel keeping a good grip on the handlebar is quite important.
I do not see thumb throttles on any trail motor cycles. Snowmobile yes, but they travel on a more forgiving media than motorcycles on cobbles.
I see Luna Cycles sells a plug and play thumb grip for $25.
http://lunacycle.com/parts/cyclone-parts/oro-right-thumb-throttle-for-cyclone-drive-with-power-switch-and-led/
Phife
10 W
I use a thumb throttle, I really like it, and I get to keep my nice looking, comfy grips. I have no trouble holding on to the handle bar, don't let that scare you. I ride single track, downhill, rocks and rough trails all the time.
Lots Quads and ATVs use thumb throttles, no problem there either. Twist throttle can be very dangerous. How many videos have I seen where someone is learning to ride a motorcycle and they fall off the bike but still hold on to the handlebars causing the bike to rocket away.
Also, bumps and body movement dont cause as much variation in throttle input as your hand is fixed to a the solid non-rotating bar.
Phife
10 W
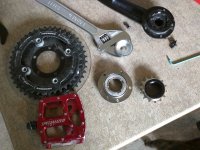
Some info for people wanting to upgrade their freewheels with the Sickbikeparts freewheels. I got the Ultra heavy duty freewheel for the crank and the heavy duty freewheel for the motor. Some things I learned that will save you guys some headaches.
Make sure to order the freewheel removal tool and a new 20mm freewheel adapter for the motor. The freewheel removal tool is needed to remove the stock freewheel from the cranks, and I cant get the stock freewheel off the motor adapter as its on there damn good. I recommend just buying a new one and saving yourself the headache. I have to wait another week before I can replace the motor freewheel as I did not order a new adapter.
The Ultra Heavy duty free wheel for the crank is very expensive, but I figured it would last forever. It sure does look feel and work much better than the stock one (which started to fail on me after like 100km). I was able to get the crank arm off the stock freewheel with a ton of effort, a long wrench, the removal tool and a bench vice. If you dont have a stable bench vice then maybe just buy a new crank arm too. Only other issue with UHD freewheel is that the 5 holes for attaching the chainring are not threaded like the stock ones are. You will need to purchase 5-M5 nuts and loctite them in place.
oh..Teh Pictures of my 3d printed mount, this time in red! So far its holding up, still more testing to do, then tear it down to look for any deformation, damage or wear.
Attachments
DingusMcGee
100 kW
Phife,
I said a field of cobbles. No way to steer around them like about 99% of what one can do on most downhill, rocks and rough trails all the time. Just about all of so called trail riding I see in the posted videos is nothing in roughness compared to riding uphill on a field of cobbles. You have to keep the throttle very constant. Not so on downhill as you don't need the continuous power. If you lose power on cobbles with an ebike while going uphill, your ride may be done as it can be quite hard to get started.
On trail motorcycle the 14" of suspension eases the forcing function on your elbows.
Try riding uphill on field of cobbles.
And once you become a cobble riding master you will not be saying I ride rough trails all time as you will not need trails.
FYI a motorcycle has a lot more power than an ebike to speed through cobbles. Ever wonder why they don't use thumb throttles despite you say they are dangerous?
I ride single track, downhill, rocks and rough trails all the time.
I said a field of cobbles. No way to steer around them like about 99% of what one can do on most downhill, rocks and rough trails all the time. Just about all of so called trail riding I see in the posted videos is nothing in roughness compared to riding uphill on a field of cobbles. You have to keep the throttle very constant. Not so on downhill as you don't need the continuous power. If you lose power on cobbles with an ebike while going uphill, your ride may be done as it can be quite hard to get started.
On trail motorcycle the 14" of suspension eases the forcing function on your elbows.
Try riding uphill on field of cobbles.
And once you become a cobble riding master you will not be saying I ride rough trails all time as you will not need trails.
FYI a motorcycle has a lot more power than an ebike to speed through cobbles. Ever wonder why they don't use thumb throttles despite you say they are dangerous?
DingusMcGee
100 kW
Go PAS and ditch the throttle all together?
Riding Cobbles requires some back spinning of the crank with careful timing to see-saw when you get a chance to maneuver with this tactic, but that would mean no power for this interval with a PAS which is not good for an uphill success trial. I have my doubts as to how well this would work. Also I have never hooked up the PAS -- too European for me.
It seems it would be quite difficult to get the crank synchronized with the openings that the petals need for clearance.
juanfeli
100 W
Speaking of kind of throttles. Does somebody have connected other throttle different than a Cyclone to the Cyclone controller?
If so, can you please share how you did it?
@Dingus, give the Thumb T a try. You'd be surprised about the grip.
If so, can you please share how you did it?
@Dingus, give the Thumb T a try. You'd be surprised about the grip.
le15otl
100 W
A throttle with cruise control can help on bumpy terrain, but it's not safe. Needed to train myself to disengage it super fast
le15otl
100 W
I have briefly tried it with my em3ev thorttle. I think any type should work as long as the on/off wire is connected right,
juanfeli
100 W
I already did it, if by the red cable you mean on/off but it doesn’t work.
There is a red cable, but I think that is more to read the voltage in the Cyclone throttle. It goes to the hall sensor connector. The Hall sensor connector also has an additional gren-yellow cable connected to the black negative. I think that that could be the switch.
Any ideas how to try it?
Have in mind that even though I have a multimeter, I have no idea how to use it.
Attachments

le15otl
100 W
The red wire has to connect with the main battery positive but I can't remember where the battery voltage wires go. And the 3 throttle wires on the controller red black and green can be connected to any 5v throttle. (red being positive 5v, black being ground, and green being the throttle signal)
It's hard to describe from the picture
Edit
I'm not using the cyclone controller and throttle anymore so maybe someone else is better helping
It's hard to describe from the picture
Edit
I'm not using the cyclone controller and throttle anymore so maybe someone else is better helping
dirkdiggler
10 kW
- Joined
- Oct 17, 2012
- Messages
- 641
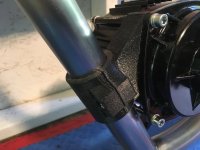
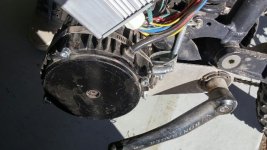
I'd like to see some mods for chains dropping. I've noticed the pinion gear or motor shaft slides in and out a few millimeters on my kit and I think this causes my chain drops. I had three last ride I was on. Pissed me off. I also notice a bit of angle on the motor now where the sprocket side is closer to the cranks than on the left side. If I crank the throttle hard while holding the bike I can see distortion of the motor towards the rear. I tried watching for when the chain dropped, but it never happened while watching it. It usually happens on steep uphill rocky sections, never had it happen on downhill or flats. I might just go back to pedal-less if I can't get it worked out. I find the pedals are absolutely pointless on this kit, except for a few downhill sections.
This kit is still awesome from a value perspective. 3kw for $400 is amazing, not to mention the light weight.
This kit is still awesome from a value perspective. 3kw for $400 is amazing, not to mention the light weight.
DingusMcGee
100 kW
A throttle with cruise control can help on bumpy terrain, but it's not safe. Needed to train myself to disengage it super fast
Yes, a low cruise control speed can often work on a series of bumps. My CA3 when cruise control is activated will automatically disengage cruise control if the ebrakes are applied or the throttle advanced. I usually ride steep trail with the ebrake motor stop wires disconnected so I can start on steep hill without rolling backward. Disconnecting the ebrake stop feature means that to stop cruise control activation your only choice is to accelerate which is not exactly what you need.
juanfeli,
@Dingus, give the Thumb T a try. You'd be surprised about the grip.
Maybe on next order from Luna
juanfeli
100 W
I haven’t have problems with chain drops. The upgrade would be narrowide chainring or a derailleur with clutch (or both). Like shadow for Shimano.
What size of chainring were you using before and what size are you using now with the Cyclone?
What size of chainring were you using before and what size are you using now with the Cyclone?
DingusMcGee
100 kW
dirkdiggler,
with all the play you are seeing I suggest stiffening the motor frame/motor mount and possibly getting a tight bearinged front freewheel [the one on the crank].
And possibly some mechanical realignment of the motor gear/ crank sprocket plane. This alignment can be checked with a straight edge.
with all the play you are seeing I suggest stiffening the motor frame/motor mount and possibly getting a tight bearinged front freewheel [the one on the crank].
And possibly some mechanical realignment of the motor gear/ crank sprocket plane. This alignment can be checked with a straight edge.
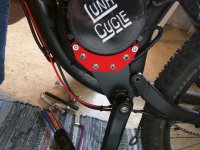
I didn't bother with the stock motor mount from the start. Picked up the LA ebike mount. Side plates are the same thickness as stock 3 and 5 mm, but 4 screws each not 2. But the solid chunk of aluminum makes for a solid mount for sure. It's pricey but, I know when I can't do better vs. time trying, have other things to do, you know. So I feel it was worth it. I's a bild in progress so i'll have more to report later. I have the room and I hope I can pull off this lay down low motor mounting position. It's inside the chain that powers the rear but there is room so the chains don't touch. Does anyone know how the brake switches work/install on the are sold for the cyclone? The ones that you can add to your existing brakes and Luna sells them, plug right in etc,. Unable to find much info on them.
Forgive me if the pictures don't post.
Rob
Forgive me if the pictures don't post.
Rob
Attachments
juanfeli
100 W
nice!
spinningmagnets
100 TW
Does anyone know how the brake switches work
I have seen reed switches used on occasion, but....most E-brakes that people would actually buy use Hall sensors and a magnet. The plug pins and wire colors vary from one manufacturer to another, but it shouldn't be too hard to figure out which wire does what. A 5V signal goes to the brake handle where it dead-ends. When the handle is moved, the magnet actuates the hall sensor, either by moving farther away, or by moving closer (they can be either "normally open" circuit, closed on actuation, or...."normally closed" circuit, and open on actuation)
When the brake handle is moved, the 5V signal goes back to the controller. Maybe one wire is a ground?
I believe most "gear-shift power-interrupt" sensors work this way too. By paralleling the E-brake circuit. The power-cut in the controller doesn't care if the 5V signal comes from a gear-shift power-interrupt, or from an E-brake. Of course, there are many more ways that they "could" do this.
If you have a DMM with sharp needle probes, you can poke through the wire insulation and look for the 5V signal when the energized E-brake is actuated.
DingusMcGee
100 kW
Here are some pics of ebrake switches I have made mountings for:

View attachment 6


View attachment 2

the micro switch is my favorite. It is easy to see its operation range and visually adjust it by bending the contacting lever. The magnets of the magnetic switches are more difficult to set up as different magnets need closer/farther coupling to work. You will want a continuity tester before attaching the 2 parts. Also the magnets can get bumped off as the glues don't hold them on alum very well. The strong niobium magnets are about impossible to drill thru -- cobalt bits don't cut it. So fastening with a screw is not likely.
the micro switches are fastened with #4 x 40 ss screws. Drill taping hole with #44 drill bit to give the most holding power in alum.
View attachment 6
View attachment 2
the micro switch is my favorite. It is easy to see its operation range and visually adjust it by bending the contacting lever. The magnets of the magnetic switches are more difficult to set up as different magnets need closer/farther coupling to work. You will want a continuity tester before attaching the 2 parts. Also the magnets can get bumped off as the glues don't hold them on alum very well. The strong niobium magnets are about impossible to drill thru -- cobalt bits don't cut it. So fastening with a screw is not likely.
the micro switches are fastened with #4 x 40 ss screws. Drill taping hole with #44 drill bit to give the most holding power in alum.
Thanks to...
spinningmagnets & DingusMcGee for the input.
Upon looking closer at the product photo from Luna it appears the magnets have holes in them. The holes looks too small for a screw so I was thinking the hole may be to pass the brake cable through it. The other part is a plug in wire to the cyclone controller with a sensor to pick up the signal from the magnet, just a guess for now. Trying to stay non DIY by adding my own micro switches etc. The switches should arrive to me soon from Luna so i'm looking for how to mount this stuff basically. I'm sure I'll figure kit out, but any information from someone who would share what they know about them would be a big help to give me some direction. This would be the type where you can keep your existing brake levers, for thouse who don't know what I mean.
Rob
juanfeli
100 W
This is how I did it.
RageNR
100 W
- Joined
- May 23, 2016
- Messages
- 216
I really dislike the magnetic reed switches. Seen so many of them fail. Then again, most the ones I've replaced were in commercial equipment that sees harsh conditions on the regular. Then there is the issue of not being able to see what the switch is doing without a testing tool (multimeter).
Feel much safer with a long arm micro switch. You can see its function, and pretty easy to tell if it is working or not. The tactile click it gives is undeniable.
Just my preference. Reed switches are usually water resistant, so that is a benefit over the microswitch.
Also... Please be careful with those magnets. Especially the ones with holes in them. They have a tendency to crack and fall apart. The smaller the magnet, the more prone to cracking. You could be in the middle of a descent and not notice it broke and fell away. Might be too late once you notice.
For either setup, it would be most ideal to have it protected. A branch or road debris could whack it and put you in a bad position without knowing.
Just be careful out there.
DingusMcGee
100 kW
RageNR,
good summary of the 2 switch options. The magnets with holes in them have cracked on me also.
How much protection? I have added a silicone RTV covering over the exposed electrical connections and have not got salt water contamination [since] which leads to a short circuit -- the ebrake switch on all the time. A fresh water rinse [and rain] has not given me any short circuits. But maybe some corrosion? The switches are quite cheap and for my setups they are easy to replace.
Snow has gotten packed along side the lever when crashing with the fat bike on deep snow rides. The CAv3 indicated the brakes were on but I did not have my hands on the levers -- my first trouble shooting routine action is to glance at the CA brake on indicator zone when the throttle fails to turn the motor.
The only covering protection I have added to my micro switches is the silicone treatment --- They are all still working. But I do not ride thru branches/
I have mounted several sets on hydraulic brakes. Choosing the switch location for them is quite though provoking since you do not want to drill into the oil reservoir and some of the metal near the bake handle pivot seems quite thin -- but 4 revolutions of threads -- about the height of standard #4 x 40 nut will hold the switch quite well. Often I have had to mount a stud in the brake handle to put some brake lever action in the same plane as the switch action lever. If you glue the micro switch to the brake lever fame, which is much easier to install than taping the frame for screws, replacing it may be more difficult than one screwed to the brake lever frame. ???
On Second Thought -- maybe some 3M double faced surface mount tape [super mount tape?] is adequate and easier than taping threads for installation as my reed pickup switch is held in place with such tape. And it occasionally gets knocked off but I have yet to replace the tape as it has always re-adhered. Depending on witch way you connect some reed proximity switches[ON when magnet close or ON when magnet far away], if you loose the magnet in the woods on a ride it may very hard to find the magnet and you will just have to disconnect the ebrake connection.
good summary of the 2 switch options. The magnets with holes in them have cracked on me also.
For either setup, it would be most ideal to have it protected.
How much protection? I have added a silicone RTV covering over the exposed electrical connections and have not got salt water contamination [since] which leads to a short circuit -- the ebrake switch on all the time. A fresh water rinse [and rain] has not given me any short circuits. But maybe some corrosion? The switches are quite cheap and for my setups they are easy to replace.
Snow has gotten packed along side the lever when crashing with the fat bike on deep snow rides. The CAv3 indicated the brakes were on but I did not have my hands on the levers -- my first trouble shooting routine action is to glance at the CA brake on indicator zone when the throttle fails to turn the motor.
The only covering protection I have added to my micro switches is the silicone treatment --- They are all still working. But I do not ride thru branches/
I have mounted several sets on hydraulic brakes. Choosing the switch location for them is quite though provoking since you do not want to drill into the oil reservoir and some of the metal near the bake handle pivot seems quite thin -- but 4 revolutions of threads -- about the height of standard #4 x 40 nut will hold the switch quite well. Often I have had to mount a stud in the brake handle to put some brake lever action in the same plane as the switch action lever. If you glue the micro switch to the brake lever fame, which is much easier to install than taping the frame for screws, replacing it may be more difficult than one screwed to the brake lever frame. ???
On Second Thought -- maybe some 3M double faced surface mount tape [super mount tape?] is adequate and easier than taping threads for installation as my reed pickup switch is held in place with such tape. And it occasionally gets knocked off but I have yet to replace the tape as it has always re-adhered. Depending on witch way you connect some reed proximity switches[ON when magnet close or ON when magnet far away], if you loose the magnet in the woods on a ride it may very hard to find the magnet and you will just have to disconnect the ebrake connection.
dirkdiggler
10 kW
- Joined
- Oct 17, 2012
- Messages
- 641
I've never understood the importance of ebrakes when you have hydraulics and a mid drive. Yes I do with a hub motor, but all that hassle to stop the mid drive motor when it's on a freewheel?
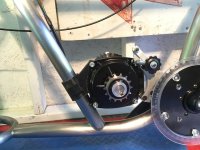
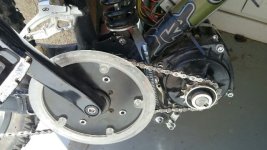
I got a ride in with no chain drops today. Very nice. I moved the chain tensioner closer to the crank and added 2 hose clamps. One clamp around the motor and the other around my c clamp on the frame. Don't know which helped more, but I don't see the motor move at all upon hard acceleration. Hopefully just get a custom mount made in the future to eliminate any movement. Just trying to get all the kinks out before that.
Hope to finally try out 60v next ride. Motor has been getting hot on the 5 mile uphill at 15 mph, that's on 48v pulling 2000w.
Here are pics - need to clean up wiring also!
Attachments
Similar threads
- Replies
- 3
- Views
- 363
- Replies
- 5
- Views
- 1,242
- Replies
- 4
- Views
- 1,488
- Replies
- 1
- Views
- 2,104
- Replies
- 12
- Views
- 2,143