New Giant DH Team/Cromotor build thread

Hey Scott, you said earlier that you thought that a 3.5" tire would not fit in the 135mm swing arm. Is this based on an actual measurement? Th reason I ask is that, since I don't have a 150mm swing arm, I have been forced to just look at pictures for comparison. It seemed to me that the front portion of the swing arm in the 150mm was unchanged and was only modified by the s-curve in the stays on the disk side. Now, with my swing arm in the shop, I can't even measure my 135mm swing-arm. I'm interested because I just found an interesting tire here:
http://www.veerubber.co.th/2013/?p=1834&cur-cat=bicycle

I had not heard of this company before but they have some very interesting tires in both the bicycle sizes and the moto sizes. Even fat bike tires! Give me a look. Obiwan
 
Obiwan007 said:
Hey Scott, you said earlier that you thought that a 3.5" tire would not fit in the 135mm swing arm. Is this based on an actual measurement?

I highly doubt 3.5 inch will fit. 3 and 3/8 inch appears to be the distance at which the tire would perfectly rub the sides of the swing arm. The welds are in the way and if they were taken off you might be able to fit a 3.5 inch tire.
The picture is an allusion, the real distance is right at the top of the swing arm where it meets the ruler not the bottom of the swing arm that just "appears" to be closer together.
 
Wile sitting on my hands waiting for the swing-arm modification to be done, I found some make-work to do. The brake disk flip modification that I did puts the disk adapter as the outermost surface from which the wires will exit. The ever-troublesome inside radius of the disk itself now sits well back past the plastic protector. The inside corner of the disk adapter however does have a not-smooth corner on it. So I spent some time putting a nice little radius on it:
image.jpg

Then I sanded it smooth and polished it up for a nice smooth escapement:
image.jpg

I would have liked to make it a little bigger radius but that would have gotten into the edges of the disk bolt holes creating more sharp edges. As it is I will be making certain that the wires don't contact it at all. But if, down the line, something goes amiss it would have to rub a pretty long time before it caused a problem.
 

Attachments

  • image.jpg
    image.jpg
    37.6 KB · Views: 2,278
Oh the injustice of it all. No sooner do I get my swing arm modified and I find this bike on Craigslist pretty close to me:
image.jpg
Never fails...but wait! After making contact with the guy it turns out that this is a reverse hybrid DH Team. He had the bike frame factory replaced after he crashed it hard. Apparently they replaced the front half with a new style frame (note the down-swept top tube) but retained the old 135mm swing arm. So it would not have worked anyway. I would have bought it if it was the 150mm swing arm. On that note, I got notification that my modified swing-arm is complete and ready for pick up. I,ll drive up and get it on Sunday. He has promised some pics in the interim so when I get em, you'll get em. He says it came out really good. I,ll Report on that later when I get it back and further when I use it for a while and put it through its paces. He said to report for others that may want to get this mod done that the charge will be $190.00 plus shipping but that he will do it for $150.00 plus shipping if the affected joints are bead blasted clean before he gets it. I think I remember moonshine said he paid $260.00 plus shipping for a new replacement swing arm from Giant back when they still had some, so that's about $100.00 cheaper to get a usable Cromotor-ready swing arm. On the advice of others I had him take it out to 155mm to compensate for the lost 5mm from the Kiwi TA adapters. Some of the techniques he used sounded cool but I will wait to report on those after I can inspect it. Obiwan
 
Got a couple of poor quality pictures back form the welder. Here:
image.jpg
image.jpg
image.jpg

From what I see so far the welds look superb. He said he took careful measurements and confirmed that the drop-out slots are parallel to the bottom bracket shell in both the verticle and horizontal planes and that the drop outs-are co-planar to each other and exactly 150mm with the TAs installed. Got a powder coat shop all set up to do the repainting when I get it back. I'm thinking about having the mainframe done at the same time if the cost isn't much more. Any thoughts on a color scheme? Keep in mind that the side panels for the battery box are black anodized.
 
Got the swing arm back from the welder and to my eye it looks great! Here are some pics:
image.jpg
This is the modified swing arm compared to the this photo of before:
image.jpg
Now it's right at 155mm to the drop-out faces.
image.jpg
He explained that each of the joints that he moved had the welds ground off and then under heat were opened to the right distance then a wedge of the same material was inserted into the gap which was then re-welded. This as opposed to simply filling the gap with welding material. This is the method he uses when making air frame repairs. Oh yeah, I forgot to mention that this welders day job is air frame repair for a major air line. Here are some of the welds before I got it stripped and dropped it off at the powder coat shop.
image.jpg
image.jpg
image.jpg
Stripping cost $25.00 and powder is going to be $150.00. More later when I get it back. Obiwan
 
So while I have been waiting for the swing-arm to come back from the powder coating shop I got to work finishing up the side panels. If you have read this thread you know why I am on my second set of these. I could not bring myself to take them back to the anodizing shop and risk getting them ruined again even though they were going to do it for free. So I changed direction and used some of the mock carbon fiber vinyl material and then put some vinyl graphics on top of that. Here:
image.jpg
image.jpg

On the back side I attached some aluminum angle with DP 460 and backed this up with some ferrous metal tabs:
image.jpg
image.jpg
Then on the back panel I attached some strong rare earth magnets:
View attachment 2
This panel covers a space that will house my charging wires so it will be nice to be able to easily pop it off and on. On the bike it all looks like this:
View attachment 1

I'm pretty happy with how it looks. I may get another set of the graphics and add one more object down below. Only thing left to do is get some thinner foam to bond to the inner wall of the panels to take up the space between the edge of the foam and the edge of the aluminum chanel that everything sits in. After that addition everything should be ultra secure. Should get the swing arm tomorrow then I can start getting everything buttoned up. Still waiting on the spokes to lace the wheel (couldn't order them until I knew the final dimensions of the swing-arm). Really want to have this bike ready for our trip later this month to the mendocino coast. Great riding there. Obiwan
 
Got the swing-arm back from the powder coat shop today and I'm pretty damn happy with how it looks. The color is spot-on for a match to the rest of the frame. The process necessary to get this color requires it to be powder coated in chrome color first:
image.jpg
Then a transparent color over the top and a second bake:
image.jpg
Had them do my Kiwi TA adapters too:
image.jpg
Bolted right up no problem:

Now spokes and lacing and final assembly Woooohoo!
 
Been on a marathon build streak to try to get this done before a bike trip to the coast. Came down to the wire but it's running now and it's Great!! Still got lots of little details and fettiling to do but it's running good and solid. Here it is?
image.jpg
image.jpg
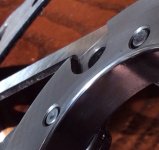
Here is the inverted disk modification I did with the disk on the inside of the disk adapter rather than on the outside a spacer between the disk and the motor cover was necessary to clear the bolt heads. The caliper was about .5mm from the hub at that point and I had to put one extra washer between the caliper and the adapter to get the caliper high enough to give the 2mm of clearance you can see here.
image.jpg
You can also see the the aluminum spacer between the brake mounts and the adapter that allowed alignment after the swing-arm widening modification. The brakes are very solid, responsive, and more than strong enough to lock em up easily on asphalt. Here is the three speed freewheel. The chain clears fine but I am still trying to find an adjustment that will prevent the arm from touching the hub cover when it is on the top cog.
image.jpg
Here is the "dash board" arrangement. Still need to figure out how to connect the cruise control unit, this controller did not have a wire for it like my last one. The plug on the end of the cruise control unit that I got from Lyen has some weird multi-plug arrangement that I don't understand.
image.jpg
As for the modified swing-arm, I could not be happier. The actual drop-out width is 155mm the Kiwi TA eats up 5mm so the actual width is 150mm WITH the TA and I would say that this just about perfect. Everything fit nicely. I laced my own rear wheel. A fact that I am inordinately proud of. It is on a 26" sun double wide rim and I am using WTB Wierwolf 2.5 tires for now. Got the spoke length pretty close for my first try. After tensioning it up I had to add 4mm of dish to get the tire dead center. This picture shows the side-to-side symmetry.
View attachment 1
The picture makes it look like the tires are touching on the sides but here is a different angle showing the clearance.

Lots of room! With this much clearance I could easily fit a 3.5" tire (if one existed for bicycle rims).
I went 40mph right out of the box after setting up the CA V3. It does not have scary low end torque yet but it's only drawing 38 amps from a dead stop on level ground so I suspect that the controller needs to be flashed. Any recommendations for controller settings? My arrangement is 18s2p 16Ah, V2 Cromotor, 18 fet Lyen controller with double beefed traces, 26" wheels and a CA V3. How important do you all think it is to upgrade to the latest version of the CA firmware? I'm sitting at v22 now. I guess I'm going to have to get a cable from Grin. Still have to do some sheet metal work to get the rear battery box panel to fit properly and figure out how to cover up the wire bundle at the front of the controller and...oh....several dozen other things. Only been on quick little test rides and then had to go to work for two days straight. Taking it up to Mendocino coast for a few day starting tomorrow though so I'll get to see how it does on longer rides. Obiwan
 
Thanks Luis, for me the construction phase is almost as much fun as the riding so the end of a project is both bitter and sweet...mostly sweet though. As soon as I get this one buttoned up completely I will start in on modifying my last build to fit my wife properly and we will finally be able to go on trail rides together.
 
Nice job!

Thats a very high quality bike, If I was starting over on my battery box I would do the same thing you did. I absolutely love that type of blue that your bike is painted. At first I did not like my black bike but i'm getting more used to it and learning to like it more. If I ever paint my bike I will paint it the color yours is. Depending on how much it cost I might at least get the swing arm painted over the summer when I switch it out with my 135mm one to go DHing. It almost looks like your drop out adaptors are part of the frame since they are painted. Thats good that your wheel ended up working out. Is the tire tilted at all since you had to dish it some?

Do you have a GoPro? I would really like to see some video of your bike in action!
 
Thanks Scott for the nice words. I wanted to say that almost every issue you mentioned in your first post her turned out to be true. I had to find was to deal with them all along the way. The powder coat was pricey and could have been even more except they just happened to to have nearly the exact color in stock. The stripping was another cost on top of that but I later learned that many have done their own stripping with permatex gasket stripper. So some savings could be had there. I'm not sure that doing the whole frame would be too much more though. Most of the costs are in the set up I gather. No tilt on the tire and the dish is little enough that it is barely perceptible unless you look at just the right angle. I used this spoke calculator http://kstoerz.com/freespoke/fullcalc which allows you to specify an offset. I worked out great, I recommend it. I think I will ultimately end up with some wider tires but I'm going to ride it like this for a while. I'll get some more detailed photos and a final report up in a few weeks with contact info for both the battery box and the swing-arm technicians for any one who needs tier services. Obiwan
 
Merlin said:
oh that look really nice..
can you give me that Color Number ?
It looks not like a RAL Number?!

Merlin, sorry it took so long to get back to you on this one but I went by the powder coat shop today and the color used here is called jollypop blue they said that there is no number but that it is a two stage color that needs a reflective base coat, hope this helps. Obiwan
 
Added a few new pics to the first post of this thread. Thought I should give an update. Been working on a few remaining issues. First got the deraileur to not hit the motor when I move it in far enough to get onto the big gear, but now the chain rubs when shifting to that gear. Arghh! I'll likely shim the freewheel out a bit more to see if I can get it to work. Techlectik, the saint, walked me through getting the Lyen style cruise control working in conjunction with my CA V3. It works great but took some messing with, email me if you want a copy of the schematic. I just got a new 600 lb. spring for my rear shock that I will soon install. Three separate people (one of which was me) have crashed it so far and boy is it ever tough. No damage at all. Been tuning in some settings in the CA and playing with the suspension settings. Other than these items it is just about right where I want it and I could not be happier. I figure my total build cost was about $2700.00. I'm helping a neighbor build a bike from scratch now and I have had a few requests now to build bikes for others. I may just do one soon just to have another project on the bench. But for now, I'm just having fun riding and getting used to this level of power and speed. Thanks to all of you who helped me along the way, you're a great and generous group. Obiwan
 
Thanks for posting all this information, what a world of help! It's fun to read about too.

How are those welds holding up!? :)

I have a DH team sitting here, waiting for a 150mm dropout and Cromotor. If you have contact information for your frame welding men, I'd sure love to jump on that! As would others, I'm sure. :D
 
No problem metallover. The swing arm welds are perfect still. While I have yet to take it off any big drops, I have not babied it either and have done a few jumps and have hit some pretty good pot holes at speed. So I think it is as good the original for strength and durability. Contact information for the welder is as follows:

Rob Colcord
(775)750-7676
1200 S. Rock Blv. #8
Sparks, Nevada 89431
rfncl@sbcglobal.net

Please tell him that Tim O'Brien referred you to him and pass along my regards. Please keep us all updated on your project. We all learn from each other. Obiwan
 
Couple things I forgot to remark on in the previous post; the name of the welding business is "Quality Heliarc". Also I highly recommend widening your swing arm to 155 or 160mm if you are going for a Cromotor build. Mine went to 155 and I had no problems at all in relation to crank arm clearance. Obiwan
 
I'd like to follow your thread when you start metallover. Please put a heads up on this thread when you start so I will be reminded when you start and I will subscribe. I will likely be able to offer plenty of help. Obiwan
 
Back
Top