Nexus 3 conversion from coaster brake to disc

John in CR

100 TW
Joined
May 19, 2008
Messages
14,954
Location
Paradise
I converted one of my Nexus 3 geared hubs with coaster brake to add a 203mm disc rotor.

Here's what I started with.
View attachment 2

I removed the torque arm for the coaster and drilled 9 holes in the spoke flange for the bolts. At a greater radius than normal disc rotor attachments and nine 3mm bolts instead of the normal 6, I think the bolts will hold up. I thought 18 would weaken the flange too much.
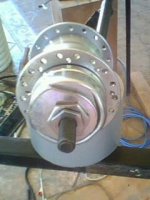
Nexus3 disk brake mod 9 holes in Nexus.jpg

Then I fabricated an adapter that leaves space for the spokes, and for simplicity I just welded the rotor to the adapter. The housing on the hub doesn't spin, so the adapter fits over it without touching. That housing is a larger diameter than the standard bolt pattern, so normal attachment of the disc was out. I was originally planning to bolt the disk on, so due to material thickness and space constraints, the holes in the adapter are threaded and don't go all the way through.
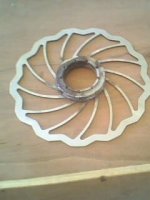
Nexus3 disk brake mod 203mm rotor with diy adapter.jpg
 
Here's what it looks like mounted up. Note that it will have to go on after the spokes. I'm sure it would be pretty difficult to get the bolts in with the wheel all laced up, so I'll get the spokes and put them in on that left side, mount the disk, and bring it to the LBS to finish up the lacing job. There's a ring of space between the adapter and the spoke flange so the spokes can move to orient them properly for lacing. I didn't have enough material to leave space to install the spokes after the disc is mounted.

Nexus3 disk brake mod space for spokes.jpg

I think having no bolts on the outside will look better once I grind it all nice and clean with the dremel, and add a bit of high temp paint to make Aussie Jester happy, but definitely not pink/magenta.
Nexus3 disk brake mod mounted outside.jpg
 
Consider starting yourself a business with that hub. The cost of a disk compatible, 8 speed Alfine hub (or a Sturmey Archer equivalent) is still very high.
 
I thank you for this thread and pics--it's essentially what I want to do with the 3-speeds I have for my trike; it's nice to see that it shouldn't be too hard to actually do. :)
 
re: starting a business converting 3 speeds to disc

You can buy a 3 speed disc compatible Shimano. Nexus Inter-3 disc

But if you already have something, nothing wrong with converting it. :)
 
Definitely no business opportunity here, since it's just for those of us stuck with a coaster brake hub we want to power with a motor. If the Nexus 3 holds up well to significant power, I'll need to make a second adapter for my other hub, so I might be coaxed into making some extras at cost and include the drill bits, tap, and bolts, so someone can do the same themselves with only a drill and a dremel. The dremel with a metal cutoff disc would be to enlarge the center hole of the disc rotor to fit over the hub. Next time I'll just bolt the 3 galvanized washers together that form the base material of the adapter, so no ugly welds or finish work required.

John
 
does the coaster brakes still work on that hub or is it just disabled and not working at all. i wish i thought of making an adapter like that for my chainring for my 3-speed hub instead of just throwing it on there...lol. it looks really good john. :mrgreen:
 
def215 said:
does the coaster brakes still work on that hub or is it just disabled and not working at all. i wish i thought of making an adapter like that for my chainring for my 3-speed hub instead of just throwing it on there...lol. it looks really good john. :mrgreen:

I didn't do anything to the coaster brake except that I had to cut off the brake torque arm to fit the adapter. Before the 3 washers that form the adapter where welded together they went on one at a time over the arm. With the bolt together washers, my other one will keep the hub 100% original other than the 9 extra holes in the spoke flange for bolts.

I was unsure about the maximum thickness of a spoke flange, but it may be possible to put spoke holes in the 1st washer and use the 18 spokes on that side to hold the disk brake adapter in place.
 
There is a tad problem with this (I think) which I am trying to resolve now myself - I just found a source for 26" inter 3 nexus 3spd with a nice rim and all for 90.00 each and picked one up... seeing the torque arm I asked if it was a coaster brake (as I didn't want to deal with that and motor power) and the guy said no... indeed it is a coaster brake!

I saw this thread and that it was you John and truly... great idea just sinking them into the end of the hub for iso disc mount tab - fantastic idea but... if you backpedal I suppose the pedal input freewheel will isolate that to prevent you turning the larger inner sprocket, but if the large sprocket goes in reverse (meaning the motor goes into reverse) at any time it will engage the coaster brake.

If there is a way to remove the end cup (on the side with the torque arm) there may then also be a manor to just remove the actual Coaster Brake Pads! That would provide you true freehub experience and support reverse.

My fear is that somthing were doing will engage the coaster brakes and heat the hub up to failure or perhaps worse that the axle nuts inside the dropout will work loose.

Any input? I know how to do a coaster to freecoaster conversion on a BMX axle style bike (removing the brake pads, adding a few washers to remove any play or lashout) but I can't figure out (looking at it) how to even begin with one of these.

Am I worried for nothing? Is there nothing that could cause the motor sprocket to be driven backwards (besides reversing the motor) and cause the brakes to engage?

-Mike

** EDIT:

I was looking for a mechanical breakdown of these and found it: http://bike.shimano.com/media/techdocs/content/cycle/EV/bikecomponents/SG/EV-SG-3C41-2330B_v1_m56577569830704663.pdf
which shows the brake shoe unit is at the very far end requiring entire hub disassembly to remove them + will require washers and springs to eliminate play (or some form of hard spacer fully)
 
Mike,
The cup comes off with those large thin nuts on the torque arm end. Let me know if you'd like me to pop it off and take some pics. I did once and saw a bunch of white grease, so I put it back on before I messed something up.
 
John,

I have the same hub here - the grease was a thrust bearing (pretty sure that is the right name) which gives freedom of motion behind the cup... to remove you remove the bolt on the cup side then pointing the cup side at the floor (holding it in your hand - lift the axle out the other side (it all comes out as a single piece).

Now you gently turn the wheel over and lower the cup the bearings if greased well will stay in a plastic knife is your friend here (I never use metal) they should hold together they aren't loose ball bearings they are in a race retainer.

Look at the end that was just closest to the thrust bearings - farthest away from the input pedals, there is a segment at the far end, that is the "Coaster Brake Disc Unit" but most have 2-3 pads which fit into them - until I open it I can't tell if this is the standard used by them... I'm also not certain that a Coaster Brake is all that bad an idea - if there is some way to cut the throttle when it's applied then it wouldn't have to fight against the motor and it is a weatherproof method of stoping that is time proven.

I'm 1/2 kidding - not sure yet - first instinct is ditch coaster pads or even the entire unit (replacing with same OD washers ID to fit over the same part of the axle (10mm I think) and yet only maybe 1/2 the length of the old unit... then add a spring behind it and another washer... Normally minimal back pedal will push that brake pad unit in and cause it to ride down on the other part making it stop... by putting 1/2 it's length back in and a spring coil over the axle between another washer - you create an area which will compress a tad as you back pedal but then the recoil of unsprung energy will just push back and you shoudl have freewheeling (in theory it's how I remember doing it as the need arised).

Surely there is a way to replace the brake unit for maintainence as the diagram I posted above shows - That is a diagram of the units we have I think - if you can replace the pads... well we should in theory be able to eliminate the brake effect internally.

Then lets work on a simpler to fab adapter for mounting an iso disc first then perhaps even a top hat with iso disc and sprocket mount for left side drives.

-Mike
 
Several people have expressed interest in using an internally geared hub as a mid-drive transmission for a motor. Some of the used 3-speeds can be had very affordably when they have the common coaster brake (Ebay, Craigslist, etc...)

Thanks for posting the pics!
 
etard said:
Good work John, what do you plan on putting this on?

Thanks, I have a 200Kv Turnigy RC motor or I can use the outrunner, so I can use one of Matt's fancy slipper clutch. The alternative to RC motor driven is using an outrunner extracted from a geared hub. After making the darn thing I shelved it for the short term once I realized some kind of clutch would be needed to get durability.


Mike,
Thanks so much for the detailed tutorial of how to open these puppies up.

John
 
John,

After pulling and inspecting the engagement clutch and the pawls for the freewheel inside the coaster brake unit - I don't think they are going to serve for much. My friend the LBS mechanic said he has managed to break 4 just pedaling, imagine what they would do with motor type power - even the slipper clutch will not improve them and the hub material is such that even if I could weld a better engagement, harden the pawls and stiffen their engagement springs - the hub itself would then be the weak point.

Sadly unless intended for use in 350-450w maximum output power systems with an intended max speed of 20-25mph, I don't see these as being useful for our application.

The disc brake and rim with freehub are quite a bit differrent from the coaster internals and the hubs aren't the same material, based on others reports I would venture a guess they will withstand 2-4kw peaks and a good amount of torque before breakage.

And yes now I'm thinking of a very small 400w - 4S lipo powered system with a very light #25 reduction to test these rears in just such a low powered environment - either that or I may just toss it on the back of an old clunker - add a front hub and sell the bike as "low maintainence" :)

-Mike
 
Mike,
Thanks for the heads up. Maybe that's why they were so cheap. It sounds like they're destined to be something low power for the kids.
 
Back
Top