OpenSource Handheld Controller (E-go similar)

torqueboards said:
Would be nice if it was a simple fix in which we didn't have to replace the on/off switch and leave the USB-jack.
Also to use the existing battery.

I think I can design an extension to the existing on/off switch so it would reach out the of the case, will try it out this week..
It's not very difficult to desolder the usb-jack, but if someone has a good solution for those who doesn't want to the stl files are up and can be modified. =)
For me using the stock battery made the transmitter to thick, which then made it hard to use extend your finger on the trigger.

Dashmista, hahaha I didn't at all think you where being a d ;)
Theres enough clearance to make "pin hole" and use a paperclip to press the bind-button, great idea!


Btw, I havent modeled anything previously and did this in a freeware from Autodesk which I'm pretty sure is meant for kids (123D Design)..
I believe Dashmista and Bandaro will make something a lot better
 
okp said:
you are printing ABS or PLA for such remote enclosure ? aswell ... which material are made Boosted enclosures ?
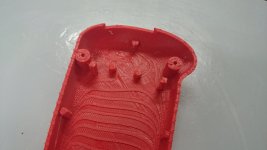
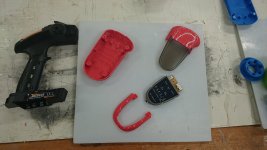
Printed mine in black ColorFabb PLA/PHA (a bit tougher then "regular" PLA).
ABS or PLA will work, print with at least 20% infill and 2 perimeters/shells.
 
@Badwolf you silly raggedy man, you're killing it! That controller came out looking very smooth!

Simple and efficient, the signs of a solid design. I think you've "raised the bar" as far as FlySky mods go.

I'm going to make something in this direction (as it just makes sense) but with as little de-soldering and circuit manipulation as possible. I'd like to use all of the pre-existing parts, just swap out enclosures.

Like Torque, i'm also curious if after riding it for a while, if you would prefer more rounded edges to the grip vs your angled ones. Sharp edges can irritate the skin after a while.

Speaking of grip. You could maybe use some Sugru to add a form fitting silicon grip to it. :D

@Okp try out this powerfull software from AutoDesk: http://www.autodesk.com/products/fusion-360/overview

It's free for 1-3 years based on if you are a hobbyist, student, or small business.

IMO it is more simple and intuitive than Solidworks, and Pro Engineer.
 
great, just watched my first tutorials. The hardest part is to find the good way to make a model; you could go with solid and pullout, or just shapes and extrude... or go the sculpt way.

I need to get a mouse, I am getting mad with the default iMAC mouse or the trackpad, right clicks & so on are just crazy to get used to. I may get a gamer mouse; would do the deal :)
 
Really nice badwolf, tis the best solution yet me thinks!

Some thoughts/musings regarding your controller first: good to hear about the battery size, I will look into a smaller AAA pack for mine. The shell looks really clean, but I would agree that chucking some rounds on the edges would make it a lot more comfortable depending on the size of your hand. The printing is really nice, gotta figure out how to get that detail in my prints, is it finished at all or straight off the bed? What I don't like is the use of extra materials and soldering/modifications. Why could you not adjust the hole sizes to fit the screws that have come out of the controller already? The ones that came out of my E were a better fit than stock metric ones anyway as they have a larger thread pitch, meaning they will screw into a 3d printed hole (as in my pictures below) without the need of tapping and hold better than metrics. I haven't got the stl yet as I don't have a B, but offer still stands regarding mods if you want.

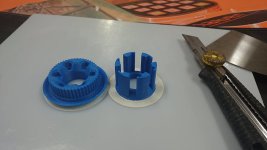
But anyway, onto my proto: So got the gear printed, just quickly and dodgily (still learning the program/printer, any advice would be great), and it shows that it is too big to fit comfortably in a hand as I have it. I got a fair bit of warping so it isn't a great fit together. First image shows the parts used. A primary aim in doing this housing was to make it a purely mechanical change over, so didn't require any electrical work, just plugs and screws with no additional parts. This was achieved by using 1.5 and 2mm screw holes to fit the screws that come out of the E controller to start with. I also wanted to keep the full control panel in one piece and accessible (changing it is beyond my skills anyway, im no electrical engineer). I wanted to fit the panel in your palm to reduce the bulk anywhere else. Initially I thought the trigger mechanism would make the overall controller too big to opted for a thumb wheel running parallel with the control panel. Unfortunately, this is also too big so will create "Wheely the Second" to be held differently. Should be much more comfortable.

up_2.jpg

up_1.jpg

up_3.jpg
On another note, got the pulleys printed. Planning on getting the extra carbon layers on my board this weekend as I finish up some client boards. Still waiting on my esc's, but should be soon now I'm getting some free time.
 
Thanks! I put a light coating off matte black spray paint (just because I had some laying around) but thats all.
Are you using ABS when printing? It tends to warp pretty easy if you're not using a heated chamber. I can also recommend a spray called 3D Lac that will make sure your parts stick to the bed while it's printing (much better then hairspray/glue/blue painters tape).

I'm taking note of all these suggestions and will probably have a v2 up at the end of this week, it will use the stock power switch, have access to the bind button and be more curvy. Using the screws that come together with the transmitter is a great idea! Didn't think of that before, I probably threw mine away after I had taken the pcb and pots out haha

Really liking your design! And using a wheel will be interesting to try out :D
Too bad the PCBs are seem to be so different between the E and B model.. Is the radio-module on the back of yours?
 
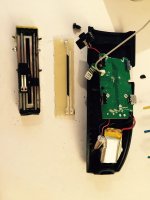
The spring system in the Yuneec E-Go controller is simple and effective, I opened it up. On the side it says 'Everbest', B10K. It is likely somewhere on this pages: http://www.ever-best.cn/en/products.asp?pageno=11&bid=8

FullSizeRender-13.jpg

Alternatively, you could use motorized faders, like the ALPS, and program your 'spring' return forces in the controller using force feedback,
like the FireFader of the open haptics project, http://fader.martijngommeren.nl

Once you have a nRF24L01 on the VESC, you can easily add a controller based on the same transceiver.

Also, you could enable the BLDC-tool to become wireless, using the Crazyradio 2.4Ghz nRF24LU1+ USB radio dongle with antenna. I've experimented with that dongle together with some Arduino+nRF24L01 projects, it works nice.
 
Thanks for cracking open your controller Erwin!

Seeing that slide pot with the dual springs and rail system made me slap my forehead.

My thoughts were a rail inline but above the slide pot, making it a taller device, but I like the flatter form of the E-Go pot better
 
dashimsta said:
any updates badwolfy?

Hahaha, "badwolfy"s 3d printer have been busy with other stuff this week, have a new design ready and will hopefully get time to try it out this weekend.
 
I have organised to have *most* of this week free for board related work, so hopefully have wheely the second printed later this week when I make the mould for my Eboard. The second will also fit the E.

Edit scrap that, onsite contract most of wednesday and first aid on friday. I'll get printing done thursday... Also the E won't work for the ones below without restructuring the board completely, I tried it already.
 
great ! by the way, I found this - Marbel controller

Remotes_grande.jpg
 
Any reason for thumb slider over trigger throttle? The index finger feels more natural given it's more articulated, which would give you more precise control. I think Badwolf has it down (also Alien made a nice one but I think they've been out of stock).

Can we create a poll to see what people prefer?
 
drmacgyver said:
Any reason for thumb slider over trigger throttle? The index finger feels more natural given it's more articulated, which would give you more precise control. I think Badwolf has it down (also Alien made a nice one but I think they've been out of stock).

Can we create a poll to see what people prefer?


And I say, why can't we have both? Both have their pro's and cons. Badwolf did a great job on the trigger mod case for the B, and I have the CAD finished for a thumb drive for the E, should be printing tomorrow hopefully. Sure the index finger has more control in some respects, but the E has a larger circuit board and bigger, longer life batteries, so it's still quite big if one uses a trigger with it.

Hopefully it will come down to user preference within a few weeks - buy the B for trigger, E for thumb. Maybe later down the track you could use either for either, but baby steps.
 
bandaro said:
drmacgyver said:
Any reason for thumb slider over trigger throttle? The index finger feels more natural given it's more articulated, which would give you more precise control. I think Badwolf has it down (also Alien made a nice one but I think they've been out of stock).

Can we create a poll to see what people prefer?


And I say, why can't we have both? Both have their pro's and cons. Badwolf did a great job on the trigger mod case for the B, and I have the CAD finished for a thumb drive for the E, should be printing tomorrow hopefully. Sure the index finger has more control in some respects, but the E has a larger circuit board and bigger, longer life batteries, so it's still quite big if one uses a trigger with it.

Hopefully it will come down to user preference within a few weeks - buy the B for trigger, E for thumb. Maybe later down the track you could use either for either, but baby steps.

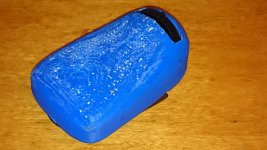
Yes, we definitely need options and variety. Hopefully users will take Bandaros and my design-files and customize it to their own liking and or new features.
 
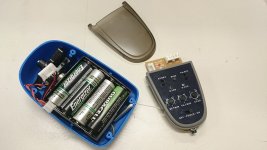
Ok, literally just sat in the workshop for half an hour throttling up and down, a very happy man. There was an issue with the printing so the controller doesn't align perfectly resulting in me not being convinced it is small enough still (may have to break my design aims and use AAA batteries) but everything works.

When I set out in my case design, I wanted it to be a simple plug and screw changeover - no soldering, wiring or modifications to the electric components. To achieve this I have done several things:

1) Cut the battery tray out of the controller. This meant that I could slip the tray into the new housing without the hassle of pulling out the springs in there and soldering it up into a printed compartment in the new housing. If anybody doesn't want to cut their controller up, they can simply print/buy an alternative AA battery case the same size and solder the needed plugs on.

2) All the original screws are used. No need to find others, just keep the ones you pull out and reuse them.

3) To make it a thumb wheel controller instead of a trigger, I used the steering control mechanism. The steering mechanical components were unscrewed, pulled apart, a nut was taken of to release the pot on it and was replaced with the pot that was previously on the trigger. Not sure how essential this part was as electrical engineering is above my pay grade, but it was a single nut and a few tugs. Also, the pot's had different numbers so I'm assuming they are different somehow.

4) Tools/materials needed will be the GT2E controller, phillips screwdriver, stanley knife, blue tack and some 5 minute epoxy. Magnets can be handy to hold screws. Batteries not included. Oh, a 3D printer or the parts could also be handy...

The housing uses around 40 grams of total ABS, depending how you orient it. I had mine oriented to use a minimum amount of support. A compromise between good surface finish and cheap print, as I'm paying 50 cents a gram. Ideally this would be printed on a SLS machine, but I don't have one of those... I have a new model partially completed to use AAA batteries, but may not continue with it if I decide the AA version is small enough. Also, I cheated and laser cut the thumb wheel instead of printing it, because it's a simple 2d extrude. On a downside, I can't find a charger cable on HK for the E version, so am reduced to taking the case apart to change the batteries. Bummer. At least they are 2.4 AH so will last a while. For this and the component size, I'm tempted to say the B is a better controller, but haven't played with one of those so that's just speculation.

For those with a short attention span:

WHAT TO TAKE AWAY:

Still playing with it but it works, I'll re-print the top section and test everything, clean up the CAD files and set them loose soon.

1.jpg

2.jpg
Note the dodgy printing as this side was face down, so the printer didn't like the unsupported area. Should have used blue support material for this side as it didn't need to be trimmed away to a tolerance, just feel good.

okp, do you have a printer and an E controller? Want to be my VIP guinea pig before the public release?
 
Back
Top