Please help me electrify my trike...

I'm actually on the BROL forums, under the same name. :)

Just went through most of your build. I like that your using these (http://www.castlecreations.com/products/ccbec.html) Castle Creations BEC's to drop voltage for your lights. Are you using Magicshines? It might be just the ticket I'm looking for, as much as I like the cycle luminators that e-bike.ca sells, I could go with two BEC's and two Magicshine light heads for less than half the cost!

In other news, I bought a used Mean Well 24V -500watt 20amp Power supply off of e-bay. Can't wait till the chargers come back into stock!
 
corkscrew said:
I'm actually on the BROL forums, under the same name. :)

Just went through most of your build. I like that your using these (http://www.castlecreations.com/products/ccbec.html) Castle Creations BEC's to drop voltage for your lights. Are you using Magicshines? It might be just the ticket I'm looking for, as much as I like the cycle luminators that e-bike.ca sells, I could go with two BEC's and two Magicshine light heads for less than half the cost!

In other news, I bought a used Mean Well 24V -500watt 20amp Power supply off of e-bay. Can't wait till the chargers come back into stock!

Ack! Sorry I missed you. Well, welcome to 'bents!

Yes, I had a 2s (8.4V) P7 flashlight from DealExtreme that I put dummy cells in to run it off the CC DC-DC converter. I'll probably save some weight and replace it with a Magicshine lighthead. I already had all the R/C stuff including the CastleLink for programming the BEC. A while ago I got a Hyperion 1420i and a 27V, 1000W power supply to charge the 12s2p pack. Are you looking for one of these chargers? They are currently in stock at http://www.rcflightstore.com/index.php?cPath=30_55. Unfortunately, the PS you got is a bit underpowered for this charger...
 
Yeah I'm aware the PSU will be a bit underpowered, but it just means slower charge times right? I'm ok if that's the case. I should only need to charge it once a day anyway in the evenings.

I was waiting for this kit: http://www.tppacks.com/proddetail.asp?prod=EBKE-x-12S-CHG-HRNSS+LVC+1420i to come back into stock, since the owner is an ES member. Seeing how it's the last thing for me to order though (Minus a bunch of anderson powerpoles), I might go ahead with that link you sent.

Oh, I'm trying to wrap my head around the battery setup, is this along the lines of what I'll have to do to get 44.4V / 20Ah out of 8 6s 5000mAh bricks?

batteryblankmod.jpg


Pardon the use of MSPAINT. :)
 
You need to parallel up two groups of four and then connect these two in series with eachother to make a 12s4p pack. Sorry, I don't have a diagram. :) Connect the negative of the one group to the positive of the other.
 
corkscrew said:
Yeah I'm aware the PSU will be a bit underpowered, but it just means slower charge times right? I'm ok if that's the case. I should only need to charge it once a day anyway in the evenings.

I was waiting for this kit: http://www.tppacks.com/proddetail.asp?prod=EBKE-x-12S-CHG-HRNSS+LVC+1420i to come back into stock, since the owner is an ES member. Seeing how it's the last thing for me to order though (Minus a bunch of anderson powerpoles), I might go ahead with that link you sent.

Oh, I'm trying to wrap my head around the battery setup, is this along the lines of what I'll have to do to get 44.4V / 20Ah out of 8 6s 5000mAh bricks?

batteryblankmod.jpg


Pardon the use of MSPAINT. :)

WAIT, That is wrong. You have 22V+ from one set of 4 on the left terminal and 24V- from the other set on the same terminal.batteryblankmod2.jpg

Try this one. Sorry for the spazout on paint, never used it before.
 
Gordo said:
WAIT, That is wrong. You have 22V+ from one set of 4 on the left terminal and 24V- from the other set on the same terminal.

Try this one. Sorry for the spazout on paint, never used it before.

THIS is why I'm figuring this out before my batteries arrive. :)

Thanks for the edit, mspaint is good for this stuff.

It makes a lot more sense now.
20ah44v.jpg
 
corkscrew said:
Gordo said:
WAIT, That is wrong. You have 22V+ from one set of 4 on the left terminal and 24V- from the other set on the same terminal.

Try this one. Sorry for the spazout on paint, never used it before.

THIS is why I'm figuring this out before my batteries arrive. :)

Maybe do a little more reading on series/parallel circuits? Play around with some alkaline "AA" that are almost dead? Do you have a multimeter?

http://www.ted.com/talks/annmarie_thomas_squishy_circuits.html?utm_source=newsletter_weekly_2011-04-05&utm_campaign=newsletter_weekly&utm_medium=email This is not meant for you, just something I found entertaining and great for my wife and daughter.
 
Gordo said:
Maybe do a little more reading on series/parallel circuits? Play around with some alkaline "AA" that are almost dead? Do you have a multimeter?

http://www.ted.com/talks/annmarie_thomas_squishy_circuits.html?utm_source=newsletter_weekly_2011-04-05&utm_campaign=newsletter_weekly&utm_medium=email This is not meant for you, just something I found entertaining and great for my wife and daughter.

I believe I've got it down now. I do own a multimeter. I really shouldn't try to design circuits when I should be working...

http://www.ted.com/talks/annmarie_thoma ... dium=email

Ha! I like it. I have two brothers about to graduate in Electrical Engineering, I think they might find this fun. :)

Well, ordered a 1420I charger last night, as well as GGoodrum's 12S charging cable + 2x6s parallel + LVC kit. Sent the pdf to my brothers and one replied saying as long as I get it to him while he's still in school for EE, that he'd solder it up for a bottle of good vodka. So that's covered.

Spent WAY to much money on buying anderson power poles last night too, but hopefully will have enough connectors to complete this build + some extras for whatever I add later. Ordered 25 feet of their 10 gauge zip wire too. Hoping to run all the primary power wires as 10 gauge with 45amp anderson connectors. I bought a fuse too - it comes with two 40amp fuses, but am I going to want to run higher rated fuses due to having a 40amp peak controller?

Just sent my payment to ebikes.ca - hopefully in the next week or two I can start assembling this whole mess. :)

I started with 1300 set aside for all of this - I went over by 344.65 - Not terrible in the long run I suppose.
 
Random update to keep this alive until all my parts arrive.

Got an update from ebikes.ca - they ran out of the 2807 700C kits in between when I placed my order and when I sent my payment.

So they are building a 2806 rear hub into a 700C wheel for me with Sapim 13ga spokes @ half the price of normal wheel builds + spokes.

So faster hub and sturdier build for meeeee!

Other than that, everything is in the mail, but with hobbyking not issuing tracking numbers, and the wheel build delay, who knows when it'll all come in!
 
Thought I'd give this an update finally.

All the parts are in for the most part. Have my stainless steel battery boxes made and mountable to the side of the trike, right behind where the seat sits. Just have to find some aluminum to make some custom covers for them. One will have my 48V->12V Dc converter in it, along with 4 of the 6S 5AH turnigys. The other will have a 100amp circuit breaker along with the other 4 batteries. The TPpacks LVC board and 8 12" 6S balance extenders mounts under the trikes tube, in between the two stainless steel boxes. The main charge plug will be secured out of that radioshack project box, once I get some better heat shrink wrap. (Do you know how hard it is to find sheets of shrink wrap in Boise ID???).

Mounted the controller just in front of my seat (power leads made more sense that way) with a piece of plywood and some 2" u-bolts. It works for now, but will be finding a piece of aluminum or stainless to exchange for the plywood. I like that I'll be able to reach the controllers power button when riding.

So now just figuring out a few things on the boxes before I label them as "complete". Mainly where I want the powerpole panel mounts to exit. Also wondering if I should add a 12V computer fan - I have room in the boxes to add an 80mm fan on each one to act as a vent, but not sure if it's a good idea or not as far as waterproofing goes. Will have to see how hot the boxes/batteries get come summer.
(Two paralleled bricks of 4 turnigy's per side, so 22.2V @ 20AH - then a serial connect line will run between the two boxes, finally equaling a 44.4V 20AH setup.

One point of confusion - is that a 12S2P battery, or a 12S4P battery? I have two packs making up the battery, so that makes me think 2, but I have 4 sets of serial connected batteries technically, so that makes me think 12S4P.

I'm short on pics, but I did shoot a little video last night when I was testing the setup after I got the battery pack all wired up.
http://www.youtube.com/watch?v=-vtPrfcZne4&feature=player_embedded

I'm a bit irked though - after shooting this vid I was discharging the entire pack down to 60% (storage charge), since they might be sitting for awhile before I get it on the road. 40 minutes in, something sparked in the charger, and left me SOL. Hyperion USA has already said they will replace it though, so I sent my receipt, RMA form, and the charger back this morning.
 
Cool!

A few comments based on the pics:

The controller appears to be up front but the motor and batteries are near the back. This makes for long runs and associated greater voltage drops when currents are high for these the main power wires.

The batteries will need to be protected from abrasion and held in place. Will you be using compression or double sided tape or... ?

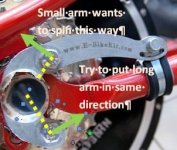
The torque arm is lever is projecting a very shallow angle between the motor axle, the intermediate pivot point and the attachment point on the arm. Therefore, it won't be very good for resisting torque. The closer this is to 90 Deg. the better.

Nice low positioning of the battery boxes!
 
rscamp said:
Cool!

A few comments based on the pics:

The controller appears to be up front but the motor and batteries are near the back. This makes for long runs and associated greater voltage drops when currents are high for these the main power wires.

The batteries will need to be protected from abrasion and held in place. Will you be using compression or double sided tape or... ?

The torque arm is lever is projecting a very shallow angle between the motor axle, the intermediate pivot point and the attachment point on the arm. Therefore, it won't be very good for resisting torque. The closer this is to 90 Deg. the better.

Nice low positioning of the battery boxes!

On the controller - With the supplied cable lengths from the e-bikes.ca kit - nearly everything lines up to not need extended and is not pulled taut, but not need shortened either. I first attempted mounting the controller under the rear rack (it clears rather well), however I would have had to extend my e-brake, throttle and cycle analyst connections. Should I bother shortening the motor cable & hall sensors a bit? I like having the controller in front of where my seat will be, as it grants access to the power button for the system while sitting.

The boxes are a work in progress - they are mounted as is stuck together with heavy duty 3M double sided tape. Before I go and start running them, there will be a lining of a wide gasket style sealing tape around the boxes, and they will be compressed in when the side panels mount on. I'm also hoping to order some shrink wrap sheeting to wrap both battery groups, I just can not find any locally so far, and need to wait till payday to order some. :) Then again, I'm tempted to run without the LVC kit and add another two batteries (1 per side) for a 25A/H group.

On the torque arm - should I just move the attatchement point to more of a 90 degree angle, say maybe to the seat stay vs the chain stay? I won't be able to move the pivot point and still connect to the frame.

Thanks for the comment on the boxes! With the seat installed you can hardly see them. I'm lucky to have buddies with stainless steel and tig welders. :)
 
Whether or not shortening the wires is worthwhile from a functional viewpoint depends mainly on current draw and how fussy you are about reducing voltage drop. If you have a beefy controller and run at high currents, you would probably notice the difference. If not, you probably won't. I shorten wires as much to avoid bundling wires or routing them the length of the bike as anything. My controller is behind/under the seat and it is easy to reach too.

Regarding the torque arm, if you flip the base portion over won't the pivot point end up close to 90 Deg?
 
rscamp said:
Whether or not shortening the wires is worthwhile from a functional viewpoint depends mainly on current draw and how fussy you are about reducing voltage drop. If you have a beefy controller and run at high currents, you would probably notice the difference. If not, you probably won't. I shorten wires as much to avoid bundling wires or routing them the length of the bike as anything. My controller is behind/under the seat and it is easy to reach too.

Regarding the torque arm, if you flip the base portion over won't the pivot point end up close to 90 Deg?

Ah ok. The controller is a 40amp Infineon, and I'll be running a 12S setup. Batteries are paralleled with 12gauge wire (need to upgrade to 10gauge and 75amp Andersons), and then serially connected with 10gauge wire, which is what the rest of the system will use. I'll probably leave it as is for now since everything is lining up rather neatly - once it's put together, if I see any drastic voltage drop, I'll look into moving it/shortening the power wires.

I seem to remember having problems flipping the pivot point (as far as getting the screw/nut to clear), but I'll play with it when I get home tonight.
 
corkscrew said:
I seem to remember having problems flipping the pivot point (as far as getting the screw/nut to clear), but I'll play with it when I get home tonight.

Spacer washer maybe?
 
I would consider the torque arm from amped-bikes on there. I think it is stronger than the one you have, and very adjustable. It has no pivot point, just an inner star cut into multiple 16? points that slots into the outer main piece. Extremely hard material. I think it would work well. Perhaps put it on the other side. The dropouts are the heart of these bikes and there is great peace of mind from having massively over-designed torque reinforcement.
 
chvidgov.bc.ca said:
I would consider the torque arm from amped-bikes on there. I think it is stronger than the one you have, and very adjustable. It has no pivot point, just an inner star cut into multiple 16? points that slots into the outer main piece. Extremely hard material. I think it would work well. Perhaps put it on the other side. The dropouts are the heart of these bikes and there is great peace of mind from having massively over-designed torque reinforcement.

I've seen that one before, and do like the design. However I'm running low on funds, and with the steel dropouts on my Actionbent I'm thinking one should be enough. (Am I wrong?) - Also - with the plastic connector on the left side of the 9C motor - does it come off to slide a torque arm onto the axle?

The pivot point on the one I have is locked rather tightly with a large bolt and nylock nut.
 
Yes the little black plastic thingy around the wire entry to axle point does come apart easily, and can be snapped back together by hand. You could have to remove your Andersons though and/or your Hall connector to get it through the torque arm hole. Which isn't necessarily a bad thing as you would then have to solder up those connections (the Halls) which removes a point of failure if any of those pins in the connector went down or corroded. I think the Andersons from the phase wires would go through, one at a time. The peace of mind is definitely worth 15 lattes! I'm glad to see that your build is nearing completion. Its going to be awesome. I suppose it depends on how much peak power you are anticipating. Anything over 1000 watts I think I would put on a couple of torque arms.

Chris.
 
chvidgov.bc.ca said:
Yes the little black plastic thingy around the wire entry to axle point does come apart easily, and can be snapped back together by hand. You could have to remove your Andersons though and/or your Hall connector to get it through the torque arm hole. Which isn't necessarily a bad thing as you would then have to solder up those connections (the Halls) which removes a point of failure if any of those pins in the connector went down or corroded. I think the Andersons from the phase wires would go through, one at a time. The peace of mind is definitely worth 15 lattes! I'm glad to see that your build is nearing completion. Its going to be awesome. I suppose it depends on how much peak power you are anticipating. Anything over 1000 watts I think I would put on a couple of torque arms.

Chris.

Makes sense. I'll order an amped bikes torque arm for the other side (or maybe for the right side, and the e-bike kit one on the other side. We'll see. The ebikes.ca simulator shows my setup peaking around 1200 watts, so I'm just barely over the 1000 watt limit lol. My OCD side sorta wanted to replace the black andersons with color coded ones for the phase wires anyway... For that matter - I sort of want to replace the wiring going into the motor, I mean, what is that, 14 or 16 gauge? :|

@Recumpence - Thank you sir! That's an honor coming from an internet legend such as yourself. :) I have covers for the sides that cover just the box - figure those will work for now, and I'll have different covers made that match the lines of my seat better once I find the material and money. Might also make one a "winter" set - with more insulation, and a "summer" set, with ventilation holes and maybe some computer fans.

I have to agree on the trike thing though - it's the closest pedal powered vehicle that I have to a car.
 
Maybe you can flip it like the attached picture. It will be pushing, not pulling on the arm, but at least it is going in a better alignment. The ampedbikes torque arm you can rotate 180 degrees so you can position it for the best alignment. I did have to take apart the wiring connector since it had clearance issues with the derailleur.

I have electrified my catrike and use it for a 20 mile commute. I have speed issues with the 20" wheel, with an ampedbikes 36V lithium battery, and am dreaming about increasing my speed via extra voltage. You shouldn't be having those problems.

When I lived in Michigan, I ended up having rust issues after riding my bike in the snow/salt. (I had an EZ-Tad with a steel frame) Something to think about. In Southern California I don't have to worry about that any more.
 

Attachments

  • torquearm1.jpg
    torquearm1.jpg
    21 KB · Views: 2,348
Here is how I mounted my thumb throttle. There is a little interference with the brake and the throttle mount. I need to keep my brakes adjusted properly. I also can't see the battery level, but with the small wheels, I am not drawing a lot of power.
 

Attachments

  • throttle.jpg
    throttle.jpg
    28.7 KB · Views: 2,339
I'm a bit sceptical of that. I think it is best oriented the way it presently is (matching design of the arm). If reversed, the end of the arm, while pushing into the frame, your way, would have a very small contact point with the frame and could maybe slip a bit "around" the frame, inside the pipe clamp, especially if there is rubber in there to prevent frame scratching. As it presently is, the arm is pulling the wheel against the main counter-torque, as designed, not being pushed into the frame. I suppose as it presently is, the pivot point could pull the clamp along the stay a bit or there would be a force vector operating that way, toward the axle, although as the pivot point moves up, it should tend to tighten the clamps hold on the stay simultaneously, as the angle on the arm changes as well. You wont' have this debate with the amped bikes one.

Actually, the clamp wouldn't tighten up at all after I look again at it. So that part of thinking is not right.
 
Back
Top