• Hello ES! We could use some help to get us past the finish line on building the new knowledgebase for the forum.
    Can you donate? Please see our fundraising page. Thank you!

Santa Cruz Nomad refresh

Nomadstealth

🔋 Established
Joined
Apr 12, 2022
Messages
62
Location
Champion Lakes , Western Australia
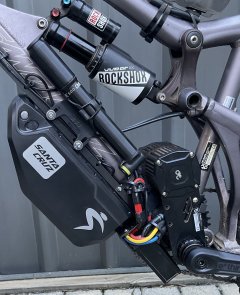
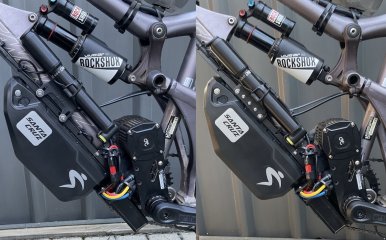
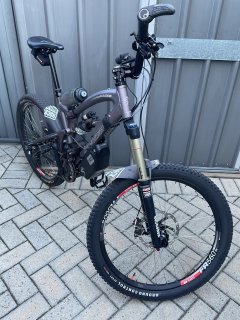
Not a build from scratch , rather a rebuild with a few new parts that make a big difference . The biggest change is the battery . This is the battery I've been searching for at a reasonable price - smaller size , lighter weight , hard case , 52 volt , 50A continuous discharge , tested to EN62133-2-22017 , Samsung 21700 cells . It's dimensions are L 279mm (11") - W 89mm (3.5") - H 107mm (4.2") and weight is 2.9 Kg (6.4 lbs) including bracket . Very little voltage sag , which means a lot more range than my previous 36 volt battery of the same 508 Ah capacity .

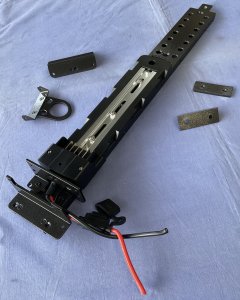
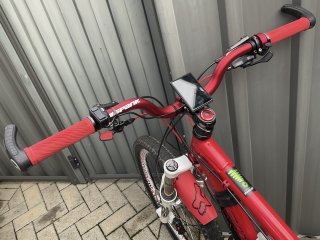
While the battery change was happening I took off all of the parts that I'd previously made and either remade or modified them all and painted them in Hammertone black (yep , etch primed first) . The largest piece is the battery , controller and pump mount which also helps tidy the wiring and cabling up a lot . The other pieces are the display mount , controller wire cover and a couple of bits that bolt over the seat rails to keep the saddle bag away from the seat post clamp when the post is dropped .

I purchased a CYC 1 to 1 cable for the display (no throttle for me) and got rid of a plug that I don't use . The cable is listed for the Photon on their website but it fits the X1 Stealth plug and play and is a little bit shorter .

Oh , and check out the cranks I'm using , e*thirteen 160mm . They fit really well with the Stealth , I think they're better than the CYC cranks because they've got a more rounded profile and self extractors that work .
 

Attachments

  • IMG_2183.jpeg
    IMG_2183.jpeg
    2.3 MB · Views: 17
  • IMG_2182.jpeg
    IMG_2182.jpeg
    1.4 MB · Views: 15
  • IMG_2181.jpeg
    IMG_2181.jpeg
    3.2 MB · Views: 18
  • IMG_2180.jpeg
    IMG_2180.jpeg
    2.9 MB · Views: 19
The largest piece is the battery , controller and pump mount which also helps tidy the wiring and cabling up a lot . The other pieces are the display mount , controller wire cover and a couple of bits that bolt over the seat rails to keep the saddle bag away from the seat post clamp when the post is dropped .
 

Attachments

  • IMG_2173.jpeg
    IMG_2173.jpeg
    3.2 MB · Views: 4
Two build threads in one .

Similar treatment for my Wife's Heckler , same 52 volt battery .

The Heckler was a tight squeeze for everything to work . The option I chose was to swing the motor down 40mm so that the battery could be fitted lower on the downtube . That way the full 170mm of fork travel was retained , it's close , really close . In some of the photos the spring has been removed from the forks and I've pushed them down good and hard . I'd be lucky to get a piece of paper between the battery and wheel . If I thought it was an issue I'd swap the 2.4" tire out for a 2.3" .

I added a piece of rectangular tubing and some 20 x 20mm angle to the battery mount bracket to support the motor . The motor now sits 130mm lower than the downtube , same as a Bafang HD , I'm happy with that . The battery mount bracket is supported by hose clamps top and bottom and there's 4 rivnuts into the frame , it's not going anywhere .
 

Attachments

  • IMG_2184.jpeg
    IMG_2184.jpeg
    3.5 MB · Views: 13
  • IMG_2185.jpeg
    IMG_2185.jpeg
    3.3 MB · Views: 12
  • IMG_2185.jpeg
    IMG_2185.jpeg
    421.9 KB · Views: 11
The Heckler is now 100% complete . I’m happy with the way it looks . It’s as neat as I can get it . It shouldn’t draw attention for the wrong reasons .
 

Attachments

  • IMG_2194.jpeg
    IMG_2194.jpeg
    2.8 MB · Views: 11
  • IMG_2195.jpeg
    IMG_2195.jpeg
    2.2 MB · Views: 11
  • IMG_2196.jpeg
    IMG_2196.jpeg
    3.1 MB · Views: 11
Did a bit of fiddling around and fabricated a better way to mount the pump . As a bonus it hides the wiring that goes to the display more than before and it feels more solid .
 

Attachments

  • IMG_2202.jpeg
    IMG_2202.jpeg
    1 MB · Views: 5
Everything is going well on both bikes , voltage sag is minimal and range has been greatly improved with the 52 volt batteries . Motors , controllers and batteries are above chainring height so ground clearance isn't an issue on the groomed trails that we all ride on these days . The batteries are rock solid with no movement whatsoever and are nice and easy to remove .

The plan for both bikes was the same as always , even before the e-bike crackdowns that are happening in a lot of places , keep everything as simple and as neat as possible . I'm trying not to have the Back to the Future DeLorean look for both appearance and functionality . And , as you know , nothing screams possible illegal e-bike more than a bunch of messy wiring and a poorly finished DIY battery held on with cable ties and tape . We all know that my bikes are DIY kits , but our friends in law enforcement likely wouldn't . I'd say that they'd pay more attention to the afore mentioned wiring and battery , that and massive hub motors . Well , maybe more riding in a group down the wrong side of the road doing wheelies . Great to watch that happening mind you , the Police give a bit of a chase and then give up . I think they know they can't catch them now that they're riding even faster bikes since the crackdown . I don't want to get caught in the net so I fly under the radar , my bikes would technically be illegal because in race mode I can get assistance above 25 kilometers per hour (15.5MPH) . I think that's a sieze and crush offense .
 

Attachments

  • IMG_2212.jpeg
    IMG_2212.jpeg
    2.6 MB · Views: 2
  • IMG_2212.jpeg
    IMG_2212.jpeg
    281.6 KB · Views: 2
  • IMG_2211.jpeg
    IMG_2211.jpeg
    599.7 KB · Views: 1
  • IMG_2219.jpeg
    IMG_2219.jpeg
    2.6 MB · Views: 2
Back
Top