
You are using an out of date browser. It may not display this or other websites correctly.
You should upgrade or use an alternative browser.
You should upgrade or use an alternative browser.
Show Us Your Homemade Battery Housing
- Thread starter jimw1960
- Start date
bonzo
1 W
Kburn77,
You bet your ass those are BMG's!
(Big Metal Gourds)
You bet your ass those are BMG's!
(Big Metal Gourds)
Takemehome
1 kW
Whenever there are elections in your town, get those signs made of coroplast.
Strong, waterproof, light weight, and free. They are printed on only one side.
In a way, you can give your candidate some power. :lol:
Strong, waterproof, light weight, and free. They are printed on only one side.
In a way, you can give your candidate some power. :lol:
dnmun
1 PW
i got some leftover realtor coroplast signs for free. 1/4", 14"x30", don't even have holes in them. neat stuff.
The Journey Guy
1 kW
- Joined
- Aug 16, 2009
- Messages
- 300
I finished installing and modding my new battery boxes this weekend. I ran across some very obscure hard panniers called Armidillos, and had to figure out how to mount them to my existing rear rack. I had to keep my stock rear rack, because that's where the controller and battery select switch is at. Anyways, after figuring out how to mount them, I then had to mod them to accept my LifePo4 battery packs with charger port and 40amp DC breakers.
I was going to go with some custom aluminum boxes that I had made a few months back, but when I found these, I thought that they went much better with the overall look of my E-zip.
If anyone has any information about the hard sided panniers I used, please let me know, as I would like to get another set.
mwkeefer
1 MW
a gull wing pro - eZip, I like it!
Needs running boards
-Mike
Needs running boards
-Mike
dumbass
100 kW
The Journey Guy said:I finished installing and modding my new battery boxes this weekend. I ran across some very obscure hard panniers called Armidillos, and had to figure out how to mount them to my existing rear rack. I had to keep my stock rear rack, because that's where the controller and battery select switch is at. Anyways, after figuring out how to mount them, I then had to mod them to accept my LifePo4 battery packs with charger port and 40amp DC breakers.
I was going to go with some custom aluminum boxes that I had made a few months back, but when I found these, I thought that they went much better with the overall look of my E-zip.
If anyone has any information about the hard sided panniers I used, please let me know, as I would like to get another set.
May I ask what in hell are you carring in those? If it's just batteries you would have enough power to lite New York City. or to lap the the US twice with out charging. And that's if their only SLAs. LOL They do look good though.
The Journey Guy
1 kW
- Joined
- Aug 16, 2009
- Messages
- 300
dumbass said:May I ask what in hell are you carring in those? If it's just batteries you would have enough power to lite New York City. or to lap the the US twice with out charging. And that's if their only SLAs. LOL They do look good though.
You're right, lots of room in those panniers! The batteries only take up the lower half of each pannier, and that's with plenty of closed cell foam to cushion them with. That leaves the entire top half for me to carry pretty much whatever I want to. Which shouldn't be much, considering that I also have the trunk, which is my main storage compartment.
I do a LOT of long distance traveling, and you never know what you'll need, or find along the way. Plus, I have to agree with you, I rather like the way she looks now that they are mounted. Sort of that 'full dress' cruiser look..
")
ambroseliao
100 kW
Hey TJG,
That's a very nice looking setup. Very clean and professional!
Ambrose
That's a very nice looking setup. Very clean and professional!
Ambrose
The Journey Guy
1 kW
- Joined
- Aug 16, 2009
- Messages
- 300
ambroseliao said:Hey TJG,
That's a very nice looking setup. Very clean and professional!
Ambrose
Thanks Ambrose! I realize that she's only a 'low-end' ebike, but she's been really good to me for almost two years now. Never any trouble with the controller or motor, drivetrain has been rock steady never needing any adjustments, and she just plain runs and runs and runs without complaint. I mean, I run this baby summer, winter, fall, and spring. Dry hot weather, wet hard rains, snow, frost, whatever - bring it on! It amazes me what this $250 ebike has done for me the last couple of years. Not to mention that this bike introduced me to the ebike world in the first place.
I plan on doing a '$1,000 build' one day soon, but until then, I'm really happy with the E-Zip.
DSX
100 mW
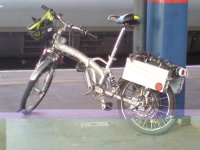
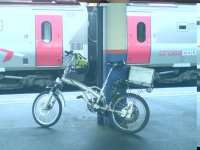
My home adapted battery housing was chosen to suit a Ping 48V 20a/hr (V2.5) . After searching locally to find something that was tough & fairly non-descript, I decided on an Attwood marine battery housing.
Pros: 1) it was cheap - my father in law gave it to me. 2) it was robust and has some ventilation. Cons: 1) can be hard to swing the leg over. 2) is a little bulky and the ping only just fits in the vertical space. 3) C of G is high but don't really notice this at speed.
I then welded 2 small metal plates to the steel rack and used large washers on the bolts and nylocs to hold the box part down. A layer of 10mm foam top and bottom and several layers around the sides protects the ping from the pounding it receives on the road.
If I had to do again I would go for a lower profile battery or mount elsewhere - but seeing how well Dogmans ping is doing its going to be a while.
monster
100 kW
- Joined
- Jun 17, 2007
- Messages
- 1,411
i've just finished doing a new battery case for my bike to lower the center of gravity. here are the before and after pictures. i was using a single large Nato ammo box. now i'm using two smaller german milatry ammo boxes. sorry the after shot is a little blurred. i'll take a better one tomorrow.
Attachments
SpeedEBikes
100 W
Here's my first lithium powered ebike from 2001

Here's a bike from 2005

I'll dig up pics of some other builds and snap one of the current build in a few days.
Here's a bike from 2005
I'll dig up pics of some other builds and snap one of the current build in a few days.
karma
10 kW
i think i have a few pics
The Journey Guy
1 kW
- Joined
- Aug 16, 2009
- Messages
- 300
karma said:i think i have a few pics
Nice!!
The Journey Guy said:ambroseliao said:Hey TJG,
That's a very nice looking setup. Very clean and professional!
Ambrose
Thanks Ambrose! I realize that she's only a 'low-end' ebike, but she's been really good to me for almost two years now. Never any trouble with the controller or motor, drivetrain has been rock steady never needing any adjustments, and she just plain runs and runs and runs without complaint. I mean, I run this baby summer, winter, fall, and spring. Dry hot weather, wet hard rains, snow, frost, whatever - bring it on! It amazes me what this $250 ebike has done for me the last couple of years. Not to mention that this bike introduced me to the ebike world in the first place.
I plan on doing a '$1,000 build' one day soon, but until then, I'm really happy with the E-Zip.
If I had an ezip and I was planning on upgrading with only $1000, I'd look into see how an RC motor could replace the existing motor and lavish the rest in the controller and batteries; the E-Zip's platform looks so much easier to adapt an RC motor to than a normal bike. It could be done for quite a bit under $1000, and you would get some quite impressive range and speed. Otherwise, I'd probably just get a new bike and that eats quite a bit into the grand - not much left for motors and batteries.
The Journey Guy
1 kW
- Joined
- Aug 16, 2009
- Messages
- 300
swbluto said:If I had an ezip and I was planning on upgrading with only $1000, I'd look into see how an RC motor could replace the existing motor and lavish the rest in the controller and batteries; the E-Zip's platform looks so much easier to adapt an RC motor to than a normal bike. It could be done for quite a bit under $1000, and you would get some quite impressive range and speed. Otherwise, I'd probably just get a new bike and that eats quite a bit into the grand - not much left for motors and batteries.
To be honest, I don't even know what an RC motor is. However, if you say that the conversion would be possible, then I will take the time to search out posts and read up on what that would entail. Thanks for the advice!
AussieJester
1 TW
Some very neat battery boxes fellas! I have been working on mine this week, while not
complete yet I hope the following pics might be of help to those looking at building a enclosure.
I have used fiberglass to construct mine -->

To construct the shape i made a block of foam using Eco-Foam (two part mix) poured into
a card board box lined with bin liner-->

Once i had the desired shape i covered it with Body Filler (bondo) gave it a coat of spray putty smoothed
it out then hit it with a couple of coats of release agent before layering on several layers of fiberglass and resin-->


Once the glass has dried the top was lopped off and the foam dug out-->

The top was cut off and a hinge added...

Enough room for 16 packs eeeeeasily and room for enough more to give DoctorBass 210km range per charge setup
a run...and lookie NO duct tape Doc !! hehehe
Hope these pics are of use to others looking to make a custom enclosure from fiberglass
TIP: if you do have HEAPS of acetone (or methylated spirits) newspaper and clean rags along with a GOOD supply of surgical gloves, as wonderful as fiberglass is its sticky itchy shit.
KiM
complete yet I hope the following pics might be of help to those looking at building a enclosure.
I have used fiberglass to construct mine -->
To construct the shape i made a block of foam using Eco-Foam (two part mix) poured into
a card board box lined with bin liner-->
Once i had the desired shape i covered it with Body Filler (bondo) gave it a coat of spray putty smoothed
it out then hit it with a couple of coats of release agent before layering on several layers of fiberglass and resin-->
Once the glass has dried the top was lopped off and the foam dug out-->
The top was cut off and a hinge added...
Enough room for 16 packs eeeeeasily and room for enough more to give DoctorBass 210km range per charge setup
a run...and lookie NO duct tape Doc !! hehehe
Hope these pics are of use to others looking to make a custom enclosure from fiberglass
TIP: if you do have HEAPS of acetone (or methylated spirits) newspaper and clean rags along with a GOOD supply of surgical gloves, as wonderful as fiberglass is its sticky itchy shit.
KiM
The Journey Guy
1 kW
- Joined
- Aug 16, 2009
- Messages
- 300
What can you say to that box, except phenomenal!!
How many man hours went into that project??
How many man hours went into that project??
AussieJester
1 TW
The Journey Guy said:What can you say to that box, except phenomenal!!
How many man hours went into that project??
Thanks mate
I would guesstimate 10-12 hours all up I have been doing 2-3 hours a dayon it most days since last Saturday... thus far ~$130 in materials has been spent
(i did buy MORE fiber glass than needed as i wish to do some other glass wok on the bike, namely
a custom 'bobber' style rear mud guard..) So material costs could be cheaper, i think
You could do one for 100 bucks all up eeeeasily IMHO
KiM
mwkeefer
1 MW
Aussie - you make me SICK!
NOT, seriously man... you have too much time on your hands if you can fabricate that thing ! I'm sure it will be a work of beauty, what color scheme are u going to go with on the chopper.... That tank would look sweet with 3 coats of midnite metallic blue (think 81 camaro) and a shot of clearcoat.
I wish I had your fabrication skills with fiberglass.... I've never been good with it, MDF sure... fiberglass, well I can patch a rocker panel with it = )_
Can't wait to see the final bling, i mean product
-Mike
AussieJester
1 TW
mwkeefer said:what color scheme are u going to go with
-Mike
HAHAA cheers mate, gives me something too do on the good days
..I'm leaningtowards electric blue same colour as original Ford GTHO Phase III's came in '71
Would like to incorporate some blue ghost flames also...shall break out my airbrushes
do a few sample pieces before deciding on this though
i want them very subtle.
KiM
Hyena
10 GW
Flames are always cool, but some lightning / electricity would probably be more appropriate considering the 1.21 gigawatts you'll have in there
docnjoj
1 GW
As usual, AJ, you do art as well as craft! Great work. These days glass/epoxy is a bit messy for me to do, but it still is nice to see time honored traditions at work. Using expanded polyurethane means yo gotta dig the foam rather than just pour gasoline in and watch it dissolve! Definitely brings back the good old days of crashing electric gliders with bodies made like that!
otherDoc
otherDoc
mwkeefer
1 MW
Hyena said:Flames are always cool, but some lightning / electricity would probably be more appropriate considering the 1.21 gigawatts you'll have in there
May I sugggest novelty options (2):
#1.) Pick up a solid state HEI ignition box (can be had cheap from junkyard)... wire up a small atomizer pump (use windshield washer pump and sprayer but replace nozzle with one from windex type bottle (aquarium tubing)... finally fill the wiper bottle with gasoline and put the whole thing (pump + ignition) on a simple toggle switch. This should be mounted in 1/2 " copper or aluminum pipe... then thread a hole for spark plug, wire to ignition module and whalla... flip the switch and your tossing flames....
#2.) Think rear rack mounted Jackobs ladder
#3.) Sorry had to - The Y flux capacitor?
-Mike
Similar threads
- Replies
- 38
- Views
- 13,733