Show Us Your Homemade Battery Housing

I ordered 2 12V 20AH Thunder Sky battery packs from Elite Power Solutions while they were on sale for $104. I copied the design of one of the other board members (thanks, dumbass) for use on my bike, which has the Curie conversion kit installed, with slight modifications for a CellLog 8 and an XLR connector chassis for charging. I used Starboard (and plywood because I was bad and didn't follow the old adage, "measure twice, cut once" and ran out of Starboard). I like the fact that I can use the Curie rack mount system, which keeps the center of gravity low, improving the handling of the bike. The Thunder Sky pack has twice the power of the stock SLA battery that came with the conversion kit, but is only slightly longer and deeper as you can see in the second photo below.

385308747.jpg


385304411.jpg
 
Is there anyone that is good with building custom battery cases?

I want something custom machined from aluminum.

-Chris
 
Nice currie upgrade! Does the battery stay in place firmly and clear the heel of your shoe on pedal rotations?
Also did you try the elite power solutions balancer before replacing it with a new one. I want to get a 12v lithium batt for camping. Did you have a good experience with the company?
 
blueblizzard7 said:
Is there anyone that is good with building custom battery cases?

I want something custom machined from aluminum.

-Chris


Recumpence (Matt) does cnc aluminium battery boxes, if you wanted a custom job i would speak to
Matt about it, it wount be cheap though cnc costs are expensive and your talking a BIG billet of aluminium..

KiM
 
mr. electric,

Thanks, the case fits well within the Currie rear rack and stays put (Currie has a keyed locking system on the rack). Heel strike isn't a problem. Elite Power Solutions was fine to deal with and I'll buy from them again (I suspect I'll build a second battery pack mid-sumer since my original SLA is losing capacity). I didn't buy the balancers that Elite Power Solutions offers since I planned on buying the CellLog 8. I always have panniers on the bike so you don't see either battery--the new LIFEPO4 or the original SLA.

385700325.jpg


385700324.jpg


385700322.jpg
 
Here's my homemade pack. Remolded 6" PVC pipe to hold 12S8P. I've got two of these, each with 96 cells:
IMG_0422.jpg

IMG_0443.jpg


Some day I plan on replacing the cardboard with something else, but it works for now.

Pack is 1.5KWh.
 
I like the re-molded PVC pipe useage. :) Clever!

That's a pretty decent pack capacity, one of the bigger A123 M1 cell based packs I've seen. Nice job!
 
Nice job with the pvc pipe! Is that schedule 40? Did you heat it in an oven or use boiling water to reshape it? Are the finished packs 24-30 inches long?

Dave
 
Yeah PVC is great. I posted about it last year in the turnigy/zippy thread.
The 100x50mm stuff available here in Australia is perfect for fitting 6S2P packs wide. I don't think it's as readily available up in the Northern hemisphere though.

pvcy.jpg

lipobox1.jpg


norco2.jpg

(temporarily mounted controller in this pic)
 
Wow, Hyena! You changed out the inner tube bands for stainless worm gear hose clamps! Wish we could find that rectangular pvc here that fits the Turnigy lipos so well.

Dave
 
dbaker said:
Wow, Hyena! You changed out the inner tube bands for stainless worm gear hose clamps!
haha yeah the inner tubes are only used on my test rig(s). Exhibit A, around the controller in the above pic :lol:
Once I have my wiring/motor/battery/controller config perfected I mount it all neatly. The only problem is I'm always tinkering and tweaking so the inner tubes are never far away :p
 
I plan to use an old tube to secure my battery saddle pack on my downhill commuter bike. The slope of the top tube, bumps on the road, and lack of sufficient velcro area allow the pack to slip down the top tube slope until the pedals start hitting the back bottom corners! I have to park the bike and take the pack inside under my desk at work for charging so hose clamps won't work for me.

Dave
 
Hyena said:
Yeah PVC is great. I posted about it last year in the turnigy/zippy thread.
The 100x50mm stuff available here in Australia is perfect for fitting 6S2P packs wide. I don't think it's as readily available up in the Northern hemisphere though.

I didn't use the boxes you made for me so am selling them now in this hemisphere...
 
I want to order a currie rack and adapt my existing battery to fit it. It seems like there are two groves along the side of the plastic case that fit with two long bars built into the rack. I imagined it would be more of a track system but the set up currie uses is very simple and lends itself to low cost manufacturing. If the rack is a bit out of tolerance it probably fits anyways. I just hope it does not rattle and bounce around too much.
 
I made mine out of a CD/DVD case. Took the cells out of their cases since it wouldn't quite fit with them. Banded sheets of tin on the outside for a little bit of containment, with big tie wraps. Sprayed some foam in back and in front. I have a little space left over for wiring and some electronics.

Bike1.jpg

Bike2.jpg

Bike3.jpg

Bike4.jpg
 
mr. electric,

I like the fact that the Currie rear rack keeps the battery packs low, improving bike handling. If you need to rebuild your case, I would suggest that you consider using starboard. Unlike other plastics, you can use your wood working tools without fearing that it will destroy saw blades or bits. I don't have issues with my original Currie battery case moving while riding and I ride a lot of unimproved forest roads that are bumpy, to say the least. The new case is even tighter in the rack, partly because I was cautious when routing the channels on the side. I used 1/4" black starboard (and 1/2" plywood for the top and base plate because I didn't measure several times before cutting the starboard and ran out of it) and ended up hand sanding the channels when fitting the case because I didn't think I could safely use the router again without taking out too much material. I will probably be building a second pack in June. That way I'll have a couple of months to see if the 1/4" starboard holds up well. I'd prefer to stay with the 1/4" starboard.
 
What did you use to connect the sheets of starboard. I imagine a long piece of 1/4" x 1/4" square stock would make the corners stronger but infringe on available space for a square battery.
This is my current set up. Either a battery in a panier or in the loaf shaped bag that slides on to the rack top, or both if I had a second battery. No amount of tightening the securing strap on the panier bag or adding foam to the rack top bag seem to really secure the battery.
 

Attachments

  • IMG_6519 (Small).JPG
    IMG_6519 (Small).JPG
    59.3 KB · Views: 5,490
Carv'n,

Very nice.

mr. electric,

The starboard sides and the plywood top and bottom plates are all well-screwed together--I used almost a whole box of screws that I picked up at the local Ace hardware store. I wanted the battery to be tight within the compartment so there wasn't movement and it is. I'll give this new battery several months of use before building a second TS LIFEPO4 pack. If the 1/4" starboard is holding up well, I'll use that size. Otherwise, I'll use 1/2" starboard. As you can see in the two photos below, the interior of the case is just large enough for the battery pack and the wiring.

385261031.jpg


385304410.jpg
 
I think I could mount this rack to my bike without much trouble. I already made custom mounts to use the rack that is on the bike now.
$54
http://www.curriestore.com/1271-ezip-rack-rmb.html
 

Attachments

  • ezip-rack-rmb.jpg
    ezip-rack-rmb.jpg
    6.3 KB · Views: 5,763
Are you going to try to completely duplicate their battery mount system and use the electrical contact blocks they have on the rack (batteries have metal contacts that touch the contact blocks in the rack)? You controller might fit inside the top of the rack, that's where Currie puts their controller.

385751255.jpg
 
I'm going to skip the contact blocks and use deans brand plugs. I will definitely try to get the controller in the controller compartment of the rack. Is the rack steel or aluminum?
I am going to order the rack asap, maybe today. I will probably redo my lower rack mounts because I just used two hose clamps for the lower mounts. I have been thinking of fabbing a new torque arm that has a threaded hole for my lower rack mount. I'm going to a machine shop that has a water jet next week so all I have to fabricate is a paper stencil. I will need the actual currie rack in hand before I can make my new torque arm/ rack mount.


My current set up is fine on road but it will probably let me down on a good trail ride. I'm going on a long ebike ride this weekend in the redwoods by the russian river with two friends who also have mountainbike ebikes. We could all use better battery mount systems.
 

Attachments

  • IMG_6520 (Small) (2).JPG
    IMG_6520 (Small) (2).JPG
    60.4 KB · Views: 5,438
liveforphysics said:
I like the re-molded PVC pipe useage. :) Clever!

That's a pretty decent pack capacity, one of the bigger A123 M1 cell based packs I've seen. Nice job!

Thanks! Here's the molding technique I used:
img0408mq.jpg


These tubes will hold a rectangular 6 by 2 by 8 cell A123 setup. Inside dimensions are 6.625"x2.75"x24", which leaves enough room for 1/4" shock absorbing padding around the batteries, plus 1/2" of room on one of the short sides for wiring. If you want to make a mold, buy a sheet of 3/4" plywood (which is actually 0.6875"), cut out two 6.625x26" sheets, and then cut out 4 ~2"x2" chunks.

Heat the oven up to 250 degrees, wait for the PVC to loosen, insert the two long boards you just cut, pull said boards apart and insert two of the spacers on one side, then the other. This will stretch out the PVC to the desired dimensions. DO NOT heat the PVC hotter than 250, as it will start to offgas chlorine gas. You'll need gloves. These fit perfectly in the frame racks of an xtracycle and allow you to use the panniers for cargo. This makes one stealth ebike.
 
dbaker said:
Nice job with the pvc pipe! Is that schedule 40? Did you heat it in an oven or use boiling water to reshape it? Are the finished packs 24-30 inches long?

Dave

Finished packs are 24" long.
 
For the longest time, I'd been trying to come up with a good solution to house my lipos. They've been an ugly, exposed, duck-tape mess and so far I hadn't been able to find a good, cheap, simple way to house them.

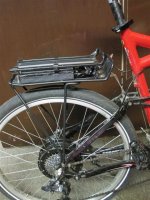
Yesterday, my motor burnt up and I decided against rebuilding it, or the bike, in the near future.

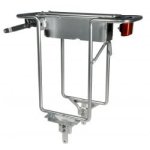
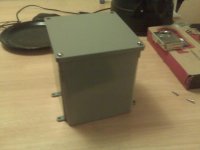
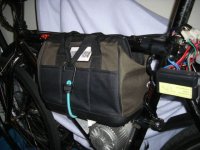
Today my new 15s 9Ah lipo pack arrived. It's composed of 9 3Ah, 5s Turnigy 3.0 packs. It says they are rated 20-30C. Much as I would love to feel the speed and power of this pack, it will never happen. None the less, I had to gloat a little and so I unpacked my new batteries and looked at them. Then, as I was drooling over them it occurred to me to check whether they would fit in a battery box I had bought for my other pack. These batteries' dimensions were a little different. To my surprise, they fit perfectly. I mean, like a glove. It was as though the box had been made for them, with one exception. There is just enough room in the box for exactly 3 more batteries, which would turn the pack into either a 9Ah, 18s pack or a 12Ah 15s pack. Possibly other combinations of series/parallel connecting 12 of these packs. Bottom line is this box fits 12 of these batteries perfectly.

Since I won't be using these batteries, and don't want them to waste away their life sitting around, I'm offering to do them up in the box nicely, add and attach some GGoodrum's parallel connectors/lite bms circuits, one of his charging regulator things, and my modified Meanwell (clone) PSU to charge it (charges at 5.8 or 8.1A now) along with the Trakker cell monitor, balancer, and watt meter. It can be all yours for the low low price of $600 (canadian dollars :wink: )
 

Attachments

  • IMG00379s.JPG
    IMG00379s.JPG
    59.1 KB · Views: 5,319
  • IMG00380s.JPG
    IMG00380s.JPG
    43.8 KB · Views: 5,319
  • IMG00381s.JPG
    IMG00381s.JPG
    37 KB · Views: 5,317
  • IMG00382s.JPG
    IMG00382s.JPG
    39 KB · Views: 5,318
My normal Bosch packs are in the plastic case above the rear wheel. SLA can be added inside the frame.
 

Attachments

  • 1-29-10 109.jpg
    1-29-10 109.jpg
    44.2 KB · Views: 5,306
Back
Top