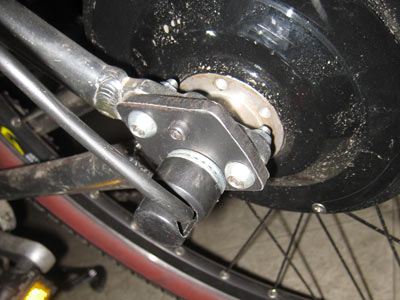
The importance of good quality torque plates

so maybe I should just finger tighten the pinch from now on..? I have trouble seeing how the pinch could've loosened the piece from the epoxy in the cove of the dropout.. since it is thick and doesn't have a slot. I noticed this when I found my wheel leaning to this side of the frame, meaning the piece was actually being forced downward. WHat is the correct way to compress an axle? it completely wedged apart my chromoly.. smeared it. "safety washers" seem to just pancake. Should I mill some sleeves that perfectly fit the OD of the axle .. with an end pad that conforms to the shoulder of the axle?
 
it looks like theres still green paint on the frame.i know theres no such thing as green seel or aluminum. so the bond failed between the paint and the frame
 
botz244 said:
it looks like theres still green paint on the frame.i know theres no such thing as green seel or aluminum. so the bond failed between the paint and the frame

I was going to say the same thing about the paint, but it's probably the angle he took the picture at since he said it was bare. How long did it take to fail?

You could also drill some holes through your torque arms and drop outs then counter sink them for the correct screw type. That would help in keeping it in place. Probably 3 screws each side is all that would be needed.

Shouldn't pinch type's have a slit at the arc end with a hole drilled at the end of the slit to prevent stress cracking? Might make it easier to tighten and if it's mild steel it probably wouldn't crack because it's more malleable.

I personally like having stuff welded if it can be, even just a few big tack welds so I never have to worry about it, but if the metals are too dissimilar sometimes there is no other choice.
 
hillzofvalp said:
so maybe I should just finger tighten the pinch from now on..? I have trouble seeing how the pinch could've loosened the piece from the epoxy in the cove of the dropout.. since it is thick and doesn't have a slot. I noticed this when I found my wheel leaning to this side of the frame, meaning the piece was actually being forced downward. WHat is the correct way to compress an axle? it completely wedged apart my chromoly.. smeared it. "safety washers" seem to just pancake. Should I mill some sleeves that perfectly fit the OD of the axle .. with an end pad that conforms to the shoulder of the axle?

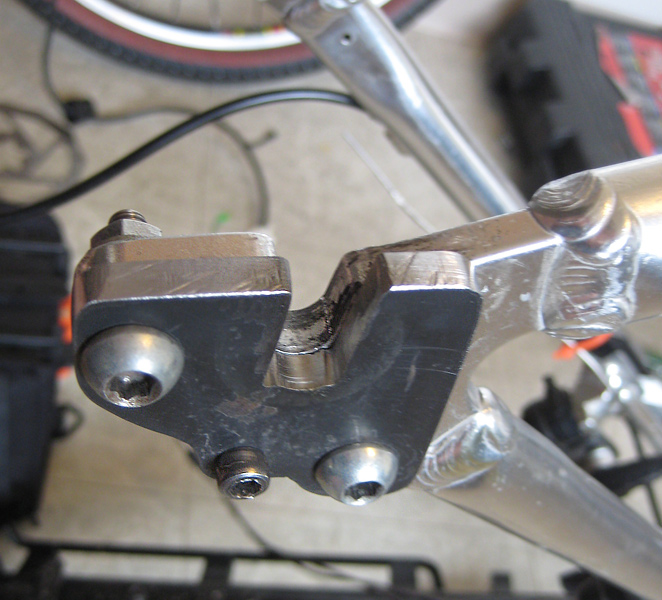
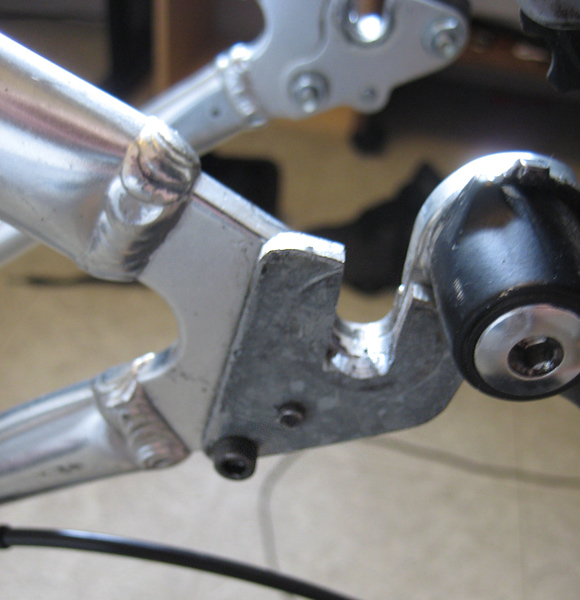
OK, This is what I assume might have happened. Tightening the pinch-bolt is what initiated the failure (the crack that you noticed). The spreading of the dropouts, caused by the wedging from the axle, further weakened the bond, to the point that the only place the bond had any integrity was in the cove area. The torque plate is now acting as a lever between the axle and the bonded cove area (the bonded area being the pivot point). The leveraged torque from the axle is what caused this last remaining bond point to fail.

IMHO, Pinched or clamped torque arms should only be bolted or welded.

As for the wedged dropouts, perhaps welding a "double-D" washer to a boss that fits over the axle. This would HELP prevent the washer from deforming.
 
I like the idea of just bolting them on. Much more peace of mind. now that I have a template I think I might machine a new set that conforms more to the frame and has more bolting points. If I used three bolts and modified my current plates, do you think that I could get away with M5 thread? Before I know it I'll have swiss cheese dropouts.

I've spreaded these dropouts when I didn't have torque plates.. and now that one side is spread again... I feel like this steel has been fatigued two too many times

I rode my bike like this for almost 700 miles. every few rides I tightened everything up as I believe I was supposed to do (nord locks included). The lower fork end spread the most (downward), which, when bent enough, led the axle to put pressure on the lower leg of my torque plate... therefore yanking it out of the cove... and putting my wheel to a huge slant to the drive side.
 
Here is my revised version at least for the drive side. I might leave the other side alone since it feels pretty solid. This one will bolt on to deraileur hangar hole (if I can recover the threads under gobs of epoxy), the original 1/4-20 hole I added in the cove, and the fender mount. this might not even need epoxy and should be pinch compatible. This should fully reinforce the dropout.. especially the lower leg that likes to bend downward under tension. I will post some drawings of the shoulder sleeve fittings I'd like to machine (safety washers).
6991321944_93f5c4bab2_z.jpg

Why don't these exist?! :
7137458647_df05e3d565.jpg
 
New and improved stainless .535" thick (.29" augmentation) plates are now tightly glued onto the clean, scratched, dremeled dropouts with a 10mm bolt to to the derailleur, a 5mm to the original fender boss, and maybe one more 1/4/20 to the cove if I have the balls to fix my hole that walked on me...

Stainless is a pleasure to work with (took me twice as long to make one stainless piece as it did to make 2 of the previous steel material). I might make a new one for the other side once our water jet is behaving properly.

I feel safe now, and I think I technically should be able to pinch. WAy more support in his design. I will countersink the 5mm so I can still tighten the 22mm nut. I may hold off until I make the shoulder caps until I get the cromotor (16mm axle). feedback appreciated

6997847280_5722819165_z.jpg

6997847722_a7c354a668_c.jpg

7143933831_c9afdf546d_z.jpg
 
Those dropouts are boss.

They would do so much better welded.
 
problem is that I don't want to frock up the heat treatment. I read about doing it and I do not think it's worth the risk on an already abused area of the frame. Side note would be that stainless is difficult to weld in general, and certainly difficult to weld to something such as 4130.
 
Stainless is softer than 4130. and plus your try to close a big gap thats glued openjust a half inch away. you need to pre tension your peice that your glueing first and not glue first then tension. so bolt your axle in your axle plate then glue it to your bike the stainless moves around .i had mine made out of 4130, but also mine are bolted to my frame and not glued. sorry if that doenst make any sense. and it only takes a speciel tig rod to weld stainless to 4130
 
mine need to be redone but for now i only have one side and its not movin any where
 

Attachments

  • 20120503_195447.jpg
    20120503_195447.jpg
    217.1 KB · Views: 2,793
its like high tension concrete. once the concrete is hard you cant tension the rebar,or itll break the concrete
 
For one, there is no way on earth this stainless is softer than this 4130. It's a no name from the scrap bin but it's super hard (17-4PH?). When I tapped the pinch section (~.65" through), I had to back up the 2 flute tap at least 5 times to clear JUST the small chips. The whole piece became hot to the touch when I was done tapping. I've had warm pieces after tapping but not hot.... AS I was letting the glue set I thought of what you describe: pretensioning the pinch... It's not a bad idea. I couldn't pinch though cause I need to drill a bigger clearance hole for the pinch bolt to line up with the threaded side (don't have the right drill bit). HOWEVER-- I did have the motor in the frame.. so it did probably do the opposite! (fits pretty close though).

I'm going to pinch this one and see what happens. I'm willing to do it again. What I do have going for me is that extreme even clamping force was present this time. The first time I did this I used one or maybe two vice grips just where I could fit them (towards the ends). Now I have the permanent bolts tightened to hell. ----maybe better adhesion? I'll let you know if I notice any cracking

updatE: I made the mistake of not backing out the bolts after epoxy set (1hr). tried loosening the smaller one and the head popped off almost like breaking a tap... the bolts are epoxied in.. probably even in the threads. I was guessing the bolts wouldn't be clean enough for the epoxy to adhere.. but I guess they were. Depending on how you look at it this is good or bad. I don't think I'm going to pinch until the other side is more spiffy.
 
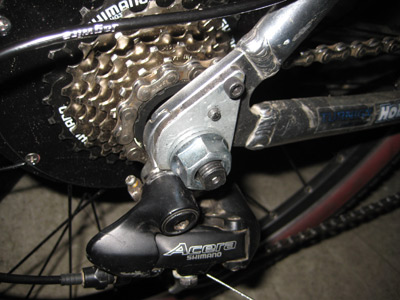
By the way, not to brag or anything but the ones i designed for my MAC motor a few years ago are still holding up to 8kW of torquey power and regen. I ended up buying another mid 2000's trek and replicating the design again because it worked so well.

torqueplate4.jpg


torqueplate3.jpg


torqueplate2.jpg


torqueplate1.jpg
 
Back
Top