The wheel-building spoke-lacing thread, post your tips

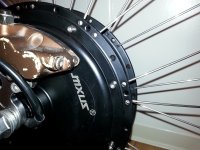
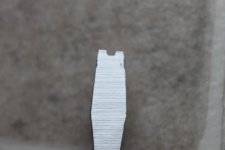
I've attached a photo below of the spokes. I guess the spokes are curved exiting the nipples rather than kinked. This is my first attempt at a wheel and my only reference was the original wheel, which had a similar spoke angle, so I may well be guilty of not knowing any better.

The spokes and nipple heads were lubricated with lithium grease. The creaking (only occurred on the very tightest of the spokes) appears to be the spoke repeatedly winding up and releasing.

I guess I should think of the spokes as M2 bolts and exercise some mechanical sympathy considering their diminutive size. Tuning wise, all the spokes "plink" with none going "plonk".

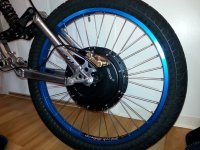
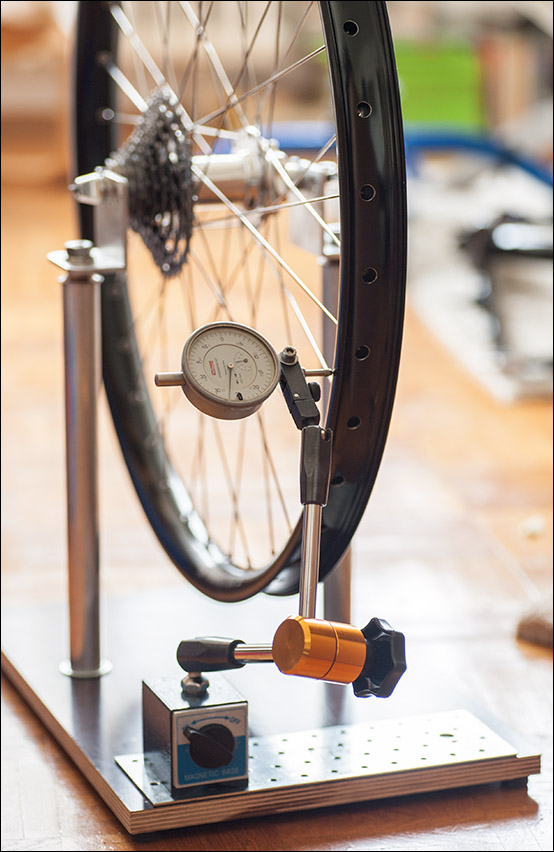
I was pleasantly surprised that the wheel required no truing. I guess I got lucky as on the first check after several rounds of tightening axial runout was ~0.75mm and radial ~0.5mm. So I just went round and evened up the tension, with a couple of subsequent minor tweaks to bring it back to true.

spoke_angle.jpg
 
My feel on how to tell the correct spoke tension........

One thing I have experienced is if the wheel is built with too much tension it can start to get real unpredictable in the way the rim will move in reaction to further trueing the rim. Everything just goes real crazy when the tension is too tight when it comes to how much the rim will react to truing adjustments. So besides getting a good seat of the pants feeling for spoke tension buy just flexing the spokes mid span this funny behaviour of the rim not reacting as it should to truing corrections can also be a heads up that things are too tight.

I think if a person builds a wheel and is not sure of the right tension a quick trip into the LBS for a confirmation on how the tension should feel to the hands would be a good idea. An extra small wheel or different spokes could I guess also effect how correct tension is interpretted. Too loose is obvious as your nipps can be moved by fingers alone if lubed propery and too tight should also be easy to kind of feel. Go for somewhere in the middle and keep the tension even is how I approach it and things have worked well over the years for me.

I feel that good overall even tension in all the spokes is more important that a perfectly true wheel especially with mountain bike rims and also because now we have disc brakes instead of rim brakes. For me I just make sure the wheel is stress relieved as I build it and go for an even feel of tension and true out the real wonky stuff.
 
Built a Xiongda recently. I am unlikely to keep it, but it has been a fun experiment...

2015-02-07 16.08.42.jpg

View attachment 5

Be aware I found that I must have ALL of spokes inserted before putting any of the spoke tips into the rim, or even putting any of the nipples on. All nipples were initially installed with only two turns in order to keep the wheel loose until all the spokes were checked and verified to be in the proper pattern.

2015-02-18 20.33.31.jpg

The round cardboard "donut shaped" divider turned out to be more trouble than help.

2015-02-18 20.16.25.jpg

2015-02-18 19.55.33.jpg

2015-02-11 19.50.34.jpg

I will need to add a washer on the left side to add a little extra airspace. You have to be aware of the type of forks you are using to make sure there will be no interference. This has not been a problem for the REAR Xiongda hubs.

2015-02-11 19.52.26.jpg
 
Looks like a neat build.

With a small geared hub duameter like that you could maybe have gone two cross.

Regarding feeding spokes from inside to out, having to give them a bend to insert is not unusual, a gentle curve is enough and they spring back if you don't take it too far.
 
spinningmagnets said:
I wanted to have half of the spokes inserted from the center towards the outside, but the flanges are 90-degrees to the shell so they would have to be bent in to insert into the rim. so...all the spokes had to be "inbound" with the spoke inside the flange.
I would have still done it that way, or even had all of them with the heads on the inside of the flanges, just to make the base of the "triangle" wider, for a stronger wheel (in side-loading, anyway).

But I'm not an expert by any means, and there might be a reason not to do it that way.
 
Also no expert, but my thinking too. but ..again, a narrow hub, thick spokes, it may have just been too much to bend the spokes in
 
If a Xiongda wheel-builder wanted to put all the spokes outside the flange for better side-loading, maybe order 230mm length instead of 229. I could have used 230mm, but the spoke end would have begun to intrude into the nipple-slot where the screwdriver is used. Plenty of airspace though, no tube interference at 230mm. You would have needed to use a spoke-wrench on the last couple turns instead of screwdriver as a result.

edit: sometimes the nipple can break if the spoke threads are only inserted halfway in (see pic in first post), I would now recommend getting the 230mm spokes for this hub on this model of rim.
 
Awesome summary of wheel lacing tips Spinningmagnets. It's funny funny to stumble on this because I was just in the process of writing something of a comprehensive guide to the particular lacing of hub motors for our website and you touch on most of the details here. There are a few additional tips I'd like to add, but first I have to address the following:

bowlofsalad said:
. Ebikes.ca is a fine calculator, but I feel like it is incomplete, missing key features that you may come to understand are important.

Everything my friend is always a work in progress! Have a preview look here:

http://www.ebikes.ca/spokecalculator2.0/sideview.html
SpokeCalc Preview.jpg

Just note that the hub motor database is very much preliminary and does not currently have any of the flange offset measurements included in it, so once we get all that done it will get pushed to the main ebikes.ca spoke calculator page, but now would be a good time to get any additional feedback you may have. Please play around and let us know if it hits the mark or not.

One of the main things I wanted to have was the ability to flip the spokehead on either the inside or outside of the hub flange and see the consequences of that both to the spoke lengths and the tension distributions, which you can now do here. It also lets you shift the hub as a whole left or right, to account for putting spacers on the axle and so forth:
View attachment 2

To the original topic of wheel lacing tips, one of the issues we've run into a lot lately are people wanting to lace up a hub motor into a fat tire rim, but where the spacing between the left and right holes in the rim is almost exactly the same as the spacing between the spoke flanges. In that case, the spokes are vertical and there is no way to true the wheel left and right, dishing is impossible, and the lateral stability of the resulting rim isn't great either.
Dishing Fat Rims.jpg

Assuming that the nipples have enough wiggle room in the eyelets, then one possibility is to lace the right flange to the left spoke holes and visa versa. This gives a much greater triangulation than you would normally achieve for a hub motor lacing, and if you look at the example on the right it allows for pretty extreme levels of dishing too, which you need for some of the offset fat bike frames.

spinningmagnets said:
If a Xiongda wheel-builder wanted to put all the spokes outside the flange for better side-loading, maybe order 230mm length instead of 229. I could have used 230mm, but the spoke end would have begun to intrude into the nipple-slot where the screwdriver is used. Plenty of airspace though, no tube interference at 230mm. You would have needed to use a spoke-wrench on the last couple turns instead of screwdriver as a result.

If you have the Xiongda 2spd hub measurements handy I can add that to the hub database and and then you can see exactly what the difference is for inside vs. outside spokes. In many cases it is around 1mm.
 
Good to see you posting here, Justin! I did use the ebikes.ca/Grin Technologies spoke calculator, and I now highly recommend it. I will get you those measurements on the Xiongda today. I only tried to lace the spokes on this Xiongda because they don't sell a factory-mounted option right now. but...now that I have, I am glad I did, and I think it would be useful for just about anyone to give it a shot at least once...
 
I have a fairly simple method for one cross pattern,
I just need this one pic handy to do it.
You get the first four spokes in the order 1,2,3,4 ( in green) exactly as shown, you simply repeat that 4 spoke pattern all the way around.
works a treat
spoking27.jpg
 
whatever said:
I have a fairly simple method for one cross pattern,
I just need this one pic handy to do it.
You get the first four spokes in the order 1,2,3,4 ( in green) exactly as shown, you simply repeat that 4 spoke pattern all the way around.
works a treat

That's how I do it, assemble 9 sets of 4 for 36H hub/rim.
 
If you guys are doing final tightening with a screwdriver then I think I got mine plenty tight enough because I had to use a spoke key petty early on...
 
Yea, ...odd, I'd only ever use a screwdriver for the first stage, but a screwdriver cut the other way to that one....with a stub sticking out the centre
So when the spoke gets to jstu start exiting the threaded hole, it pushes the screw driver off the nipple.

From that point I then use a spoke key
 
Yes the proper tool for the job usually makes things easier, Spoke wrench to tension.

Just Had to use that slotted screwdriver to take apart a wheel that had the threads sticking up too far and the nipple was rounded off so the wrench did'nt work.

So when I read...
spinningmagnets said:
If a Xiongda wheel-builder wanted to put all the spokes outside the flange for better side-loading, maybe order 230mm length instead of 229. I could have used 230mm, but the spoke end would have begun to intrude into the nipple-slot where the screwdriver is used. Plenty of airspace though, no tube interference at 230mm. You would have needed to use a spoke-wrench on the last couple turns instead of screwdriver as a result.
...made me think of that screwdriver that I hit the dremel tool with.
 
I think I wrote it before: For the last ten or twelve wheels, I used Sapim Hexagonal nipples. I will not go back to standard nipples if I can avoid them by any chance.

hexagonal.jpg


If you have a slim 5.5mm hex nut (standard M3 nut size) that will fit through the upper spoke holes, inserting nipples into the rim is vastly more convenient and initial truing is way easier to do as well. Mine was 1/2 a millimeter to thick for the job initially, but some persuason with a file and electric drill fixed that.
Apply a little bit of grease to the spoke thread and the nipple seat to make sure all nipples have similar friction.

I use 2mm Sapim Leader spokes. They proved sufficient for the 2.5-3kW hubs in 24" and 26" rear wheels, as well as for the latherally way more stressed 20", 24" and 26" front wheels of my Trike.

My truing stand is a rather simple affair. Made from a piece of plywood, two 25x3mm aluminum tubes, two M10 thread rods, two aluminium brackets and a couple of washers and nuts.

diy-truing-stand1.jpg


Works as a crude hub motor test stand as well.

hub-motor-test-stand.jpg
 
Just doin one..
Counted the turns till about 75% tort, then before I moved on to shaping it up, checked tension was even on all spokes. Now, It would be had all spokes and nipples matched. Mine are from china though. Counting turns is mathematically correct, but only if they are all the same size, with threads starting identically. It just didn't happen. So, at this point I did some truing but not typical truing where we take from one spoke to give to another. Instead, I did a rough check of squareness then found the looser spokes and did them up where possible. This gave me a fairly square wheel with more even tension across all spokes. It was then that the more typical truing began. From this better foundation than just counting turns would bring.
 
The sort of driver I have always used, is as pictured in the article below

http://www.wheelfanatyk.com/blog/wheelbuilding-tip-15-spin-those-nipples/
 
I have a normal screwdriver with the middle of the tip ground out to make something like a security bit. Simple enough. To this I have added a cable tie. Just round the shaft, with the free end sticking out. I put the driver on the nipple, and turn the cable tie around on the shaft till it is in alignment with the rim. This makers counting turns a lot easier, and aids giving them a number of degree's. I found without the tie I was counting half turns and remembering the position in terms of telling the time. Watching the cable tie do laps and finish aligned is a lot easier.
 
friendly1uk, you are right, I didn't mention that...after I had gotten the entire wheel to 12-1/2 turns per nipple...that was when a snug tension was achieved. I then loosened a few 1/2 turn, and several were given an extra "tightening" turn or so to true the rim up. Until I ride on that wheel, I won't know if the tension was tight enough. Right now the rim is "fairly" true and straight, and the spoke tensions are "reasonably" even and snug.
 
spinningmagnets said:
friendly1uk, you are right, I didn't mention that...after I had gotten the entire wheel to 12-1/2 turns per nipple...that was when a snug tension was achieved. I then loosened a few 1/2 turn, and several were given an extra turn or so to true the rim up. Until I ride on that wheel, I won't know if the tension was tight enough. Right now the rim is "fairly" true and straight, and the spoke tensions are "reasonably" even and snug.

It's a feel thing isn't it. Something a book can't tell you. A built wheel that needs truing can be done by following rules, but that initial set-up takes.. empathy?
 
If you don't have the tension-checking and alignment/runout-checking tools, etc., then yeah, it is kind of about the feel.

With those tools it should be possible to follow a set of rules and do it, or to have an automated machine do it, though an experienced wheelbuilder could probably still tune it more perfectly after that just by feel. ;)
 
NeilP said:
Regarding feeding spokes from inside to out, having to give them a bend to insert is not unusual, a gentle curve is enough and they spring back if you don't take it too far.

Great thread and love the pics! A further note on Spinningmagnets' concern about spoke bending from my own experiences - basically bending spokes doesn't matter. Spokes are made of steel - you bend them to get them into your wheel and then just bend them back to roughly fit. Properly tightened, all 'bends' will disappear. What really matters is that you get rid of any residual spoke stresses. This may mean:
- always dipping all spoke threads in thick oil or grease (wipe off excess and drain on newspaper)
- over tightening with the spoke key or spoke spanner (a screwdriver can never get the wheel to the appropriate tension) and then backing off half a turn to remove 'wind up'
- if spoke elbows are not snug against the rim where they bend around it, just tap them gently(!) with a small hammer to remove excess clearance and radius
- stress relieve all spokes several times during the tensioning up, mostly by squeezing adjacent pairs of spokes as hard as you can, and at least once, by going around the wheel on both sides, 'levering' adjacent pairs of spokes against each other with something like a ring spanner.

It's stress from excessive torsional wind-up and from unrelieved tension stress as well as inadequate tightening that leads to busted spokes down the track. Removing wind-up is particularly important in preventing breakage at the threads. I've found that ensuring the above steps are followed is the recipe for strong wheels. So in a very real sense, 'a bent spoke is a good spoke!'

Savvas.
 
I ended up drilling new holes, 3mm diameter, countersunk, at 20mm on center to lace up my 24" rim with MXUS 3000 motor. Spokes are Sapim 13 gauge by 135mm but could have been 2mm shorter. I think they ended up being longer than what the spoke calculator specified because I laced them with the elbow in (head out). Rim is centered over the hub (no dishing). I hope it works out.
 

Attachments

  • R1(Custom).jpg
    R1(Custom).jpg
    88.1 KB · Views: 3,025
  • R2(Custom).jpg
    R2(Custom).jpg
    79.6 KB · Views: 3,025
  • R3(Custom).jpg
    R3(Custom).jpg
    91.9 KB · Views: 3,025
Back
Top