Updated Cap choices for high power motor controllers Updated

I would expect the ripple current at the PWM frequency to be the dominant contribution. Also, there will be significant ripple currents occurring at the harmonics of the PWM frequency - 2x, 3x, 4x, 5x, etc.

jbd, I don't see anything wrong with your SPICE simulation. I don't understand why you used a snubber instead of just putting the smaller cap in parallel with the larger one, but that would have a minimal impact on your results. The main caps see a lot of ripple current, no way around it. I don't think it's realistic to expect anything smaller than several hundred nH of inductance on the battery wires, so the 200 nH of your sim is probably optimistic. It's worth noting that the ripple current rating of caps is often (not always) given at 120 Hz, so the rating at 10 kHz will frequently be higher.
 
When you change the value for L4 to be more representative, you will find the cap spikes decrease. The situation you've drawn is similar to what happens when somebody tries to run an RC motor (which generally results promptly in cap explosions, and mosfet explosions etc, as your model would dictate.)

Try changing L4 to 450uH, and R5 to be 280mOhm. Those are fairly typical hubmotor values.
 
I’ve been a fly on the wall with this very interesting conversation, yet I beg to ask a question at risk that it might be construed as OT...

Would it behoove us to replace the large stock caps on the non-ESC controllers with low ESR-rated?

For myself, there are two I can think of:
  • 100V 470uf hanging off the Vbatt
  • 100V 1000uf off the FET side
Searching for validity, I tried to do a reverse lookup of the Changx 100V 470uf and couldn’t find diddly on it. However the Nichicon 100v 1000uf matching the temperature range does provide ripple current rating of 715mA though does not list the ERS or Impedance.

Given a positive nod, it wouldn’t bother me in the slightest to replace these components. At Digikey, Panasonic – ECG lists p/n P10874-ND as 100v 470uf with 1.92A ripple and 47 mOhm Impedance (and has thrice the rated lifetime over the Nichicon). Likewise, Cornell Dubilier Electronics (CDE) lists p/n 338-2507-ND 100v 1000uf with 1.7A ripple and 182.0 mOhm Impedance. The total would be < $8 USD.

Am I barking up the right tree?
Seeking attenuation, KF
 
LFP, I don't like to be contrary, but I don't think the larger values of L4/R5 will make as large a difference as you expect to the currents in the decoupling cap. I'd be interested to see jdb try a different set of values, but I wouldn't expect to see a large difference.

The L/R ratio of the motor controls how fast the motor current grows, but motor current is still relatively constant with some ripple. The problem the caps are trying to solve is that the battery current is trying to go from zero to max and back to zero during each PWM cycle as the FETs turn on and off. The motor L/R ratio doesn't have very much influence on this process (non-zero, but relatively small). The R/L/C values associated with the wires and caps are much more important.

KF, I don't think you can do any harm by upgrading the caps. Higher values and/or lower ESR can only have a positive effect.
 
rhitee05 said:
LFP, I don't like to be contrary, but I don't think the larger values of L4/R5 will make as large a difference as you expect to the currents in the decoupling cap. I'd be interested to see jdb try a different set of values, but I wouldn't expect to see a large difference.

The L/R ratio of the motor controls how fast the motor current grows, but motor current is still relatively constant with some ripple. The problem the caps are trying to solve is that the battery current is trying to go from zero to max and back to zero during each PWM cycle as the FETs turn on and off. The motor L/R ratio doesn't have very much influence on this process (non-zero, but relatively small). The R/L/C values associated with the wires and caps are much more important.

KF, I don't think you can do any harm by upgrading the caps. Higher values and/or lower ESR can only have a positive effect.


Change the values and see.

Watching on my scope across the caps on an RC motor controller, changing from a 3 turn to a 5turn, keeps an identical L/R ratio, but the voltage ripple more than doubles...
 
liveforphysics said:
Change the values and see.

Watching on my scope across the caps on an RC motor controller, changing from a 3 turn to a 5turn, keeps an identical L/R ratio, but the voltage ripple more than doubles...

If you change the resistance of the wind, then obviously we should expect the current and hence ripple voltage will change. The example I was trying to make was that, assuming a constant average current, changing the motor L/R ratio won't have much effect (basically that means adjusting L and leaving R alone). I ran that simulation and the battery and cap current waveforms were nearly identical for R=100m, L=50u and R=100m, L=200u (a factor of 4 difference).

What this tells me is that no matter what motor with whatever L/R ratio, the caps will probably see a peak current approximately equal to the average motor current. This appears to be true even when the PWM frequency is increased, which reduces ripple everywhere else.
 
I don't understand why you used a snubber instead of just putting the smaller cap in parallel with the larger one, but that would have a minimal impact on your results.

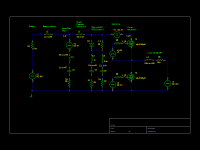
The snubber serves a different purpose. The model is intended to show the influence of caps that are immediately adjacent to the fet on the PCB. They play a significant role in reducing the peak voltage seen at the cap due to remaining inductance in the input filter caps themselves as well as trace inductance between the input filter caps and the FET. I've modeled a nominal 10nH here, and that may be optimistic, depending on the board layout.

I don't think it's realistic to expect anything smaller than several hundred nH of inductance on the battery wires, so the 200 nH of your sim is probably optimistic.

It was the smallest source inductance that I could bear to model without cringing. Here's another model run that raises the battery inductance to 1uH, and raises the input cap to 2 mF to represent a larger array of caps to spread out the input current. The effect is pretty dramatic. Effectively the cap current becomes a square wave, with the battery pack current being relatively constant. Therefore, putting a current clamp on your battery wire and measuring the ripple on a 'scope should give a good indication of how well the wiring has been routed.
battery_current.png

Postby liveforphysics » Fri Apr 29, 2011 1:51 pm
When you change the value for L4 to be more representative, you will find the cap spikes decrease. ...

Try changing L4 to 450uH, and R5 to be 280mOhm. Those are fairly typical hubmotor values.

rhitee05 wrote: LFP, I don't like to be contrary, but I don't think the larger values of L4/R5 will make as large a difference as you expect to the currents in the decoupling cap. I'd be interested to see jdb try a different set of values, but I wouldn't expect to see a large difference.

There is almost no effect on the voltage spikes whatsoever. The principle effect of increasing the motor inductance is to reduce the ripple current in the motor windings themselves. It also reduces the ripple voltage seen at the filter caps to a point, but this isn't where the damage is being done. I did not increase the winding resistance, even though it would probably be appropriate, just to avoid rebalancing the BEMF.
motor_current_200uh.png

Now on to the really interesting changes. I replaced the ideal freewheeling diode with a second identical FET, with the gate held to zero. My original intent was to check for dV/dt-induced turn-on of the low-side FET, but instead I discovered something else. The body diode takes a non-zero amount of time to switch off, which IR has been kind enough to provide in their SPICE model. The effect is that there are two voltage spikes to deal with: one when the high-side fet is turned off, and another when it is turned on. At the same time, I had also modeled the inductance of that film snubber cap. The result is... pretty dramatic. I started seeing these extra-large voltage spikes on the turn-on, and ran a short-run high-resolution test of one PWM cycle to take a closer look.

fet-death-on.png
I guess that's how SPICE shows something blowing up :twisted:. The voltage is clipped on the high-side due to the reverse breakdown of the low-side FET. This is the voltage that would be measured on the fet's package pin, not the controller's input terminals.

So, what cap has the smallest ESL? An MLCC, of course, as fetcher pointed out above. A relatively standard 1210 2.2uF 100V MLCC cap from Kemit comes in at a 0.8 nH package inductance, and 1MHz ESR of only 6 mOhm. And it totally saves the day.

fet-survive-on.png
fet-survive-off.png

So, the lessons: Attention to detail on the board with the caps that sit immediately adjacent to the fets also has a strong influence on the fets' survivability. Higher-capacity low-ESR input filter caps do help to decouple the battery from the controller, but there is still some remaining inductance that must be addressed by low-ESL low-ESR smaller caps.

Second, the body diode of a power MOSFET may be a relatively low-performance P-N junction. There is a short-duration shoot-through current during high-side turn-on (and low-side reverse recovery) that makes the snubber's job much harder. In this particular sim, the peak current is 2x the winding current, for 4x the energy storage required to avoid a breakdown of the low-side diode. It might be interesting to take a 6*N-FET Infineon (or one of its clones) and populate it with 6*(N-1) FET's and 6 Schottky diodes, assuming you can find parts that are pinwise compatible with TO-220 (I haven't checked). Slowing down the switching speed does help a little bit, but at a much higher switching loss penalty.
 

Attachments

  • snubbers-schematic2.png
    snubbers-schematic2.png
    11.6 KB · Views: 8,849
Ok so I am reading through this thread and trying to understand what numbers to look for.
I also remeber what luke was trying to teach me. But can you guys give me some ideas for what caps to choose for populating 3-24fet bords and 3-36fet bords?
Luke was teaching me about using 3 types of fets for different levels of protection. But I need some help I want to buy in bulk and have been shoping egay with some luck on some fets that look like thy will cover part of the job.
Any help would be awesome.
Arlin.
 
SO I ordered these
200501968503 50pcs Nichicon Snap-In 160v 220uf Capacitors New 1 $38.00 $38.00
200527616424 50 Nichicon 160V 22uF Low ESR 105C Radial Capacitors 1 $32.00 $32.00
190348413929 20 CDM 160v 100uF Low ESR 105c Radial Capacitors NEW 1 $37.00 $37.00
190445572283 25 TCI 160v 1500uf 105c Super Mini snap in Capacitors 1 $56.00 $56.00
But I still cant find the little red ones luke was pointing out...
Anybody know of what other caps I should get for my controler builds?
 
Are there spaces existing on the boards for ceramic caps across B+ and B- right next to the FETs?
 
jdb said:
Are there spaces existing on the boards for ceramic caps across B+ and B- right next to the FETs?
I think so i will douple check tonight.
 
Arlo1 said:
SO I ordered these
200501968503 50pcs Nichicon Snap-In 160v 220uf Capacitors New 1 $38.00 $38.00
200527616424 50 Nichicon 160V 22uF Low ESR 105C Radial Capacitors 1 $32.00 $32.00
190348413929 20 CDM 160v 100uF Low ESR 105c Radial Capacitors NEW 1 $37.00 $37.00
190445572283 25 TCI 160v 1500uf 105c Super Mini snap in Capacitors 1 $56.00 $56.00
But I still cant find the little red ones luke was pointing out...
Anybody know of what other caps I should get for my controler builds?
My order was substantially less for my two 100V 12-FET controllers:
  • P6702-ND CAPACITOR 1500UF 100V ELECT @ $3.37 each
  • 493-1685-ND CAP 680UF 100V ELECT @ $1.80 each

I just went with the biggest I could stuff into the enclosure from Digikey. Sorry – didn’t consider the ceramics.

Snubbed? KF :)
 
Kingfish said:
My order was substantially less for my two 100V 12-FET controllers:
  • P6702-ND CAPACITOR 1500UF 100V ELECT @ $3.37 each
  • 493-1685-ND CAP 680UF 100V ELECT @ $1.80 each

I just went with the biggest I could stuff into the enclosure from Digikey. Sorry – didn’t consider the ceramics.

Snubbed? KF :)
I want to stick with 160 volt caps so I can build any controler to run 150v fets as well if I do run 4110 fets I run 24 s so I dont want to be that close to the cap limit.
As for the price...... I am looking to build the best controler possible not the cheepest. As well 12 fet controlers will not work.
 
Kingfish said:
Sorry – didn’t consider the ceramics.

Snubbed? KF :)

Quick warning: The diode in that snubber is important. The Fairchild and CDE application notes point out that its purpose is to prevent ringing between the snubber caps and the main input filter caps. Without the diode, this particular model blows up the low-esr ceramic cap with excessive ringing current.

See also Fairchild Application Note AN-9020, section 7. The modeled snubber is based on the RCD Snubber Circuit, type "e" in that document.
 
I hear and understand your points, but I still don't think that the diode snubber is necessary or beneficial. You really want the decoupling caps to both absorb and release energy quickly and the diode prevents one of those from happening. It is possible that some ringing could occur, but I don't think it's very likely. It's better from an engineering standpoint to just design the board carefully and eliminate the ringing that way. And in all honesty, I'm not convinced its that likely to happen anyhow.

My design recommendation would be to use a set of large low-ESR electrolytics for capacity and a set of ceramics for low inductance. Surface-mount ceramics would be preferred, but you could get away with leaded. The ceramics need to be placed carefully for the lowest inductance possible. It's not as important with the large caps, but still useful to keep the inductance low. To add an extra degree of protection in really stressful applications, I would add a TVS diode across each MOSFET. Those diodes would clamp the FET voltage below the maximum limits and absorb any quick transient spikes.
 
Hmmm thanks rhitee05.
I will do some more shoping online once im in Ottowa if I get a chance.
 
Hello,
My comments may be late but I still need advices
My design recommendation would be to use a set of large low-ESR electrolytics for capacity and a set of ceramics for low inductance. Surface-mount ceramics would be preferred, but you could get away with leaded. The ceramics need to be placed carefully for the lowest inductance possible. It's not as important with the large caps, but still useful to keep the inductance low. To add an extra degree of protection in really stressful applications, I would add a TVS diode across each MOSFET. Those diodes would clamp the FET voltage below the maximum limits and absorb any quick transient spikes
I'm ok with all this. Now I wonder how the layout of Mosfet + traces + different capacitors is done. Anyone have a example layout?

My second question is about the way capacitors are chosen.
They have some caracteristics (capacity, voltage, riplle current, ESR, impedance)
Do anyone have a method (even empiric) to choose capacitors (depends on the application), or is everybody doing in way certain way because it has always be done this way.
I don't want to be rude but some people seem to have a working system with 3$ capacitors when others buy 30$ ones. I wonder if we have to spend 30$ in capacitors if 3$ ones do their job.

Have a good night everybody
 
This is tricky business to get right. Most people would just toss a lot of capacitors at the problem, thus more expensive. To do it with less requires a great deal of knowledge, experience, and most of all probably several design iterations.

Lower ESR is pretty much always better. You can figure out what's "low enough", but again that's tricky to do. Same with "enough capacitance", but more never hurts. A combination of ceramics and low-ESR electrolytics is better than electrolytics alone.

Layout is the most important. The ceramics in particular must be VERY close to the FETs with the smallest loop area possible. Electrolytics can be further away but closer is better.

So many factors influence the performance that its impossible to make specific recommendations. To a certain degree, you can use more capacitors as a substitute for knowledge/experience/iteration, but only in a limited way. The design challenge increases quite rapidly for higher power designs.
 
rhitee05 said:
Same with "enough capacitance", but more never hurts.
At least, until there is so much capacitance that the power-on inrush current vaporizes the power input traces. ;)
 
Hello,
and thanks for the answers

I'll make a few statements tell me if it's true:
- The capacitors must be put between the V+ and the V- of the battery

- The capacitors must be put as near as possible to the mosfets.
But near from which ones? high ones? low ones? both?

- To satisfy the speed problem (inductance) ceramic capacitor are used in addition.
The best ceramic capacitors are Surface mounted ones, but since for my layout (but i'm pretty sure not to be alone) the V+ is on a side and V- another, it's quite tricky to put a surface capacitor
The objective of this capacitor is stocking fast little energy. I'll begin by using somethin,g like this : http://fr.farnell.com/avx/12061c105k4z2a/condensateur-1206-x7r-100v-1uf/dp/1833855


-Then there is also need of bigger electrolytic capacitor with low ESR ( to prevent them heating) an high ripple current ( a little bit like ones chosen for a power supply?). Then can be put a little bit farther.
I'll choose some thing like this http://search.digikey.com/scripts/DkSearch/dksus.dll?Detail&name=SLPX392M100H5P3-ND

Last questions:
What are the key factors of the design that have an influence on the choice of the capacitors ?
- voltage
- amperage?
- switching frequency ?
- motor consideration?
- ...

Have a nice day everybody
 
Lagoethe said:
Hello,
and thanks for the answers

I'll make a few statements tell me if it's true:
- The capacitors must be put between the V+ and the V- of the battery
Yes
Lagoethe said:
- The capacitors must be put as near as possible to the mosfets.
But near from which ones? high ones? low ones? both?
as close as possible to the pair. the Pair of MOSFETS should be situated as close as possible to minimise inductance in the loop. See my PCB in my controller thread http://endless-sphere.com/forums/viewtopic.php?f=2&t=23205&start=195
Looking at my PCB you can see the SMD capacitor is touching the drain and source pads of the MOSFETS with low inductance wide fill areas for the +bus and -bus.
Lagoethe said:
- To satisfy the speed problem (inductance) ceramic capacitor are used in addition.
The best ceramic capacitors are Surface mounted ones, but since for my layout (but i'm pretty sure not to be alone) the V+ is on a side and V- another, it's quite tricky to put a surface capacitor
The objective of this capacitor is stocking fast little energy. I'll begin by using somethin,g like this : http://fr.farnell.com/avx/12061c105k4z2a/condensateur-1206-x7r-100v-1uf/dp/1833855
I used some physically larger SMD caps as more surface area is better ( generally lower ESR). See my thread as I can't remember the part number.
 
etard said:
I would love to see someone start a controller build thread that outlines each component chosen, why this particular choice over others, and what each part does in the system.


How large would the interest be for a thread outlining the design (from scratch) of a sensorless BLDC controller ? I have a design using a generic PIC16F88, schematic, assembler code, everything my own design...

http://www.youtube.com/watch?v=dGfrcnu5J-I
 
Lebowski said:
etard said:
I would love to see someone start a controller build thread that outlines each component chosen, why this particular choice over others, and what each part does in the system.


How large would the interest be for a thread outlining the design (from scratch) of a sensorless BLDC controller ? I have a design using a generic PIC16F88, schematic, assembler code, everything my own design...

http://www.youtube.com/watch?v=dGfrcnu5J-I
The problem with sensor less is you can not start with hi power off the line. SO if you simply have hall sensors then you can start with more power and have the controler switch to sensorless once you are moving!
 
About capacitor:

As I asked before in the thread, is there a rule and how can we choose capacitors for DIY controllers? Here I talk about the main capacitor, the big ones, NOT those for little power, little noise, (high frequency), very close of the FETs.

Ludwich Retzbach:
if we use rule of thumb, for every 4inch/10cm extra length/distance between battery and ESC, add an 220uF extra capacitance ,

CC :
if we use rule of thumb, for every 2inch/5cm extra length/distance between battery and ESC, add an 220uF extra capacitance

I think the rule should be a little more complicated than that in theory? Must be a link with Lenght of wire (Inductance OK) and with Capacitance (OK). But also with other electrical caracteristics:
ESR as we said about 2541 times in this thread, switching frequency, voltage, Amperage, Heat dissipation?

It seems to me it's the only part of a DIY controller, which is not fully mastered in this forum, and it seems that everybody only use their nose and no proven method (when I write method I also think of Empiric method, then rule of thumb should be interesting, but don't talk about ESR, which is decisive).
It's sad because there are enough skills on this forum to solve this problem, and not make each one burn the same Fets.
I know it's a complex part of the design, but maybe if we look at it little by little as we do all the time we might be able to solve the problem. Maybe we could make brand new topic, now that a lot of enlightments have been put here, now that a lot of us have the "basics" of those capacitors. Or maybe not. But we miss a clear explanation on choosing the main capacitors.

I apologize for my wood-legged english (don't practice enough), I hope you'll have understand the main idea.


Have a nice day everybody
 
Back
Top