ZombieSS's power stage for Lebowski's controller video pg17

Hi ZombieSS's

All aluminum is not the same to machine. You may want to try a few different suppliers if this gets going. Some is a real pain with sticking/ galling to tooling. Good taps are a must. Agree on the skip tooth style also. Old machinist's rule of thumb was to use cutting oil on steel and kerosene on aluminum. Best stuff is the old reliable pro tap /tap magic or rapid tap for aluminum. I hate the smell of most of them, but work better than anything. They are a life saver in deep pockets. Keep those cheap taps to loan out to folks that never return stuff. :twisted:
 
So I ordered some Widia taps from McMaster Carr... wow, what a difference. I got lucky and found one of my old good 6-32 tap, but these new Widia taps are even better. I also ordered a T-handle that allows me to do the tapping while using the mill (unpowered) to keep the holes straight. I just received all my goodies today, but I already have all the holes tapped, somewhat straight :lol: Explains why I broke my old good tap... oops.

So due to me lacking proper clamping devices at the time I did this work I mangled the holes a bit, but now it will all fit together, just not as nicely as I had originally planned.

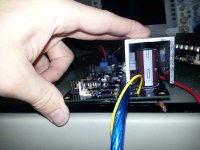
Here are some pictures of the FETs mounted to the heat sinks and also of how they will be mounted inside my 6x6x12" 0.125 wall "enclosure". This thing is going to be shoe box sized, but it is a prototype after all. Good news is it fits on the rear rack of my high speed Cromotor bike without issue so I'll test it on that beast, motor is only 30uH and >17KV. Best load source I have and it's been my standard for testing controllers.

So here is the rough mockup of what I'm doing. It may be ugly, but it should work well. This is what you have to do when you design something without an enclosure in mind.

View attachment 3
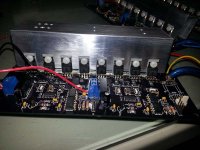
controller-hs2.jpg

controller-hs3.jpg

Below you can see that each phase get's it's own 6x12" face of the tube as a radiating cooling surface. Attachment is done by six 6-32 bolts on the top of the U channel to help spread the force evenly. Hopefully it works well with a think coat of thermal paste. I'm not a big fan of having the heat having to travel around that 9 degree bend, or that U channel is 0.125 wall vs 0.250 wall, but I needed to make sure everything fit correctly. My original plan of stacking the 3 boards with 50mm spacers just didn't work out as well as I had hoped, but this design is thermally superior to what I originally was going to do, 3x more case surface area is being used and a much shorter path.
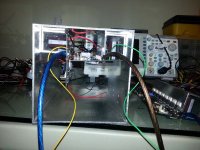
controller-hs4.jpg

Now that I have the proper blocking and clamping kit + a good mill vise, my next heat sink bar should come out much better. Plan is 18 TO-247 FETs on a 1.500 x 1.000 x 7.000" aluminum bar (9 on each side, high side on one, low side on the other with 2 almost direct 1.0uF D-S caps per phase) and then mount the 1.000 face to the top of an aluminum enclosure for thermal dissipation. I'm thinking about going 1.500x1.500 for the extra surface area on the mating face, but it really drives up the 4 layer board cost.

New all SMD driver boards are almost ready to be sent to PCB fab at OSH park. They will be 1 high side, 1 low side with the option of being powered by individual 1W isolated supplies or just two 2W isolated supplies, 1 for high side, the other for the low side. All the same features of this but I'm including the option of the boost stage which will allow up to 15A peaks, if the supply caps can deliver enough current. I've placed spots for 10uF XR7 caps on the board so I'm thinking it will do it. During testing of the this current design I was able to get decent arcing from my gate driver at 15V which surprised me since the power supply is only capable of 67mA at 15V, but the peak current is much higher. Board size is 2.5 wide by 2.5 long, boost transistors bent over so that 3 of these boards can be built into a 3phase sandwich. Screw terminal blocks for connections, twisted wire outputs/inputs. Pretty sure I'm going to make this open source. I need to document how to change the components to fit individual needs, but I already have a spreadsheet that does all the hard math.

I'm not sure how many people will really want to use this gate driver design once it's proven, but from what I've seen on forums so far, gate drivers are the hardest thing to design and have work well, let alone have all the features like my Cadillac driver does. No worries if no one else wants to use it, I did this mainly for myself and HighHopes encourage copying working designs, I do it all the time and I like to give something back.

Before I do all that documenting though I need to get my act together and update my greyborgusa.com website. Business needs to come first and I haven't updated it in a long while, not since I started selling the custom warp ebike frames :( I get too wrapped up into this development.
 
Lebowski said:
fingers crossed that it'll survive :D It's not exactly a low inductance output stage, so slowly increase the max phase current when you take it to the street.

Define low inductance output stage for me.

I've seen you talk about it, but it doesn't make any sense to me. From what I've read and seen inductance doesn't matter anywhere near as much as loop area and everything in my design has very small loop area, everything that has high di/dt overlaps to help cancel out the radiated field.

As far as I can tell, stray inductance pickup in the gate driver is the issue that happens in most designs and that's where having big loop area / high inductance matters the most. My output stage has >90% over lapping power planes which means I get very little radiated EM field that I have to worry being picked up in the gate drive and causing ringing. I get virtually no ringing at 150nS switch time using 1 or 4 parallel MOSFETs into a 5uH coil, the more in parallel, the cleaner the signal even when I speed the switching time back to 150nS. Tried single pulse and 5uS-10uS pulses at 19khz, no issues no matter what the load was, dead short to 100uH. Biggest problem I've had with this driver/output stage so far is slowing down the switching time from warp speed to something around 400nS.

Guess I'll find out when I can finally load test this on my bicycle with my high speed Cromotor that makes a Crystalyte 5302 look like it's a high inductance hub motor.
 
Lebowski said:
zombiess said:
Lebowski said:
fingers crossed that it'll survive :D It's not exactly a low inductance output stage, so slowly increase the max phase current when you take it to the street.

Define low inductance output stage for me.

http://endless-sphere.com/forums/viewtopic.php?f=30&t=55641&p=828490#p828490

Go look at my design files and you'll see all the overlapping power planes, same thing ;) Only non overlapping power plane areas are where the B+ and B- connect, right in the middle of the buss.
 
zombiess said:
Lebowski said:
zombiess said:
Define low inductance output stage for me.

http://endless-sphere.com/forums/viewtopic.php?f=30&t=55641&p=828490#p828490

Go look at my design files and you'll see all the overlapping power planes, same thing ;) Only non overlapping power plane areas are where the B+ and B- connect, right in the middle of the buss.
still, it violates the second part of my thread (build 4 6FETs instead of parallelling all FEts for one phase together). But the proof will be in the riding around, I hope it survives :)
 
zombiess, I would love to see some scope shots of the switching from the system you got now to compare with my shots. I did see some in previous posts, but I was missing an explanation of how it was measured e.g. where did you place the probe, were you using differential probes ect.

You say "virtually no ringing at 150nS switch time", can you provide a scope shot of that? I just need to see what "no ringing" looks like for comparison.

I'm interested in both the gate-source shot and the source-drain shot. A shot of the delay from controller chip output to FET gate start rising would also be interesting to see.
 
Futterama said:
zombiess, I would love to see some scope shots of the switching from the system you got now to compare with my shots. I did see some in previous posts, but I was missing an explanation of how it was measured e.g. where did you place the probe, were you using differential probes ect.

You say "virtually no ringing at 150nS switch time", can you provide a scope shot of that? I just need to see what "no ringing" looks like for comparison.

I'm interested in both the gate-source shot and the source-drain shot. A shot of the delay from controller chip output to FET gate start rising would also be interesting to see.

Pics and discussion start on page 7 around jan 22nd and wrap up on page 10 of this thread. All shots were taken with the supplied probes which we discover pick up a lot of common mode noise which shows up as ringing and other odd dips on the trace. My biggest overshoot issue was on the off transition, but it improved as I went up in buss voltage from a 24-30v overshoot at 24v to only around 20v at 96v. This was then correcteced by adding a small gas cap. Several shots of how my probes are placed. Lots of really good discussion on my pics and each one is titled to what it is, the buss voltage and the amps being pulled.

I have been meaning to go back and redo the tests with one of my differential probes on the gate signal did to see how much noise / probe noise was being picked up. Been side tracked playing with Lebowskis chip and putting holes into metal. I own 2 differential and one 900mhz active probe all made by Tektronix and all purchased after a lot of research for about $500 total on eBay. Differential probes I have only have a +/-25v linear range with a 10x attenuator, but that's all I need. They can be hooked up to 250v max with the 10x adapter. This is a down side of the old equipment, but they work perfect when setup following the instructions, and for gate drive work I don't need over 25v. I can in theory hook them to the buss voltage, I just won't get as reliable readings.
 
The black and red power wires to each gate drive power supply should be twisted together.
Otherwise looks really good to me. The low inductance path that lewbowski talks about is in a different area than what you described in your reply to him so you to are not talking about the same thing. I'm typing in my cell in an airport right now so can't go in deep discussion. Short form; his concerns are totally valid but my guess is that your gate drive design will be immune to the negative effects he us worried about.

Have fun and keep your E-stop handy during first rides!
 
Thanks for the power wire tip, I did not think about that. I am replacing the power feeds with 8 gauge tonight and will twist the feeds together.
 
Lebowski said:
any interesting progress ?

Yes and no. I was able to get everything mounted in the extra large case... and then it stopped working correctly. Did some troubleshooting on the bench tonight and it looks like I toasted the phase A mosfets, high and low side due to a short on the MOSFET pins caused by sloppy assembly. I'll be desoldering the 8 FETs tomorrow and examining them closer. All the others are working fine. PWM test really helped me troubleshoot this issue as when I tried single pulse testing it was working OK.

I am curious to see if I can figure out what I boogered up on this phase and if all MOSFETs are dead or what. There are no shorts pin to pin so what ever happened they failed open, or I have a completely different problem. Gate driver is sending the pulses and they look fine, what clued me in to phase as was the high side miller plateau looked weird on my scope and also shows some weird noise up around 11V which wasn't on any other phase, high or low. Time to solve a mystery.
 
Lebowski said:
don't forget to check for short through the FETs metal tabs... Did you get the new chips in the mail yet ?

No, they still have not arrived. Last time it took like 2 months for them to get to me. Did you happen to put a return address and some details in the package as to what they are? The US Govt might think they are for a missile guidance system or something and hold onto them for a long time before letting me have them just like they did last time :(

Yes, I did find a shorted FET through the insulator, the ones I'm using are pretty thin and I had a small burr on the mounting hole tonight, fixed it by sanding. I originally filed them down and sanded them but missed this tiny burr. I'm going to disassemble all the phases and double check everything.
 
New chips have arrived. I have not tried them out yet though. I just completed all the debugging on the other version I have and I now have complete sensorless start up working. Bench testing shows it working VERY well, this is quite impressive. Evidently one of my big issues was I had a bad solder joint on one of my driver boards, once I solved that everything just fell into place. I can use push start or complete sensorless startup. Next up is trying out one of the new chips which just got here and then putting everything back into the case for a test ride under battery power.
 
I need to capture some screen shots to show everyone here how clean the my switching looks so far. I'm powering a 60uH 13KV 23 pole pair hub motor. The D-S switching is happening in just under 300nS and that is with 4 parallel IRFB4115 MOSFETs, each with a 15nF G-S cap on it for a total of 60nF G-S cap per side of the half bridge. These MOSFETs just want to switch very quickly, even though I am using a 20ohm gate resistor.

The switching has zero ringing so far, but I'm only running low current. It's amazingly clean. I tried running without the G-S caps in place, just the 20 ohm gate resistor and my switching time was < 100nS, but it was ringing bad for about 1uS after turn on/off. With the G-S caps it has no over/undershoot that I have found.

I'll try to grab some scope shots tomorrow to post up on here.

My new gate driver and power stage design is almost done. It's going to be an TO-247 size based 18 FET IRFP4568 using the same gate driver as I am now, but everything is going to fit into a nice sized Hammond enclosure so it will fit on an ebike easier. All my work is now SMD and I'm redesigning my brain board to be all SMD so I can reduce it's size.
 
I'm very curious to see how your output stage will hold up on the street, and how you will like the 'feel' of the controller :D

Have you tried the v2.00 already ? (the chips with the blue stripe)
 
I'm very curious to see how your output stage will hold up on the street

ya.. when i said "take your time, no rush" i didn't mean take a year! ;P
 
HighHopes said:
I'm very curious to see how your output stage will hold up on the street

ya.. when i said "take your time, no rush" i didn't mean take a year! ;P

Hey, I ran into some bugs that needed squashing. They are now squashed, mostly questionable solder joints which occurred because of the board warping after I added copper to the traces. Then I got held up with an enclosure, I now have that resolved. Last night I believe the final bug is out of the system and it's running better than it ever has. Tonight it's going into the "case". If I'm lucky (that means motivated) I'll attach it to my test bike this weekend and give it a whirl.

I REALLY like what I've seen on the bench testing so far, will be nice to have it power a bike.

I thought I'd be at this stage last weekend, but I had something many orders of magnitude more important come up :mrgreen:
 
I switched over to Ver 1.21 of Lebowski's chip today and reset all the parameters. Works great. The FOC motor detection gets the numbers really close to what I measured with my inductance meter an 4 wire resistance meter. I have FOC off right now because I'm going to start off as simple as possible under power running full load.

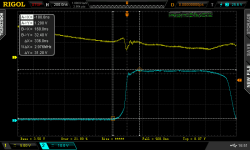
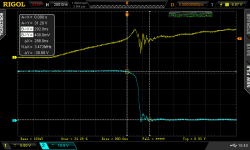
Here are some scope shots of the G-S and the D-S waveforms. I chose the worst ones that I logged.
Here is the off transition of the G-S and D-S, Miller plateau isn't looking too good.
off_g_s_d_s.png
Here is the on transition of the G-S and D-S, Miller plateau isn't looking bad.
on_g_s_d_s.png

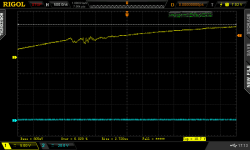
I suspected a lot of what I was seeing was noise, so I setup the differential probe and checked the gate signal with no other changes. I stored several thousand waveforms and then went back through and looked at them, this was the worst one I could find. Without the B channel connected and using a differential probe which rejects many times more noise than a normal passive probe, the issues isn't as bad as the initial measurement would lead you to believe. Probes make a big difference!
on_g_s_differentialprobe.png

After seeing how much better it looked on the differential probe, I went back and hooked up the probes in different locations and was able to get a much cleaner looking signal on both D-S and G-S.

Everything should be getting mounted into the enclosure tonight. Not sure if I'll be road testing or not tomorrow, but things are on track.
 
Zombies I am having problems trying to use the components from your library. You have a PNP-BCE transistor for the clamp feature but the orientation of the arrow comes from the top. How do I get it to show that I have spent 2 hours on this now. lol I have imported your library and I tried everything including editing the component.

Also the number is different in the PDF and the SCH what part numbers did you finally select for the Clamp feature and the boost stage.
 
Are you trying to mirror the component? If so just start moving it and press X or Y to flip it on that axis. Not really sure what you are trying to do as your question isn't very clear. I learned KiCad from the tutorials and help menu. Creating custom components is pretty easy after you do your first one, usually I just copy something close and then tweak it to my needs.

The driver/power stage I have built right now is in the first post of this thread. Now I have a new design that's MUCH smaller. The boost transistors are still the same DV44/DV45 parts, but I switched to a Zetex part for the miller clamp.

I thought I had everything called out in what I posted on here with part numbers. The only changes really made since I posted that was the elimination of the boost stage and some changes to the zener values + different R/C values for the 2 level turn off. These changes were made after bench testing and tuned to get the desired result.

If you want, I can send you my entire custom library of parts I built, I also have a bunch of custom foot prints for board layout.
 
zombiess said:
Are you trying to mirror the component? If so just start moving it and press X or Y to flip it on that axis. Not really sure what you are trying to do as your question isn't very clear. I learned KiCad from the tutorials and help menu. Creating custom components is pretty easy after you do your first one, usually I just copy something close and then tweak it to my needs.

The driver/power stage I have built right now is in the first post of this thread. Now I have a new design that's MUCH smaller. The boost transistors are still the same DV44/DV45 parts, but I switched to a Zetex part for the miller clamp.

I thought I had everything called out in what I posted on here with part numbers. The only changes really made since I posted that was the elimination of the boost stage and some changes to the zener values + different R/C values for the 2 level turn off. These changes were made after bench testing and tuned to get the desired result.

If you want, I can send you my entire custom library of parts I built, I also have a bunch of custom foot prints for board layout.
I downloaded the zip file and dug out the custom parts lib. :) push x hu.... lmfao
 
Well, I thought I would be further along than I made it this weekend, but I had some minor set backs + I'm working on other projects. Good news is I have everything in the case and just bench tested it, so all that is left to do is verify if my 24V SMPS works off of 50-75V DC and then hook it all up to the test bike, tweak the settings and see if it works. I still need to hook up a kill switch, but that's pretty easy. I finished the coding on my fault handler and tested it, it works great. It takes < 3uS to detect the fault and shut down the PWM once the signal is received by the PIC. I have to measure the entire propagation time, but my guess is it's well under 10uS. Once it errors out, the PWM from the brain board is turned off by my 8 bit bus transceiver and an error LED blinks out what caused the fault. If there are multiple faults it blinks out the codes in series and continues to loop until it's reset. I decided for initial testing I wanted to use a latching shut down so that I can find any issues that might crop up.

Looks like test riding will be this week... finally.
 
Back
Top