You are using an out of date browser. It may not display this or other websites correctly.
You should upgrade or use an alternative browser.
You should upgrade or use an alternative browser.
2008 CRF250R - QS138v3 70H - ANT - Sanyo UR18650-RX 20s20p - Votol EM260
- Thread starter bananu7
- Start date
It's been a while, so just a small update; I've put some filler on the foam, but I don't know why I bought a glass-fiber reinforced filler. I think I must have been thinking about laminating when i ordered it. Upside: very stiff and sturdy when it hardens. Downsides: smells just as bad as polyester resin, is messy to apply and really hard to sand. For the 2nd layer I used a "lightweight" construction filler and that was night and day in application.
Here's how it looked after the first filler:
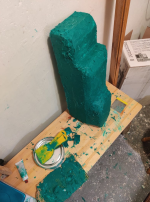
The 2nd layer should be dry today. I won't spend too much more time on it as it will be the inside of the box anyway, I just want it to slip out reasonably easily. I will sand it, then cover with PVA, then with 6 layers of wax. Then the plan is to laminate without putting the first layer of resin on, just relying on soaking through. Normally that's bad practice but again my idea is to aid form separation as much as possible. It's a long piece and the only way it goes out is through the small end, so if it sticks I'm going to have a hard time removing it.
I also got (and weighted) my AWG1 connecting cables. They weigh about 1kg with connectors... a lot of copper. Unfortunately i made a mistake and assumed the controler has M8 screws; it actually uses just M6 for the main connections! Hopefully should be fine. I still need to buy some cables that will go on the inside of the battery and to/from the main fuse.
Here's how it looked after the first filler:

The 2nd layer should be dry today. I won't spend too much more time on it as it will be the inside of the box anyway, I just want it to slip out reasonably easily. I will sand it, then cover with PVA, then with 6 layers of wax. Then the plan is to laminate without putting the first layer of resin on, just relying on soaking through. Normally that's bad practice but again my idea is to aid form separation as much as possible. It's a long piece and the only way it goes out is through the small end, so if it sticks I'm going to have a hard time removing it.
I also got (and weighted) my AWG1 connecting cables. They weigh about 1kg with connectors... a lot of copper. Unfortunately i made a mistake and assumed the controler has M8 screws; it actually uses just M6 for the main connections! Hopefully should be fine. I still need to buy some cables that will go on the inside of the battery and to/from the main fuse.
Hey man cool job for the motor mounts. Since those got shipped and you paid in € I imagine that you used a EU based company ? Care to share the details for a fellow EU Citizen that will soon need to have some plates cut too ?I've been silent since those last days have been just waiting for parts, and then more waiting. That being said, today the big ones arrived. Firstly, engine mounts!
View attachment 361095
Very glad I gave myself +/- 5mm wiggle room:
View attachment 361096
They fit really nicely, but admittedly I could've made them thinner at the bottom. Right now they protrude past the frame making it impossible to rest the bike flat on the stand. I guess I'll just hacksaw the extra couple mm needed, no big deal since this is aluminium. They were extremely affordable too, costing me just (equivalent) of 17 eur, shipping included.
I would have immediately started turning spacers for them, but... I had to ship my new lathe back on warranty. I was unable to fit the chuck properly, and decided it's just not worth risking damaging anything. The warranty claim must be settled in 14 days and I'll likely get a new machine, so it's just (hopefully) a minor setback.
I ordered them in Poland; there's actually plenty of shops here that offer sheet metal fabrication, and sourcing locally is typically the cheapest. No idea about France, but I'm sure that if you google around you should find an affordable "send-cut-send" equivalent. I placed my order on our local Amazon equivalent called Allegro, where they advertised rectangular sheets but mentioned "we can cut any shape", so I just sent them a vector file, confirmed the pricing and got the parts in a couple days.Hey man cool job for the motor mounts. Since those got shipped and you paid in € I imagine that you used a EU based company ? Care to share the details for a fellow EU Citizen that will soon need to have some plates cut too ?
So this is my abominable, pardon the word, ghetto setup for polyester resin curing. It's 5 degrees outside, 6 inside, but I was too determined to wait till spring; once it's 15 outside, i want to be riding it!
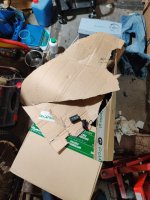
I laid up two layers of gelcoat, separated by about 50 minutes. I'm pretty sure i could have given the second coat a tad more time because of the temperature, but it seems to be stuck together well. Unfortunately i had to lie the box down to get it under the cardboard. This meant it had to rest on something, which happened to be another box. When lifting it, it stuck down to it enough to rip parts of the box out (sorta good, I'll just sand it) but also some of the gelcoat out (less good, but at least means my wax prep was good enough!). I have turned the heater off after ~6h, coverered everything up with 20C inside and left to cure overnight. The plan for tomorrow is to sand it and immediately proceed with actual GF. This is going to be the actual box, not the mold, since I'm making it on a positive plug.
So just to give you an idea how it looks now:
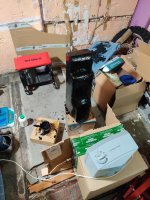

Well, bummer, the gelcoat is still soft in places. Low temperatures definitely don't help. I hoped to lay glass on it today, but that's clearly not happening, as I wasn't able to sand the gummy spots. Plan B is to take it back to a heated basement and leave there until monday, which should give it plenty of time to cure as much as it ever will.
My key takeaway here is that splitting the lamination is the worst idea ever. Ideally all layers should bond chemically and not require sanding in between. This part is the first of I hope a few more, so I expected such lessons to be a part of it. So far it still seems it might come out okay, so fingers crossed.
My key takeaway here is that splitting the lamination is the worst idea ever. Ideally all layers should bond chemically and not require sanding in between. This part is the first of I hope a few more, so I expected such lessons to be a part of it. So far it still seems it might come out okay, so fingers crossed.
j bjork
1 MW
The gelcoat are not supposed to cure totally until you put your fiberglass and polyester on it. If you want the gelcoat to cure by itself you should add a wax that makes it a topcoat.
I believe that's solid advice if you can do the entire thing in one go. I wasn't able to finish it, and had to leave it overnight, and in that case the correct course of action, according to my research, is to forgo the chemical bond, wait for it to cure, then sand the surface to appropriate roughness and rely on the mechanical bond between the gelcoat and resin.The gelcoat are not supposed to cure totally until you put your fiberglass and polyester on it. If you want the gelcoat to cure by itself you should add a wax that makes it a topcoat.
I fully agree that doing it all at once before it cures is a much better option, though, and intend to try to do all subsequent parts in this fashion.
j bjork
1 MW
I often lay the first layer of gelcoat and let that sit overnight. When I lay the second layer the day after, the first layer is still sticky and bond with the first layer.
I then lay the fiberglass in one go, otherwise it will cure and as you say you cant really make a chemical bond with it later.
If you dont want that, and want the gelcoat to cure like a paint there is a special parffin wax to add when mixing the gelcoat and hardener.
I think that is used when repairing boats and such, when you dont put the fiberglass in top of the gelcoat.
I do have the paraffin additive, but from what I've read it's nor recommended to use it if you're going to laminate on top of it as it sort of "floats" outwards and makes the surface less sticky for subsequent layers. Good to know that you can still laminate even a day after though, I assumed that's going to be too late for a good bond.I often lay the first layer of gelcoat and let that sit overnight. When I lay the second layer the day after, the first layer is still sticky and bond with the first layer.
I then lay the fiberglass in one go, otherwise it will cure and as you say you cant really make a chemical bond with it later.
If you dont want that, and want the gelcoat to cure like a paint there is a special parffin wax to add when mixing the gelcoat and hardener.
I think that is used when repairing boats and such, when you dont put the fiberglass in top of the gelcoat.
Unfortunately I've left my form on a pipe near the ceiling to keep it in slightly higher temp and of course it fell down, so now I have an extra effort of fixing the hole in it... Thankfully none of that should be visible on the outside, I just hope to remove the plug reasonably easily and every crack like that is a potential for the next layer to stick. Overall I made a lot of stupid mistakes during this which is I guess sort of expected doing it for the first time
Dui ni shuo de dui
100 kW
I strongly recommend you to get the quick change tool post. This is what transformed my mini lathe from a barely usable tool to an actually, really useful one. It is a little bit expensive, but it makes a huge difference. Take a new tool, drop it in there, tighten the lever and you're good to go, it's as simple as this.
After some hiccups and its small size, my lathe is proving to be an excellent tool. I'm still working on the upgrades for it, but immediately after that I'll be making spacers for the engine mounting plates. I wanted to get some practice first, and now feel reasonably confident that it should be easy work.
Get as many tool holders as you can afford, the more tool holders you have the less lazy you'll be to change tools to get the job done properly. Otherwise you tend to use whatever tool is already installed because its a hassle to change it, and this tends to lead to mistakes or poor results.
Keep up the great work!
I finally have a moment to do a longer writeup. I did the laminating in one go in the morning, then laid one gelcoat layer on top in the evening. During the day i heated the garage to about 18C around the form, then later carried it inside into the basement once it didn't smell as badly.
I saw, also in the picture, a lot of small bubbles in the resin. I'm pretty sure they were caused by a bit too vigorous application and not enough rolling. Both of those are actually related to the fact that due to the shape, i couldn't lay the form down, and instead had it supported vertically. The support wasn't sturdy enough and it kept tipping and falling, which really didn't help.
Other than that, the laminating went reasonably fine. I used about 2kg of resin and 2m2 of 150g CSM. I tried to do it reasonably evenly, but i think the corners will be a bit thicker than the flat surfaces - probably for the best. The last layer of gelcoat was very easy to apply, but i did leave a couple spots. I intend to fill them later either by applying a full next layer after sanding or just in those small spots.
I am planning to remove the plug from it today. Because of my inconsiderate handling, i damaged the initial gelcoat layer and the filler layer, and as a consequence also the separating wax. I hope that those few spots will be reasonably easy to rip out, I don't have a lot of hope about saving the plug form anyway. Afterwards the key point is going to be whether the thing fits the battery in and whether it still fits in the frame. If it does, I can proceed to making a cover for it, cutting it to shape and finally starting work on the motor mounts.
If the laminate turns out structurally solid, I plan to do a couple more pieces on the bike. I have to say that polyester resin is pretty nasty to work with; I will need better air filters for my mask, as I spent most of yesterday with a headache. The interaction with CSM is definitely making it much easier to form complex shapes, though, as the sheets don't really need to be precisely cut and will conform to the shape given enough resin. I think the battery box was actually the biggest and the hardest to get right (because it's so tall) - the top side fairings will be much flatter, the gas tank and the airbox replacements much smaller.
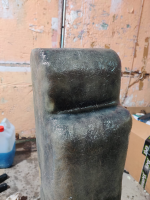
Well, I think we're good! Getting the foam out was quite a bit of a pain, and i quickly decided that saving the plug is out of question:
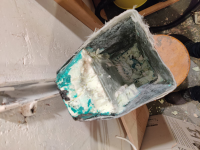
The top part did get out reasonably quickly, i believe it was waxed properly - it's just that getting such a shape out from an enclosure is going to be hard regardless of form separation. Maybe if I had like a hook embedded in it somehow, but even then i predict it would have ripped out the foam before anything moved. Either way, i got it all out without damaging the part, which is what matters.
I weighed it at 2287g, which is about expected giving how much resin went into it. Of course the entire battery will be closer to 25kg, but it's nice that i'm not adding that much by the enclosure itself. Also it doesn't fit in the frame, obviously, but i think i should be able to grind both the gelcoat and the unimportant yet protruding frame welds to make it fit, i need around 3mm on either side.
The battery itself seems to fit quite snugly, helped partially by the fact that the enclosure is quite flexible. Definitely a great material to use for this purpose.
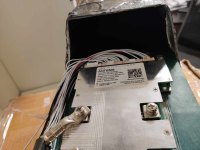
The plan right now is to clean up the shop, get the enclosure to fit in the frame, get the battery fully into the enclosure (i need to cut the parts that were at the end of the mold and went sligthly inwards - i have plenty of spare material there, so hopefully won't be an issue and finally see how it all matches up. I'm the most concerned about the seat height/angle, as my measurements indicated that even if the battery went in all the way perfectly (which is now less likely to happen considering it grew a bit) it would still be about 2cm higher than the original tank. I hope i can rectify the situation by making a new seat mount and replacing the original tank entirely.
I also have to finally get around to mounting the engine, as that will also impact the amount of space the battery has at the bottom.

The top part did get out reasonably quickly, i believe it was waxed properly - it's just that getting such a shape out from an enclosure is going to be hard regardless of form separation. Maybe if I had like a hook embedded in it somehow, but even then i predict it would have ripped out the foam before anything moved. Either way, i got it all out without damaging the part, which is what matters.
I weighed it at 2287g, which is about expected giving how much resin went into it. Of course the entire battery will be closer to 25kg, but it's nice that i'm not adding that much by the enclosure itself. Also it doesn't fit in the frame, obviously, but i think i should be able to grind both the gelcoat and the unimportant yet protruding frame welds to make it fit, i need around 3mm on either side.
The battery itself seems to fit quite snugly, helped partially by the fact that the enclosure is quite flexible. Definitely a great material to use for this purpose.

The plan right now is to clean up the shop, get the enclosure to fit in the frame, get the battery fully into the enclosure (i need to cut the parts that were at the end of the mold and went sligthly inwards - i have plenty of spare material there, so hopefully won't be an issue and finally see how it all matches up. I'm the most concerned about the seat height/angle, as my measurements indicated that even if the battery went in all the way perfectly (which is now less likely to happen considering it grew a bit) it would still be about 2cm higher than the original tank. I hope i can rectify the situation by making a new seat mount and replacing the original tank entirely.
I also have to finally get around to mounting the engine, as that will also impact the amount of space the battery has at the bottom.
The enclosure still won't fit in the frame. I thought I had enough spare room around the foam model but clearly i didn't. I guess my options are:
1. Make a new enclosure from scratch - obviously I'd rather not
2. Make the existing one fit by:
2A. cutting some of the enclosure material off
2B. cutting some of the frame material off.
I already started doing both 2A and 2B. I don't want to remove any material from the frame, especially in the structural areas. Thankfully the location where I'm having problems right now is a thick, solid piece. I'm thinking I can remove as much as the frame has already sustained from cables running on it etc; it seems i need around 2-3mm extra on each side, as it tapers slightly. My goal would be to make it more even to accomodate easier fitting of another enclosure if i ever make one.
As for grinding the enclosure itself, there's plenty of material added on those corners, so it did get a bit thick. I'd really prefer to avoid grinding to the other side though, and there's no clear indication of how far I'll get.
In the end, getting those to fit is a barrier that stands between a bunch of useless parts and a motorbike, so I'm willing to do whatever it takes.
If frame altering isn't enough, you might be able to cutout the part of the glass that rub, roughen the surrounding surface of glass, and lay a thinner patch, then bag the whole kit and cure in the frame as a mother mold. Though, if going this route I'd make sure before curing in place, there are no over hangs, otherwise the box might be sorta permanent...
Just ideas from working with complex glass structures at a past job. We would use the environment of layup as a support and pseudo mold a lot, works great with care .
Hope you can sort this out with minimal hassles!
Just ideas from working with complex glass structures at a past job. We would use the environment of layup as a support and pseudo mold a lot, works great with care .
Hope you can sort this out with minimal hassles!
Is that frame model the one from your previous post (that was for a different frame), or is that from a scan of your own frame that you've done yourself? If it's from your own scan, could you share the procedure you used?
That's still the previous one. I would love to have an accurate scan of mine, but got no budget for a proper scanner yet. This one was definitely done with something decent, just at low output resolution. I do all my scans with the Polycam app, but they're nowhere near as accurate.Is that frame model the one from your previous post (that was for a different frame), or is that from a scan of your own frame that you've done yourself? If it's from your own scan, could you share the procedure you used?
Polycam...I tried to read up on their site (poly.cam) but it keeps taking scroll control away from me and moving it to some other part of the page, making it unreadable and unusable.  I'll have to do a websearch for other people's info on it instead.
I asked because I've got a 3D printer, and there are quite a few things I would like to create for it, mostly things to attach to existing objects, but buildng the models accurately to fit (especially for complex shapes) is as close to impossible for me ATM as to make no difference. I was once pretty good at building things from scratch in Lightwave3D (ancient version with parallel port dongle) but I didn't really have to make them to a particular scale; it was mostly just artwork (mostly spaceships), so I'm reasonably familiar with 3D modelling (just relearning new programs' ways of doing things now).
Last time I was researching 3d-scanning to help me deal with this (before I had the printer), i only found things that required laser scanning, or expensive purpose-built camera setups. These days I see stuff that can do it from your phone's camera in at least a primitive way, and some stuff that can supposedly do it with webcams or old xbox cameras, etc. But I don't know which ones would be better for the purpose.... I'm also quite limited on budget (ok, I don't have one ) so looking for the free-est way possible.
While I have a number of things I am pondering for ebike stuff, I have more little things I need to make for the Snuggles The Wolf robotics project, and for ergonimicizing various music and computer user-interface devices I use all the time. Being able to 3D scan the stuff they have to connect to or mount on, and my own body surfaces like hands and fingers in specific positions to match up to, would save a fair bit of time (in some case make the difference between possible and not).
I asked because I've got a 3D printer, and there are quite a few things I would like to create for it, mostly things to attach to existing objects, but buildng the models accurately to fit (especially for complex shapes) is as close to impossible for me ATM as to make no difference.
Last time I was researching 3d-scanning to help me deal with this (before I had the printer), i only found things that required laser scanning, or expensive purpose-built camera setups. These days I see stuff that can do it from your phone's camera in at least a primitive way, and some stuff that can supposedly do it with webcams or old xbox cameras, etc. But I don't know which ones would be better for the purpose.... I'm also quite limited on budget (ok, I don't have one
While I have a number of things I am pondering for ebike stuff, I have more little things I need to make for the Snuggles The Wolf robotics project, and for ergonimicizing
I actually did some of such poor-man's-scanner-aided-design for my EXC. I've posted about it on advrider, but for some reason my photos there seem to disappear :| and I recently had a NAS server failure that impacted a lot of my photos from 2024. Maybe they'll come back: 2021 KTM 500 EXC-F setup for dual sport
But long story short, i used polycam to scan the plastic tail part, measured a known dimension to get the scale right, and then imported it as a reference mesh in CAD (I use Siemens SolidEdge because it's free and has no restrictive licensing like Fusion or OnShape). It wasn't perfect, but it definitely helped getting the part fit right. If I had an actual scan accurate to sub-mm, I totally see myself using the part directly and copying and maybe slightly smoothing the surface.
Generally speaking, for parts that need a good interface with a mesh scan but otherwise are mostly for looks, I think Blender is a decent choice as well. Given proper scaling, you can create very complex, curved shapes very easily, much more easily than parametrically modelled surfaces. I know that stuff like BlueSurf and other advanced tools can help with that, but we're doing hobby 3d-printing not product design for millions for injection molding. I'll likely use Blender for CRF fairings if I ever get to that point (I'd like to cover the battery and cabling in additional layer of fiberglass on the outside).
And finally, if you actually need a part to truly fit, not just conform to the shape roughly, the mesh is mostly used for clearance purposes, and in the cad you can create reference surfaces (planes for flats, cylinders for holes) to build the design off of parametrically.
One issue with scanners is that they require quite a powerful PC to work well. In my future workshop, I envision a connection to a server rack where the GPUs would sit, but right now dragging my PC to the garage is rather out of the question. A laptop would need to be quite beefy as well and they're prone to overheat - so the photo-based scanning apps are actually really decent for the sweet price of 0 (well, Polycam itself has like a limit of scans or something, which i haven't hit yet - I'm also not sponsored by them or anything, I just found it to work reasonably well; I've used 123D in the past and it was markedly worse.)
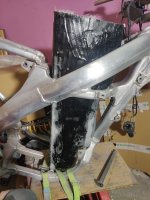
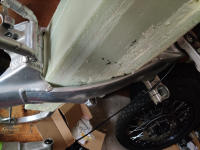
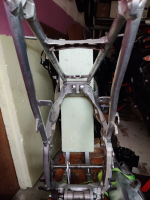
I've had enough. Busted out the angle grinder, and it still took two hours, but it fits!!! I had to grind through the entire gel coat layer and a bunch of the fiberglass. No holes made, I just made it much much thicker on corners during the laminating so there was plenty of material added there (which I presume was the reason it didn't fit in the first place). With so little space to work with I might just paint it instead of gel coating and call it a day. Next laminates are gonna be better.
The frame got a bit of polish and I did grind one hollow section a bit thin, but otherwise I have 0 doubts about the structural integrity there.

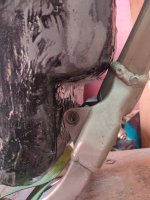
It could technically go 1cm lower, but it already will interfere with the engine mounts, so this is fine as is. The front mount will be used for some sort of band or something to hold it at the bottom - it's very snug at the top.
Similar threads
- Replies
- 31
- Views
- 888
- Replies
- 3
- Views
- 268
- Replies
- 6
- Views
- 737
- Replies
- 103
- Views
- 12,972
- Replies
- 17
- Views
- 4,445


