A 1982 Raleigh 10 speed with TSDZ2 mid-drive

999zip999 said:
You are lucky your not hurt

Thank you, zip, I appreciate your voicing concern. ... I'm thinking of four things about this:

1) file a claim with the city for not fixing the streets. It's a real embarrassment that they let our streets get this bad. And;

2) see if I can figure out how to run TWO different rear wheels on this bike (maybe fronts, too), one narrow, and a second set with a much wider tire for when I have heavier loads. And;

3) changing my route(s) so I'm less likely in harms way from either road issues or cars. And;

4) upping my protective gear - such as gloves, maybe some kind of shoulder / arm protection from road-rash... The best protective gear a person can have saved my ass this time (with a dose of good luck); my almost instinctually doing the right thing regarding where to steer to avoid a crash to the ground.

Thanks again for your comment...
 
I had a 12 pack on my handlebars 90lb. 7,000 watt bike 3 blocks from home. A guy comes flying backwards down a driveway and I stop and turn begore he hit me. Woke up in the hospital with 8 Staples in my head. The fireman must have locked up my bicycle to a pole and left the 12 pack in the hospital room nice fireman. Never found or saw the guy again that backed out of the driveway of course he didn't hit me but a 12 pack on the handlebars is like a bowling ball on one side. Oh yeah at 8 miles an hour
 
RTIII said:
2) see if I can figure out how to run TWO different rear wheels on this bike (maybe fronts, too), one narrow, and a second set with a much wider tire for when I have heavier loads.
I've gone that sort of route before; it's easier to build up two complete bikes; one for cargo-specific trips, and one for just riding, with a bit of cargo ability in case you need it.

If you use quick release wheels, it would at least be easy to change them out if you do go that route, but you'll also have to readjust the brakes everytime, too, as a tire that's much wider will also require a wider rim, which changes the spacing and angle of the pads on the rim.

Misadjust the brakes or forget once, and they don't work so well when you need htem suddenly. :/


3) changing my route(s) so I'm less likely in harms way from either road issues or cars.
That's generally a good idea anyway; sometimes you don't have a choice in route at certain points, but wherever you do, I definitely recommend picking the safer one.

It might be less convenient, might take longer, but if it gets you there where the other might get you a permanent nowhere.... ;)


4) upping my protective gear - such as gloves, maybe some kind of shoulder / arm protection from road-rash...

I used to use heavy duty gear, including a FF MC helmet with removable chin guard, and it has saved my skin a few times. Nowadays, I don't use any, and rely on my skills and attention, as well as the size and visibility of my trike/bike, to keep me safe.

Not that I'd recommend that for everyone; it's just that some time back I realized that any kind of minor accident that the gear would help me with is one I can also avoid in the first place (mostly by not putting myself into dangerous situations). Anything I can't avoid is probably going to be so serious that the gear wouldn't really help anyway.
 
999zip999 said:
Lots of good inexpensive chromoly bikes on Craigslist 50- 100. Plus I use koolstop brake pads

... Don't forget to add $350+ for another TSDZ2, likely tires / tubes, and random accessories that one might not want to have to move from bike-to-bike.

Amberwolf's point about brakes is well taken. Bummer!

I'm more likely to just swap the bike out instead and only care and feed one beast of burden.

And thanks, amberwolf, for your comments about protective gear. Still, you're in a heavy, slow-ish bike. I'll be cruising up to 30+ MPH on occasion, I imagine, as soon as my battery arrives; I should be wearing something to help in case of a spill... Certainly at least a basic, minimalist bike helmet seems prudent. Gloves to help with the all-too-likely palm down in event of a tumble... I was thinking of maybe a specially constructed leather pair of sleves, connected in the back, but otherwise just sleeves to the shoulder blades. Doing a tumble at anything over 10MPH would be a really big deal, or, as you note, zip, a lot slower even than that!
 
RTIII said:
...Amberwolf's point about brakes is well taken. Bummer!

I'm more likely to just swap the bike out instead and only care and feed one beast of burden...

Good plan! What you have now is a high strung race horse from long ago. It sounds like you need a do it all sort of bike. With large volume tires. The air is a shock absorber.

Alloy rims with modern brake pads are a nice improvement from 1982.
But current generation bikes have disc brakes for very good reasons.
You can lock the front and rear with two fingers on the levers, rain or shine!, without wearing out the rims with each application!
 
So...
Thinking I have AT LEAST until Friday to get the bike ready for the battery, I tore down the rear axle, trial fit the new rear gear cluster, adjusted the derailleurs, etc.

I used a hydraulic ram to spread the rear forks (and luggage rack). In addition to the yellow tool pictured, I also used a roughly 50mm diameter, oh, 75mm-ish long dowel that I keep as a push-tool at my press. This dowel was used to narrow down the space for using the spreader pictured - worked like a charm! I did it in two goes, first time just to see what the elasticity was like and the second time to get it right where it needs to be. Took longer to get the hydraulic ram out and put it away than it did to actually spread the forks!

I then mounted up the new cassette onto the new rear axle and mounted them in position and then set about adjusting both front and rear derailleurs, even though I don't have the front gear mounted yet - I could only set the inside limit

The REAR, however, required disassembling from the bike and cleaning because the limited range it had been put to in the past had left old grease and other gummy substances causing it to stick. So, cleaned it, relubricated it, reinstalled it and then adjusted it and now it works like a champ! I get all 7 gears without any difficulty whatsoever.

You can note the new kickstand in some of the images...
 

Attachments

  • Hydraulic_ram_spreader_1_2.jpg
    Hydraulic_ram_spreader_1_2.jpg
    55.9 KB · Views: 2,541
  • Legran_rear_axle_spreading_etc_1_2.jpg
    Legran_rear_axle_spreading_etc_1_2.jpg
    72.6 KB · Views: 2,542
  • Legran_rear_deraileur_testing_28T_1_2.jpg
    Legran_rear_deraileur_testing_28T_1_2.jpg
    68.5 KB · Views: 2,541
  • TSDZ2_chainline_front_to_rear_underneath_1_2.jpg
    TSDZ2_chainline_front_to_rear_underneath_1_2.jpg
    70.1 KB · Views: 2,541
RTIII,

Glad the BFH worked. Sometimes, that is the best way. ;)
Glad you are OK too.

Back to bike technology. Three brake problems from that real old school bike (the kind I used to ride back in the day). The calipers really don’t have much force, the brake pads aren’t up to the task, and those chrome rims have no bite – and are scary worthless in the wet.

So, I would upgrade to dual pivot calipers (or maybe some cyclocross calipers if you have tires bigger than 30mm), a 700c wheel (with a good machined brake track), and some good brake pads (kool stop).

On wheel size:
- 27” is 630mm
- 700c is 622mm
Thus, you can usually change between these two wheels and use a reasonably sized caliper, as the pads only have to move 4mm. The 700c wheel size is going to give you an incredible choice in tire size and construction.

A 26inch wheel has a diameter of 559mm, so you can’t use rim brakes on a bike desined for 630mm rims (theoretically you could swap out 700c and 26” wheels if they used disk brakes and some people do change tire size that way – usually between 650b and 700c sizes).
More info: https://www.sheldonbrown.com/tire-sizing.html
 
My spokes came today, so I'm about to head out and lace up that new rear wheel! A custom job, to be sure: A new 27" alloy X 1 1/4" wide with new Shimano 7 gear cassette "silent" freehub supporting a new Shimano 11-28T cassette! (See photos of rear axle and cassette above.)

And the BATTERY is expected today! :D 8)

Kid, meet Candy Store. :wink: :lol:
 
Wow, busy on this bike! I got a LOT of parts for the bike a few days early yesterday, most of which weren't expected until tomorrow and then some. So, I spent yesterday trying to get them installed and otherwise sorted.

Among these was the battery. The official delivery window opened on Friday, and went for an additional 12 days! BUT, instead, I got it mid-day yesterday, Wednesday. Aside from coming earlier than expected, the good included that it has a USB charger I didn't expect, and it also came with an extra pair of gold plated bullet connectors for my motor! The only bad about it was that the case was sealed with silicone and it was rather sloppily applied. First I took it off from the seam with a razor blade, then a plastic dish-washing ball.

I had to mount the battery, of course, and this unit came with a mounting bracket for the frame. However, while moderns come with accessory mounting holes, my bike, from 1982, did not and I wasn't keen on drilling holes, etc. So, I fabricated a bracket out of a bit of flat bar stock by drilling some holes through and welding some nuts in alignment with those holes, and thereby attach the battery bracket to the bar stock, and then bent the bar stock in a particular way to match the shape of the frame and then clamped the (now painted) bar into the frame. The bar is damned near completely invisible when installed. It's simple and elegant and secure! Just what you want!

While working on the battery mount, I had the new battery charging on the new battery charger! It went well - love the new charger.

I got the spokes I needed to complete my new 27", cassette geared rear wheel. Relacing the rear wheel was, in itself, no big deal, but truing the wheel was a challenge because the donor was more ellipse than circle - that is, it had two high spots and two low spots, each 180 degrees opposite and the pair around 90 degrees opposite. So, getting it both round and true was a bit of work, but it's pretty damned nice now. My only complaint is that it's out of balance weight-wise due to the fact that the brand new Kenda tire has a manufacturing defect putting a blob of rubber in a particular spot and it's just too much at high speed... I hope I can get them to warrantee this - it's a genuine manufacturing defect. -shrug-

The big time consuming monster was the damned gearing: I also got the 52T, in steel. I was keen on steel because I know it's going to suffer power abuse and also have to deal with a significant diagonal due to the crazy chainline of the TSDZ2. Recall that I'm doing a dual chainring installation and have created my own adapter. ... I must have done at least 8 or so trial assemblies, maybe more than a dozen (!!) before I got it to work OK. A lot of that was getting the shimming just right so the spacing was perfect, but one of the most frustrating points was when the large chainring would derail to the smaller 42T automatically when I selected the larger, and more inboard, rear gearing. Damn! The 52T chainring I ended up with has a definite inner and outer face! It won't derail oriented the right way!

However, while I got it to downshift from the front chainring, I never got it to upshift for the simple reason that the derailleur just wouldn't push it far enough. :( I'll have to EITHER get a derailleur, or give up on two. :( NOT OK with that!

Anyway, screwing with the gearing took up a huge fraction of the time spent working on the bike but I also was working on attaching my new kickstand and front basket! ... AND ...

I got a throttle; IT DOES NOT WORK! :cry: :evil:

However, I FINALLY got to take a ride on the bike with the new electrical power! It was a brief ride, but my perception was that it was entirely effortless. Tomorrow I'm planning out a very long ride so I can really learn about the unit!

More soon, and photos!
 
That is some kind of chain line. Let me know how it works out. As I run 52t 11t - 7sp with hub motor. I want a taller front to peddle at higher speed (34mph). I only go up 4 gears in the rear and leave it on 52t. Yes a front 2 speed gear road bike.
 
As I wrote last night, I finally got it all done; the metamorphsis is complete, and the pupa has emerged from its chrysalis as the butterfly that she is! And a new road has opened before her!

Some changes from before:

New aluminum rims, front and rear, with quick release, still 27" X 1 1/4", with new Kenda tires, tubes, protective band, and a new 130mm Shimano "Silent Clutch" 7 gear freehub axle with new Shimano 11-28T cassette.

New (of course) Tongsheng TSDZ2 "48V 500W" (15A) mid-drive torque sensing motor with VLCD-5 display, dual chainring of 42T / 52T, and a 13S4P battery made up of 33G cells yielding 12.76Ah, mounted in a "dolphin" with USB charging socket.

And, there are some accessories such as a rear rack with optional, properly attached "milk crates" on top and right, a handlebar-accessory tube with the VLCD-5 display mounted, along with a headlamp.

Things which remain incomplete are:

+ She needs a new front derailleur that can go further outboard. Otherwise I'm stuck on the 52T and can downshift to the + + 42T but not re-upshift back to the 52.
+ The front basket installation needs completion but is stalled waiting on the new fenders, front and rear.
+ The thumb-throttle doesn't work! :evil: So, I removed it from the accessory bar for now.
+ A bell and cell phone mount are still on-order.
+ A new seat may be fitted today!
+ The kickstand needs a mount fabricated so I can easily remove it when I don't want to carry it around - it's heavy, but will be vital when she's serving as a cargo bike.
+ A wider tire is being seriously considered... The Michelin World Tour is a consideration.
+ New brake pads - might get them today! 8)

Here are some images to show the butterfly in all her glory!
 

Attachments

  • TSDZ2_dual_chainring_1_2.jpg
    TSDZ2_dual_chainring_1_2.jpg
    52.6 KB · Views: 2,493
  • Legran_rear_deraileur_w_7spd_freehub_1_2.jpg
    Legran_rear_deraileur_w_7spd_freehub_1_2.jpg
    59.8 KB · Views: 2,493
  • Legran_handlebars_1_2.jpg
    Legran_handlebars_1_2.jpg
    47 KB · Views: 2,493
  • Legran_electrified_right_1_2.jpg
    Legran_electrified_right_1_2.jpg
    46.5 KB · Views: 2,493
  • Legran_electrified_left_1_2.jpg
    Legran_electrified_left_1_2.jpg
    49.2 KB · Views: 2,493
...Just a head's up that I've posted a very similar report on the "main TSDZ2 thread" for the simple reason that I think that a "pilot report" is helpful for people thinking about choosing the TSDZ2 unit and therefore such report should not be "lost" or "buried" because it was only made on a "build thread" that fewer people might notice. So, sorry for the near duplicate. ... I'll add some other insights below this post...

---

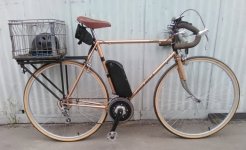
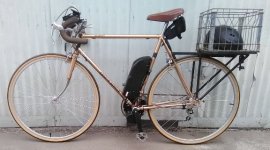
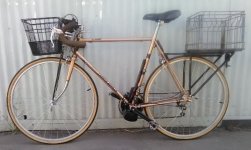
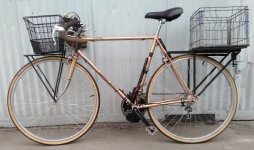
Yesterday, the butterfly emerged from her chrysalis, and today we went on our first adventure together.

Recall, her job is to replace an automobile, so, this was to test running errands, and try and "do it all."

We started by visiting the T-Mobile store and paying their monthly annuity, and showing the bike off to the store manager, a lovely friend of mine of some 7 years or more. Getting there wasn't far but did cover a very steep freeway overpass. Then, off to my bank, not far, nothing much to mention, but the bankers like me for some odd reason and are very accommodating, letting me bring my bike into their small space. I got very pleasant comments from my young, beautiful, female teller about my bike helmet - we're friends since she started working there some 5 years ago or so. I'm sure she says nice things to ALL her customers, but it felt nice. Then, to the post office where some employee snapped at me about my bike, that I couldn't bring it in with me, which REALLY pissed me off - I wasn't being a burden to ANYONE! Asshole. Oh well... So, I had to keep a sharp eye on it.

Then, off to PG&E to pay the utilities, which I prefer to do in person because you pay $0.5 less but it costs them more to have a person do it, and I like to harass them about it. The way there was a LOT further with a lot more obstacles, and various road conditions, including two large overpasses and for the first time I got that sucker up to some really high speed. It was VERY OBVIOUS what benefit it was for the two new aluminum rims, properly trued. Last time I went there (not power assisted), on the downhill it was downright scary when I had to brake, but this time, No Problem! And even the straight ahead was smoother, too. . . It was also the first time to user higher assist levels - perfectly quiet - silent even! - smooth, ZERO NOISE. I also got a few chances to check things out on the flats. Once I got there, again, no problem bringing it in the store, and it even prompted a conversation with a guy who is now interested in this model - he wants one so he can ride with his three children but has back and other issues and can't pedal hard, but doesn't want a moped for various reasons including not wanting to encourage his children to ride mopeds. I gave him my card and said that if he contacts me, I'll point him here, etc!

Then, I had a decision or three to make; how the hell was I going to go WAY up town, to the north-east of Lake Merritt area from basically the edge of San Leandro, but way up in the hill area, near I-580? Hmmm... I decided to go into the barely familiar residential region in the hills east of the flats by the bay, but downhill from I-580. This proved a good choice. LOTS of hills, few cars, mostly empty, but the roads were typical Oakland; maybe a 3 to 4 on a scale of 1 - 10 with 10 being great and 1 being "4 wheel drive only." I could NEVER have done what I did without assistance! And, this helped me develop a real pattern of use. I ALWAYS start out with it either turned on but with no assist, or in eco mode, then bump up help as I both need it and as I gain speed. Rise to the crest of a hill and lower the assist as I get there... NEVER start off with high assist - don't want to trash that blue gear!

At one point, I hit a bump so large it actually knocked the battery off the battery's mounting bracket! And, it was LOCKED! But, no apparent damage, I only lost a few miles of the odometer reading, which happens when you don't turn the TSDZ2 off before powering down / disconnecting the battery. I also, after that, had the unit cut out twice for unknown reason(s) and it was VERY disconcerting! If it happened at the wrong moment, it could be a safety issue, but I never found a cause - so far at least. This is my ONLY issue with the unit. It may turn out to be a fault battery connection where the stock TSDZ2 has crimped on bullet connectors that I'm still using.

Eventually I made it to the Lake Merritt area and on a way down one of the hills I started to realize that my brakes are wearing out! I'm glad I was prudent and put my speed in check early, it could have gotten dangerous.

And so it was that I got to "Cycle Sports" bicycle shop on Grand Ave, about a block and a half from the Grand Lake Theater. The odometer said I'd done 11 miles, but I lost a couple of miles when the battery popped off, so who knows, maybe 15? The whole point in going there was to pay back this business WITH some business for having set me on the right path when I called them for help electrifying my ride. For no money, they set me on a path that led fairly directly to the TSDZ2, and I wanted to buy some accessories from them to help show appreciation. However, they didn't have the fenders in stock that the guy on phone said they'd have. Rats! They DID have a seat, however, so I bought one the guy recommended - that'll help with these cratered streets. I learned a lot and was there a long time, chatting with first the sales guy, then other customers, looking at bikes, and this one technician, Calvin, was especially interested in my ride and spent some time going over the issues with me. He disagreed with the assessment that I don't have enough air in there... We went through all kinds of things we have gone through here, where some have been advising me to find a different frame, etc. It was nice to get a professional opinion, and he'd show me a bike and point out features, so it was a great way to learn. His short advice was enjoy it as it is, and look for an opportunity to get another steel frame that's younger and will have more features I might like. Go with disk brakes, he urges, and I can certainly see the point, but you can't realistically adapt them to the bike I have now, he says, because it's not designed for the stresses.

(While I agree, it's NOT designed for the stresses, that doesn't' mean the stresses will be an issue for it. It's steel, and the main rearward (horizontal) tubes have indentations in them which greatly strengthen them. I have a hard time believing the stresses of a brake would do much to them, even over time.)

One thing that rather annoyed me is that the sales guy, Chris, didn't want to sell me newer / better brake pads! :shock: :shock: :shock: What?! ... I think maybe he doesn't want me to be happy with my bike so I'll "upgrade", since I did talk about maybe doing that eventually. Whatever the reason, there appeared to be new, modern shoes that would fit my calipers, but he said they wouldn't and didn't want to sell them to me, so all I ended up buying was a seat. ... He says there's no "frames" for the "replacement inserts" that fit my calipers. Maybe not refillable inserts, but I saw plenty of pad sets that were more modern than mine that looked like they'd work just fine. Instead, he wanted to sell me old-school types like I was already running - and which I can buy in bulk online if I wanted, and which, by the way, I have a few pairs of just laying around from disused bikes. ... I was profoundly disappointed! ESPECIALLY SO because I now realize that this new TSDZ2 is going to have me coming down LOTS of hills where I can't just coast and use the energy but have to stop due to cross traffic, bad roads, etc. Heck, I came down many dozens of significant hills on this ride, at least TEN I'd call very steep, and most none of them I could have ridden up without assistance! LOVE the TSDZ2, but it requires AWESOME BRAKES for this part of the world!

OK, done with that, now I was in busy down-town and I used the TSDZ2's power to get engaged in traffic as I never had before. I could now keep up! I had the power and used it! Woo Hoo! I got it up over 24 MPH on several occasions but never went for 6th gear for fear of ending up in 7th where it was popping out, and surely I never got to 7th, either, so who knows how fast she'll fly?! 8)

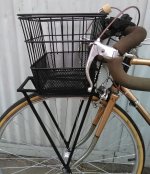
From there, met with a friend for a bit, then headed back, stopping off in the Fruitvale area at my local grocery and stocked up some 20 lbs or so of miscellaneous into my wire milk crate. Then, on my way out the parking lot, I caught a pedal on a curb and almost got knocked over, but I caught myself. Ouch! And embarrassing! But, no harm. So, on my way, now back down San Leandro Blvd, where I lost a wheel last Saturday, and I stopped in at the bike shop that helped me fix my trashed rim! They invited me to another party, tomorrow night! :) And, they found something of mine I'd lost when I was there, and gave it back to me - very nice! And they were right, it was mine. So, good memory of them! The rest of the ride, I was delighted I'd gone all that distance and wasn't all worn out, and, as a kind of last hurrah, I pushed it HARD, got up some speed, and went UP the over-pass / on-ramp at Hegenberger Road full tilt and HALF WAY UP glanced at the speed and it was over 20 MPH! I passed two bicyclists walking their bikes up the overpass and said to one, "PEDAL IT, GIRL! :D " I got a bewildered look! The car behind me didn't seem to mind because I was kicking ass! And on the downhill, I let it fly! IDK how fast I got it up to but it had to be up there - too many cars around to look at the speedo.

Finally home, it says 18 miles today - it was probably more like 22. :D ... I then put it on the charger. There's also a learning curve about this charger - recall, it's that ultra-expensive, super-high-tech charger, and I've only ever used it before to "top up" my brand new battery after shipping. When I plugged it in, I set it to "standard charge" which means 54.5v, what some might call "an 80% charge". According to the display, it took just over an hour and a half and loaded up 3.73 Ah and 200 watts into the battery. ...While I took the DZ2 out of the higher modes every chance I got and only used the heavier modes when needed, this was no standard day; I'd gone out of my way to take on long, steep hills just to see what would happen, and went WAY faster than I had to as opportunity permitted, for much the same reason - I want to learn the machine anew, as it is now in butterfly form! After the ride was done, I hit the button on the side of the battery that's supposed to show you pack charge level and it showed three green and one amber LED. It's a theoretical 12.76Ah battery, and with 3.73 Ah going into the battery, that's about 29%, so the one amber LED makes sense - not perfectly accurate, but then, it's not too bad given all the vagaries.

My take is that this was the perfect purchase for me, for what I want and need. I love it! It truly can replace a car in my scenario for very nearly 100% of what I need to do, and I can get exercise and run my errands and not spend crazy time doing it, either, nor will I arrive all sweaty (!!) - at least, not on a cooler day like today (70F). I also want to say, I never heard a peep out of my unit and I have pretty damned good ears. No Noise Trouble At All! :D I'd say this unit's early days with issues of noise are now safely past. Continuous improvement has its place!
 
I'd forgotten to mention that the VLCD-5 display was remarkably easy to read in fully bright sunlight. I had been concerned I'd need a visor, but no, it was easily readable.

My big concern now is brakes. I need better brakes! The salesman at the high-end bike shop I visited yesterday didn't want me to buy the brake shoe holders for the Kool-Stop inserts because ... IDK, he said they wouldn't fit. To that I say bullshit. But what do I know, I'm only an engineer and he's a sales guy! If the issue is rotation, that's a problem I can solve... If anyone has any good tips here, I'm all ears.

I said to myself: screw it, I can fix any rotation problems, so I bought a set of four Kool Stop pads with holders for $10 each, shipping included. Done. I should get them early next week - will report on how well they work on my old-school center-pull brakes. I'm thinking I'll fabricate a simple anti-rotation bracket, replacing the inner washer and locking into both the pad holder and the caliper arm. Simple, easy to make, strong, and ensure the pad stays in the right orientation. Damn, having a well equipped metal-working machine shop and the skills to operate the tools sure comes in handy! 8)
 
RTIII said:
...My big concern now is brakes. I need better brakes! ....... If anyone has any good tips here, I'm all ears.....
OK, if you are determined to put money into making this antique more functionally modern,,, :wink:

You need to open that dusty old billfold and buy 'Dual-Pivot Road Brake Calipers'. Maybe the long reach version, if you need them for the 700c wheels. You can find them used everywhere.
I haven't kept up on your current state of upgrading.
Dual-Pivot will at least bring you into the last few decades of road bike brakes.
The brake lever forces you need will be much less!! = more powerful brakes !!
And you can now use more modern pads, hopefully on modern aluminum rims.

EDIT: Saw the pics of your rear der. Never mind on upgrading that thing. You can't hang a new der. on that old frame. Maybe they make an adapter rear der hanger for that old frame.

And you sir, will have entered the '90's in Road Bike tech!! :D

You could go crazy and buy used 8 spd Road Bike brake/shifter levers and a matching 8 spd derailleur (for what ever range of cassette you have.
You only need the rear. Fresh cables and housings too. The index shifting requires compressionless housings to work properly. You can find this stuff cheap, new online.
But put the modern levers on both sides so you have modern brake feel. You can still shift that front der. with the old fashion lever.

Treat that old heap to some fresh bar tape you you will have a nice old bike ,,,with modern shifting and braking ! :mrgreen:

Keep in mind this old tech is still wearing the rims out with each hard stop.

Next time you are at that bike shop,,,, Do not ask for a test ride of a new Road/Gravel Bike or Mtn Bike with disc brakes. 8)
 
Norton said:
The index shifting requires compressionless housings to work properly.

Normal index shift housing is not less compressible than brake housing-- its benefit is that it maintains a constant length when flexed, so it doesn't change shift adjustment as the bike is steered or as suspension parts articulate. Segments of housing that don't articulate, like the rear derailleur loop or bridge sections on the frame, work just as well with brake housing.

So-called "compressionless" long-lay jacketed brake housing is good for improving the feel of brakes, and it's entirely usable for shifters, but not necessary or beneficial for shifting.
 
Norton said:
RTIII said:
...My big concern now is brakes. I need better brakes! ....... If anyone has any good tips here, I'm all ears.....
OK, if you are determined to put money into making this antique more functionally modern

[...snip...]

Next time you are at that bike shop,,,, Do not ask for a test ride of a new Road/Gravel Bike or Mtn Bike with disc brakes. 8)

Next time you are at your keyboard replying to me, put that frocking condescension up your asshole where it belongs and instead be polite to me and any others who have older hardware than you approve of. I have gone out of my way to defend you here, on this site, and now I'm questioning whether maybe the others who have expressed offense at your comments may have in fact had a really valid point. I've asked you to STFU regarding your views about "old" and you just don't seem capable of being a polite poster. So, get with the program about being a good guy, won't you?
 
Chalo said:
Norton said:
The index shifting requires compressionless housings to work properly.

Normal index shift housing is not less compressible than brake housing-- its benefit is that it maintains a constant length when flexed, so it doesn't change shift adjustment as the bike is steered or as suspension parts articulate. Segments of housing that don't articulate, like the rear derailleur loop or bridge sections on the frame, work just as well with brake housing.

So-called "compressionless" long-lay jacketed brake housing is good for improving the feel of brakes, and it's entirely usable for shifters, but not necessary or beneficial for shifting.

Yes, thank you, Chalo, ... for the uninformed the mechanical strategy is called a "Bowden tube", or "Bowden cable", which is named after the inventor, Ernest Bowden, patented some 121 years ago , and is implemented as a structure that supports an inner cable that transmits linear force within a housing that doesn't change lengths when bent around objects like, for example, a bicycle frame. It's a fundamental feature of engineering design and is extremely well known among engineers - and used in a great many venues beyond bicycles.
 
The bowden cable like a clutch cable on a VW as we didn't have enough bow and it wouldn't work ( I was 16 ). It's the slack in the line that makes it work. As the outter sheet must be longer and have a bow ok. But what's the rule for length of the bow in the bowden cable.
 
999zip999 said:
The bowden cable like a clutch cable on a VW as we didn't have enough bow and it wouldn't work ( I was 16 ). It's the slack in the line that makes it work. As the outter sheet must be longer and have a bow ok. But what's the rule for length of the bow in the bowden cable.

Yes, exactly; in the VW (and many other makes of vehicle), the bowden strategy is used to buffer between two parts or assemblies that move relative to one another so that a cable (or wire) connection can be made that doesn't shift adjustment when the two parts do move relative to one another. In the VW case you cite, it's the engine / transaxle assembly that's mounted in rubber fixtures that dampen engine vibration from reaching the frame and without a bowden tube, the clutch adjustment would change at the engine / transaxle shifts in its mountings resulting in a shuddering effect. The "rule for length" you ask about is simply that there must be sufficient shortness in the bowden tube so that it remains fully taut throughout the entire range of motion of the transaxle / engine assembly within its mounts. There's never too much tautness (so long as the parts hold shape) but if there's too little, the assembly can move to a point where the adjustment DOES change...
 
RTIII said:
.. be polite to me and any others who have older hardware than you approve of. ..
OK, I will. I need to understand sentimental value and STFU with my bike snobbery. :cry:

The info about Dual-Pivot and Long-Reach Calipers and fresh brake pads will improve your braking.
Just upgrading the two brake calipers and pads will greatly improve your braking power and feel.
Not sure how much if you're still using a steel rim on the front but it will still be a noticeable improvement.
 
Norton said:
RTIII said:
.. be polite to me and any others who have older hardware than you approve of. ..
OK, I will. I need to understand sentimental value and STFU with my bike snobbery. :cry:

Good Norton; I am far from alone in my position. I've gotten lots of private messges in support of my saga, and
I just happened to get, at right the same time as your post to me, one such private message that I'll share but not cite who the author is - because they'd chosen to write privately:

Sent: Sun Jul 02, 2017 12:30 am
From: [redacted]
To: RTIII
I wanted to message you to say I have really enjoyed and learned from your posts on your e-bike journey. I especially am impressed with you converting your old (but still functional) bike into a new much more useful vehicle. I think if more people adapted what the have, reuse instead of replace, we could break this cycle of consumerism as a way of life.
Your stories of how you use your bike really stand out from the the rest of the users and emphasize how the e-bike is intergrated into your life. Other builds a reader doesn't know if it is just a toy or a hobby or a true commuter/transportation vehicle. I have been lurking on this TSDZ2 and other threads for a while as I want to build an ebike and after saving up the money and buying a new bike (did not have anything to upgrade, had to replace my last bike that was stolen) I am now trying to figure out the e-bike side of it. Anyway one of the things I wanted to know is the name of the Bike shop near your bike rim vs. crater incident. I live in Berkeley and am always looking for good bike shops to give my business to. Well it is pretty late so that's all for now. Thanks again for sharing your experience.
 
More Improvements!

I've added a front basket to help balance the load.

I chose one that lifts off so you don't have to run with a basket, and it's about as big as could be put into the space available.

Because the basket design was based on an upright handle-bar scenario that just wouldn't work on my bike, I've modified the original brackets and made my own in order to carry the load appropriately but with little weight penalty. And, I've dramatically improved on the way the original bracketry kept the bottom off the basket off of the front axle tube.

See the captions on the images for more description.
 

Attachments

  • Legran_w_front_basket_left_1_2.jpg
    Legran_w_front_basket_left_1_2.jpg
    46.1 KB · Views: 2,402
  • Legran_front_basket_mounting_closeup_1_2.jpg
    Legran_front_basket_mounting_closeup_1_2.jpg
    74.9 KB · Views: 2,402
  • Legran_front_basket_mounting_from_rear_1_2.jpg
    Legran_front_basket_mounting_from_rear_1_2.jpg
    122.8 KB · Views: 2,402
...As nice as the new front basket is, I couldn't just leave well enough alone - because there were some issues...

For one thing, I lost my front reflector - due to the re-use of the mount for the basket - AND front lamp - because the basket is now in the way. So, I need a solution for that.

For another thing, I kind of like the idea of being able to strap something down without the basket! I can leave the basket at home and still bring something back on the front, perhaps.

So, I added a front rack like the back one, custom made, of course, and of roughly matching design to the rear, using square tubing. But because I don't have as much room up front and therefore won't carry as much weight, I used much lighter weight tubing - actually, I salvaged the square tubing from some dis-used "portable lamps" - the kind you mount to a work space and can move it around on an arm to get the best lighting. This stuff would telescope inside the rear tubes. . .

I projected the front out by basically taking the existing (made the day before) mount to the fork and continuing the line forward up to a horizontal that's just below the basket but that's above any future fender I'll mount. I added two more verticals (though they're at a diagonal), and then made a rectangular frame for the platform, tying it in to the previously fabricated vertical for the basket.

The only real difficulty was that this square tubing is of a thickness that's rather between the stages of my venerable Hobart MIG welding machine. The lowest setting was too cold and it would tend to glob metal, and the next setting too hot and it would blow through. So, I tried to use the cold to add a bunch of material, let it go completely cold, then go over it with the higher setting and thereby melt all the new metal and get a good flow without blowing through. -eh- :roll: it worked, but I've done prettier welds.

While I was at it, I took one of the hooks I cut off the basket support and lopped off about 3/4" and welded it in between the two hoops that attach the basket at the top. I then drilled a hole in the basket in the right spot and -Ta-Da!- Lockable! :D

Now I need to find front and rear lamps I actually like and weld in mounts for them, but at least now I have locations for them to be welded to! ... I'll run the wiring inside the square tubing! 8)

Once again, let the pictures tell the rest of the story:
 

Attachments

  • Legran_w_front_basket_n_rack_left_1_2.jpg
    Legran_w_front_basket_n_rack_left_1_2.jpg
    61.7 KB · Views: 2,374
  • Legran_front_rack_n_basket_left_closeup_2_2.jpg
    Legran_front_rack_n_basket_left_closeup_2_2.jpg
    114.6 KB · Views: 2,374
Back
Top