RTIII
1 kW
(title was supposed to read
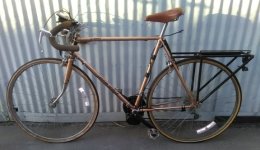
A 1982 Raleigh 10 speed pupa metamorphizes and emerges from its chrysalis as a modern E-Bike!
In the last week of May, the decision was made to take this old bike and transform it from a relic of the past into a viable part of modern city transportation. It was selected because of its familiarity to the owner (me!), because it was in great condition, and because as an e-bike its former handicaps evaporate. However, the transformation that began then wasn't just to the old bike, but to the bike's owner!
Here it is, barely two weeks later and things are really taking shape now. Back when I started, I was thinking DIY was going to be a lot more engineering on my part, however, what I envisioned for the e-bike world was perhaps true as recently as 5 to 10 years ago, but where the e-bike world is today reflects a transformation in the industry too! You can read what my perceptions were a couple of weeks ago (before I found this place!) here:
https://electricbike.com/forum/forum/main-forum/introductions/36743-first-e-bike-taking-an-old-10-speed-and-adding-a-bottom-bracket-system
The emerging butterfly's electrification is based on the Tongsheng TSDZ2 mid-drive, pedal assistance system (no throttle or brake cut-outs) in "48v", 500W. It's already mounted to the bike!
For gearing, vital on a mid-drive, the original was 40T X 52T with a freewheel of 14 - 28. The TSDZ2 comes with a 42T and now that I have it in hand I realize it's got a completely custom gear on there with a built-in offset to the inside to help not expand the driveline. As is, the driveline is in exact, 100% perfect alignment with the freewheel's 14T, and unfortunately, the only choice at adding more chainring is to the outside of the mounting hardware and I'm concerned it'll be too wide. An additional consideration is that the TSDZ2 stops assisting a rider at a cadence of about 90 Pedal-RPM. :-( ... So, gearing has to factor that in. And therefore, I've decided to replace the rear wheel with a free-hub style so I can take a cassette, and I'll be making the wheel myself from a new one and a particular Shimano rear axle. I'll be expanding my rear wheel's anchor points (darn, what are those called again? Not Enough Coffee this AM!), from 122-ish to 130 and adding at least two gears. If I can fit the Shimano 8 gear HG51-aw (11-32), I'll go there, otherwise it'll be a 7 gear Shimano 11-28, with a 52T in front - same as original. This gives me a theoretical cruising at top gear of 34.2 MPH at 90 PRPM, however, I don't anticipate getting up that high as I don't have a deathwish!
The only two open questions about gearing are first, if my chosen rear axle will take the Shimano 8 gear or not. If it won't, I may drop down to a 7 gear instead - fastest to get me going, and in which case, I'll drop the 32 leaving a low-gear of 28 - as was stock. And second, I have to figure out spacing between the two front gears - how far apart are they supposed to be, how am I going to achieve that spacing, and so forth. I bought a FLAT STEEL 52T - should give me the necessary versatility and durability; if it's going to be cocked at an angle, I want something that will take the abuse.
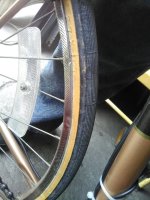
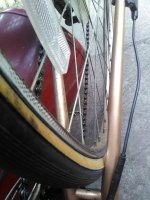
For wheels, I'm sticking with 27" X 1.25" with quick disconnect, but in AL instead of FE based material, and a Shimano rear axle, (130, 36h). I've got new tires, tubes and liner already on hand, wheels expected in a few days, so riding on the old stuff for a while. Owner reports are that the Sta-Tru wheels I've ordered sometimes run true and sometimes they come needing truing - I guess they're supposed to STAY true, not ARRIVE true! In any event, a key reason to get these is the better braking everyone reports. So, I made sure to order up a spoke tool with maximal sizes and that it wouldn't arrive a decade after the wheels (as almost happened!)
For the battery, I agonized over it, really, and when it finally came time to buy, everyone's out of stock of the cell type I wanted (!!) - the LG MJ1 series. I ended up with the number 2 battery type (33G) in a 13S4P arrangement as a pre-made unit 12.4Ah. Even Luna was out... I think I made the right call - or at least not a bad call - on which vendor to use because I also ordered the charger from them when I found the charger manufacturer said they were out of them. It turned out they drop-ship from the manufacturer, so THEY were out, too, but didn't know it yet. And to my surprise, the vendor went to bat for me and convinced the manufacturer to dig one up from somewhere for me. ... That vendor is EM3ev.
While not related to my emerging butterfly, the battery CHARGER is well worth mentioning. As a scientist, I'm deeply caught up in the very technical and after reading all the battery and charger specifications, I realized most of the chargers harm the batteries and in fact have apparently created this mythology that you have to go with an 80% or 90% charge to get longevity. Well, that's just wrong. The reality is that there are (at least) three key problems here: 1) if you take the time to READ and UNDERSTAND the specification sheets from the manufacturers of all the various 18650 cells, they do not all have the same charging characteristics, with the best ones (like the MJ1) tending to have unique requirements. And 2) charging these cells properly typically requires having a constant current and constant voltage for most of the charge cycle, and then reduce both at some point, and this requires sophistication. The MJ1, in particular, calls for a crisp cut-out point of the charge cycle that's unique to it. And 3) as a sealed battery, these are prone to "cooking" by the charger - that is, they're very sensitive to over-charging because there's no place to vent to. Add in to the mix an unsophisticated charger and you end up with damaged batteries. If you cut the charging voltage down a bit, you avoid the cooking, and this is where the 80% / 90% charge to gain life mythology is born; that is, if you're going to be unsophisticated about it, you need to have a lower charging voltage to get away with it - it's not a % of charge thing, it's the intelligence (or lack of it) of the charger. INSTEAD, I have chosen a better battery charger! Check out this unit:
http://www.ebikes.ca/shop/electric-bicycle-parts/chargers/cycle-satiator.html
Pay attention to the graphs and so on in their literature. While they don't say so directly, if I were wrong about any of this you would not need this kind of sophistication and they would not have created it or found a market so strong for it that several vendors are reporting they're out of stock on it!
OK, now, back to the TongSheng TSDZ2. Obviously I haven't run it yet, but it appears to be very well made and installation was a breeze. I spent more time taking off the old crankset than installing the motor! It comes with a special tool to tighten the main nut and I'm darn glad it does, too! I got mine with the VLCD5 display and it comes ready to plug in a throttle and motor cut-out brake levers, as well as a few other things. Even though I want the assistance, I've ordered a throttle for emergency circumstances, such as injury or whatever.
I'm now working out issues related to the mounting of the parts on the frame. I'm a very picky engineer - it has to not only work very well but also look great. So, things can take time. One part of working well is that I I want to be able to remove the VLCD5 for whenever I'm forced by circumstance to park in risky locations - don't want the eye-candy attracting unwanted attention. Some idiot might steal it even though it would be useless to anyone else if they cut the wires off - they might mistake it for some kind of bike computer that could fit any bike. So, that means I have to be able to disconnect it easily yet TongSheng mounted wires long enough to go all the way to the motor onto it - so you'd have to un-feed and re-feed it when taking it off. And that means a big risk to open it up and re-do the wiring! But I think I must...
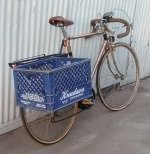
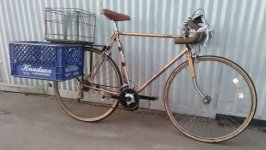
Another factor is that the bike has to be utilitarian - a grocery getter. So, in these two-ish weeks, I've designed and fabricated a rear luggage rack that bolts solidly to the frame. It has FIVE M6 attachments (two each at the rear axle, one at the rear brake mounting) and ONE M8 attachment (at the seat-post clamp). It could probably take 500 lbs of load without sweating it. To this I've added a removable attachment to mount an oversize plastic milk-crate on the right side, like a saddle bag. This was chosen because it will hold TWO full standard grocery bags. For heavier items, I made a removeable atttachment for a wire-type milk-crate directly on top of the luggage rack. And on the left, I haven't decided yet - a second larger sized milk crate? ... To test the system, last Sunday I took the bike 16 miles (according to Google Maps) to a friend's birthday party in the park surrounding Lake Merritt in Oakland. I went laiden with an ice chest with two 6 packs of beer (plus ice!), an additional 6 pack of beer, a back pack with maybe 8 to 10 lbs of gear including bike lights, cups, bottle opener, jacket, etc, and TWO folding chairs, wrapped in a blanket and attached on the left via three bungee cords - one to keep the chairs in the blanket, the other two to attach to the luggage rack. ... The system made it fine but I did learn that the milk-crate needs better attachment. And BOY did I get attention! Lots of people admired so much gear on a bike! ... And I also learned I need a rack in front to help keep the balance of weight under control!
And, she needs a traditional type kickstand - something that'll hold it upright while loading and unloading. And fenders. And a better seat. And a better lock! ... But the metamorphosis is all coming along!
...Having the motor with no battery, my situation at the moment, makes me like the kid at Christmas who got his favorite toys but whose parents forgot to buy the batteries! Doah! Anticipation! But the butterfly hasn't quite finished pupation; I have all manner of parts (and a few tools) on the way and I expect to have most everything in hand by about June 25 or thereabouts.
One of these days, I'll post pictures!


