AM dual motor = bafang middrive + rear hub motor

Thanks Oldhaq, that's how I feel when all is running in the zone.

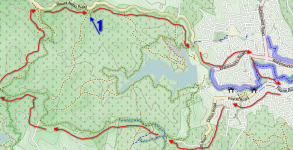
last couple of days I put on a 2.35" high roller for 3 reasons: lower the front to normalise the bike, get a thinner tyre matching the thinner front rim (over buying more stuff like rims...) and finally for aesthetic reasons looks cool thinner front fatter back and kind of matches up with the pit bik / chopper look.

however I went to change my disc pads and have since then 2 days ago learnt a hell of a lot about bleeding hydraulic brakes. Finally fixed the lost pressure and tomorrow if no other issues in life spring up (as they always do) I am carving up the trails for a full session up the mountain with full knobbies both ends.

Oldhaq if you are free let us know.

Other points of interest:

I noticed this before but didn't kind of really take notice until it has continued to happen - and possibly more now that the bike is heavier with more batteries.

WHEN I FLY OVER HUMPS AND LAND HEAVIER I HAVE A SPLIT SECOND OF POWER LOSS.

I wonder if the batteries are taking a beating or something else is happening?
 
could be any of a number of faults
throttle connector (wiggle it under power), e-brake switch cutting in (disconnect e-brake connector. loose lever perhaps?).
battery to controller connection (could be a parallel brick connection depending how you've wired the pack). wiggle or move wires in different spots along its length.
bad solder connection in controller (try tapping it with a rubber mallet or similar under power or with the wheel of the ground).
Red or black hall wire fault.

Not sure yet if I can ride tomorrow, what time you thinking of going?
 
Can't believe how frocked my gopro is. I only recorded a handfull of times and each time it stopped recording usually by freezing.

Went for an epic ride with Oldhaq and thought I got some huge moments of ebike history on tape only to see that the camera froze!

the only footage is in this video,
https://www.youtube.com/watch?v=XoEgrzIsZqM&list=PLzqojlpNeKR3t_VglNJXlBRmy_6rz9GuX&index=1
 
good to at least get that climb in
I think I actually stopped moving forward near the top then got just enough traction to keep going.
shame about the camera crapping out
great area to e-ride, need torque tho or else you're pushing your bike up some of the hills
 
Oldhaq I just studied the maps and I believe we were half way around the circuit home, so we could have made it home without having to turn back.

This link doesn't show the enoggera creek concrete bridge thing we crossed twice. except for a little blue rectangle where it was. http://www.openstreetmap.org/#map=18/-27.44125/152.89027&layers=C

but on google maps I can see the creek clearly. and I remember the switch backs comeing down it.

I think the terrain we took back was more your style anyway :twisted:

31km journey
12% regen over an 1AH
hour and a half

lucky I didn't kill my batteries more than that.

I believe we can make it if we don't do the reservoir track and duck pond track way http://www.openstreetmap.org/#map=16/-27.4427/152.9143&layers=C
 
man, those maps show how massive that area is compared to what we've covered.
i think we could go for a week solid and still not see it all.
so think it's worth a shot to ask energex to put in some power points on those towers?
file.php

Doesn't have to be all, just every 2 or 3 will do.
 

Attachments

  • electricity towers.jpg
    electricity towers.jpg
    45.3 KB · Views: 1,762
Oldhaq we could just try a long bit of metal to reach up there?

I'm currently trying to get my head around short cage vs long cage derailleurs, this comes from http://forums.mtbr.com/drivetrain-shifters-derailleurs-cranks/when-use-long-cage-vs-short-cage-derailleur-205890.html it's a bit dated but it gets the idea across well.

44x34 starts off at zero because in that combo, all of the chain is being used up by the ring and cog, and the derailleur needs to take up none of it. As you shift through the cassette range (moving down the column), the amount of free chain increases as the cog size decreases.

Take a look at the useable gears, which I've outlined in green and yellow. Those fall near the stated capacity of the medium cage derailleurs. (I mentioned that Shimano's stated capacity is conservative, and in practice, I find their medium cage to be closer to 39T.)

For instance, in the middle ring (32) and the small cog (11), the table shows you've got to absorb 35T. This is near the stated capacity of either of the medium cage derailleurs. This gear combo remains useable, but you'd be better off shifting to your big ring for better chain tension.

You can also see that to use a SRAM short cage derailleur (30T capacity) on this drivetrain would leave you with two or three unusable gears while in the middle ring, and only about three useable gears from your granny ring. (Any number greater than 30T on the table would be near the limits of the short cage derailleur.)

Oops! Accidentally shifted into the unusable "red zone"? Nothing major: the derailleur cage folds back on itself, the chain droops, and you maybe drop the chain if you don't catch it in time.

In my opinion, it'd be stupid to size a chain any smaller than what is required to shift into big-big. If you accidentally force a shift into that combo, which is certainly possible when you're tired or "in the moment", you don't want to break anything. So chain length will be the same no matter what derailleur you choose.

chainlength.jpg


Benefits of a shorter cage length?
- snappier shifts
- better chain tension
- less chain slap / greatly decreased drivetrain noise (!)
- better obstruction clearance / improved spoke clearance.
- slight weight loss -- but you gotta be a real weight weenie to appreciate this one.

What I am worried about is that it will work with my 1x7 11-32t

Unless I can find a shorter or more suitable short cage one, I might get this $65 one from http://www.chainreactioncycles.com/au/en/shimano-zee-m640-shadow-10-speed-rear-mech/rp-prod82431
It's hard to compare stuff when they don't list sizes.

Black
Size: 32-36t - Wide Ratio
10 Speed

rdm640ssc.jpg


Edit: I paid for the above short cage $65 free shipping with fox gloves and chain tool. :)
 
Decided to give

1.

the title of Rob's knob because I don't think there's anyone who will be able to climb that for a very long time.

Actually avoided that point because I discovered there is a very easy 100m bit of bitumen with a no fencing...

Anyway, I conquered the Centre road circuit:
25km in an hour.
Regen 12%
Maximum speed 60 kmh
Average 23 kmh
7.3 AH
Only got hot once @ 110 degrees, after climbing a mountain without break and still going up and down big valleys. The 110 was short lived however. I rarely got close 90% of the time.
 

Attachments

  • Robs Knob.png
    Robs Knob.png
    177 KB · Views: 3,637
Looking good! Did you get your gopro fixed? I hate it when your excited about some footage and it didn't get recorded right.
 
Gopro needs to be formatted often. It worked today but wasn't worth recording.

1973551_10152555749744845_3999154281288868379_o.jpg


Almost 14% regen half way through that ride, because it was all climbing up the mountain. To be honest I pedalled the first quater limited to 10 amps - up to half on 20 amps and then when I was sure I'd make it around full 40 amps.

It's a great way to set out. Must have gain down to 5 on the ca otherwise its too anoying cutting in and out like a stutter.

you can see the dust build up really fast and how badly I need this short cage, when I push the derailluer forward where it should be it's almost on the ground.

906306_10152555747129845_8572001266805148450_o.jpg


[youtube]qznCr4Q15zU[/youtube]
 
that zee mech sounds like what you need, might get one myself, let us know how it goes.
haha, rob's knob, classic. Keen to ride that again, tho the climb in the vid doesn't really show how steep it actually was. was the vid the knob?
I just recharged, put in 11.8ah into the 2P 16ah pack, was on 78.6/3.74cell down from 88 fully charged. so had probably about 2ah useable remaining from the ride assuming 10% pack wear.
 
rob's knob, classic. Keen to ride that again, tho the climb in the vid doesn't really show how steep it actually was. was the vid the knob?
I just recharged, put in 11.8ah into the 2P 16ah pack, was on 78.6/3.74cell down from 88 fully charged. so had probably about 2ah useable remaining from the ride assuming 10% pack wear.
Gopro wide angle really stuffs perspectives up. I find putting the camera on something stationary horizontally with a group of vertical trees behind it the only way to get a decent gauge of steepness.

Yes really there should be two knobs for both parts but the one on video is by far the most impossible for me or anyone I know to climb.

The gopro seems to work well now, so must try getting that footage again.

Rob I think my next pack should be 8AH 2p too, not sure the size would fit in front of the seat in particular (the current 5.8ah were chosen for their short length) about 14cm without wires...

Regen

Yesterday I did exactly the same ride. However I pedalled less, starting the ride off only limited to 20amps

24km
8.2AH
vmin 75.8
10% regen
Max speed 63.2kmh
ride time 50 minutes

I shaved off 10 minutes mostly in the getting from home to the dirt track up the mountain. This blew an extra AH (from 7.2ah last time).
I probably regen braked a little less as I know the mountain corners better, but less regen is because I used more power to gauge it by.

I like doing the exact same circuit a bit like a formula 1 track, getting to know corners and feeling what the bike and tyres can do better each time.
I felt like the downhill end part was much more flowy this time.

I question should I make a cool video or enjoy riding (POV videos are boring) so I've just been riding....

Next ride I plan to have no limiting at all, use full power to get up there, should cut the ride time, but I know the last part will be harder with less volts.

Riding Wednesdays and Thursdays is cool because there were no people seen at all.
 
Had a full power no pedalling (I have to spend sometime adjusting the rear derailleur - kept shifting off) ride today. Doing the centre road circuit for the third time. I managed to hit 120 degrees as the ride was non stop. In the minute I stopped it was ready to go again. I am not upset that it overheated. I was really pushing it all the way and I never ride that long without a beer & smoke brake usually.

10513373_10152558499089845_3642031206805481821_n.jpg


40 minute ride (shaved another 10 minutes off)
24 km trip
Maximum speed 67kmh (hits over 60 kmh on flats easily even toward the end of the ride)
Average speed 31kmh (about 10 kmh faster than the initial ride)
9.2 AH (used another AH again)
Regen 8.5% or 0.8AH or Fwd 10AH
Vmin 75.2

I really need to buy downhill goggles as the gravel and dust was spitting up in and over my glasses, even gravel was flying into my underwear somehow! I think up my short legs. Have to learn to ride with a closed mouth to as I was crunching on gravel at times.

Also dropped the chain once! :( not devastated but bit disappointed. I won't say much about the race face chain ring until I have the chain tensioned correctly...

Was a cool ride :mrgreen: :twisted: , and am now satisfied with that circuit. I have some long POV video uploading but it's probably recorded my battery pack and headset more than anything.
Edit: Yes it did record my headset and battery pack more than anything :cry:
[youtube]qvaxXHJxJnI[/youtube] Now that my back is lower, the handlebars are nearer the chest mount height. Anyway boring video

Next ride is going to be about recording third person.
 
Although it's no where near as much fun as just riding with a cam on your chest, the difference in quality and watchability is huge. Just take this my latest recorded ride from yesterday compared to the POV video in the last post.

[youtube]0PsSWbOivrY[/youtube]

Hope you enjoy, I enjoy watching this, makes me want to go out and ride again. :twisted: :mrgreen:
 
Hey John,

Great quality video, makes me want to go ride 2

I bet that takes some time to make, but well worth it, clever how you do those zooming effects and slow motion

I'm real happy to see all your hard work seems to have payed off for you and the bike

It's good that your getting quicker at your circuit the more you ride it, and that you smoke and drink less now you don't have to stop, Lol

Great thread thanks for keeping it
 
deffx said:
Hey John,
Great quality video, makes me want to go ride 2
I bet that takes some time to make, but well worth it, clever how you do those zooming effects and slow motion
I'm real happy to see all your hard work seems to have payed off for you and the bike
It's good that your getting quicker at your circuit the more you ride it, and that you smoke and drink less now you don't have to stop, Lol
Great thread thanks for keeping it

Appreciate the positive feedback, can be heart breaking when you don't get any after spending time something.

Recording
Thanks Deffx
Yeah, it's not much fun setting up the camera all the time and riding away and past and then picking it up to do it again.

I use sony vegas, for zoom and panning effects post recording obviously, and 720HD 120 frames per second in parts to allow for the time stretching clarity in slow motion.
I actually recorded the zoom parts in 2.7k which is a huge amount of pixels in theory as I planned to zoom deep, but realised the picture format is a square so doesn't give more pixels to work with (I think).

I wish Gopro mounts weren't so dam expensive: I really want to buy two: the jaws and frame.
pdp_image_Jaws_PDP_1.jpg

It would be so easy to get the shots I want, by attaching to thinner trees. (They sway a little, but not so bad)
Currently I am always looking for flatter rocks or objects to sit the bare camera on. I don't use the cover as it ruins the sound clarity and slightly diminshes picture quality. Cool thing about only having the camera is it fits in your shirt or jacket pocket so not annoying to the ride and getting it around.

Thread

Is a place for me to get help, but the longer I do it, hopefully will give information to others to help them along the way too. It is both a place to record things for myself as I forget what the specs of something are: e.g. erd of something, and it is a show case. :)

Tyres
I will have to start researching again what other options I have and if I will stick with these creepy crawlers as they look like they'll be bald in a month! I think riding bitumen at high speed is killing them - trials riders hardly do any kms on them (just jump off things). I also wonder if they would suddenly fail at high speeds on bitumen. I need them to be able to do bitumen to get to many tracks further out....


stay tuned...
 
Yeah, takes a lot of patience to setup 3rd person shots which I lack in. Thanks for doing those shots. I actually like the POV shots also because you get to experience the trail.

Yeah, those gopro accessories are expensive. One tip I found is if you get gopro tripod mount , then you can use non gopro accessories like this one

http://www.amazon.com/gp/aw/d/B000VRLX9Y/ref=mp_s_a_1_5?qid=1404733167&sr=8-5&pi=AC_SX110_SY165_QL70.
 
Hey Drew,

Don't get me wrong, a bit of POV is great, especially when you are following another rider, a luxury we both can't afford every time we ride. The more riders the better as it kind of maps out the course. You both get the sense of riding and can see a bike in action too, POV and 3rd person.

The other option is to both set up a few 3rd person shots to cut up the POV a bit when riding alone. My last non electric video ride I did that. I think I'll try this for the next recording.

Eg.
[youtube]u-FOZL5Vofo[/youtube]

Your POV has the added interest of the all the data on screen though, I would like to have that too, but not sure if I want to carry anymore stuff on the bike. I remember you said you were going to post a how to use all that stuff video, which I am eagerly waiting on. ie show us the gadgets, explain how they connect up, how the software is used etc.
 
Yes, tried twice to create that video. I need a better desktop screen recorder because ones I have makes the video turn out awful. Still researching for good free one.
 
19" rims take 20" tyres - here is my growing editable list. Most trials tyres are about being super grippy = soft tacky and as I have discovered with my creepy crawler wear really fast.

Echo Rear 19''
- Rear mod tyre from Echo, based around their popular first model.
- Loved by many street riders for their stiff sidewalls and low rolling resistance.
- Hard compound lasts ages.
- Proven and trusted traditional style ‘block’ tread pattern.
- Weight: 896g - Please note this weight can vary +/- 5%

Please note: This tyre is marked as 20" x 2.50, but it is to fit a 19" rim! The marking on the tyre refers to the outer diameter of the tyre once inflated on a rim.
large_echo19.jpg


pneu-ar-monty-pro-race-19x260.jpg

MONTY PRO RACE TYRE 19X2.60 (REAR)
Bit wider, but still says soft compound
I wouldn't take this over a creepy crawler as I don't need light, it has less knobs which I don't need.

Edit: From tarty bikes
Hi John,

The Echos would be the hardest compound we can get, but as you said
they've been out for a while (as have nearly all of our 19" tyres!).
We did order some on our latest Echo shipment but they didn't arrive.
I'm not sure when more might be available, sorry!

We may also have some Monty ones of a harder compound in the future,
but again we tried to order some of these recently with no luck... If
you can find someone else with them in stock though (they will
probably have a white or a yellow stripe) they should last longer :)

Cheers,
Adam
 
drew12345 said:
Great Vid! Love it. What grade do you think that hill is? Looks steep.

20% minimum - I know bitumen roads with signs on them that say that, easy to go up if hard ground.

Thanks Drew, I did say I'd do a POV and I did actually upload one but the angle this time was too much at the sky so decided to keep it unlisted... Too low too high - pain in the *&^

The sound of the actual footage in this one was terrible, because I used the casing (I knew there would be too much dust).
Would be interesting to try this section after some rain :twisted:
 
Have been researching for my next battery.

I want to get the lipo as simple as possible. Am considering 20s2p made up of 10s x 4 bricks.

Came across some info from Edamame http://endless-sphere.com/forums/viewtopic.php?f=6&t=43482 He's got some great build pics..
piggies.jpg

Hobby king charger http://www.hobbyking.com/hobbyking/store/__11597__icharger_3010b_1000w_10s_balance_charger.html
IMG_2290.jpg

topbatts.jpg


EDIT: It doesn't sound so simple now, I didn't realise (although I suspected) that the balance wires get complicated:

Edamame answered many questions (thanks!)
John Bozi wrote:
Cheers,

I originally went 6s setup because everyone is using them, and being new to lipo I just followed the lead. Looking at higher than 6s packs I still get confused because I don't understand the charging process when it appears there 2 balance leads and 2 x red and black. You just have to charge one pack at a time if you want to really get them balanced.

Just to make no mistake at all, Are those batteries you have there only got one red and black, and one 10s balance plug? Yes, but I had to combine two sets of 5S balance wires into one 10S balance plug. Slightly tricky. The owner of Progressive RC helped with this though I wouldn't expect him to help.

Is there long wiring run down the length of the pack (kind of like to 5s bricks together) or are the actual cells all really long? It is two 5S bricks shrink wrapped into one.

So do you directly plug your balance leads into the charger without the balance board? Yes, the 3010B has a 10S balance port.

How long does it take to balance charge 10s2p? 15 mins per pack after I bulk charged most of the way up.

Why wouldn't you balance charge when you have the equipment for it? Bulk charging is a lot faster. One hookup rather than four. My batteries stay pretty much equal. I balance them once in a while.

That's awesome you run it on solar power! I will have to look into doing that one day. I highly recommend buying a blemished 230-250W residential panel off of Craigslist and a good solar charge controller (The Kid) and a pair of new 100Ah AGM batteries to store it in. A hobby unto itself.

Eesh forget it.

for the cost of the extra charger price, cost of one cell going bad and throwing away double the cells, removing only one set of discharge plugs from the equation seems futile. Soldering all the balance leads into a 10s one on 4 batteries is uncool too..
 
Back
Top