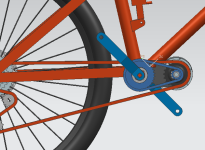
Converting a hubmotor to a middrivemotor

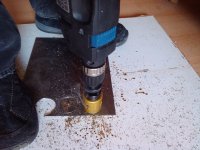
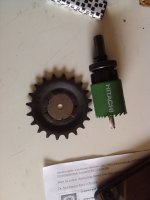
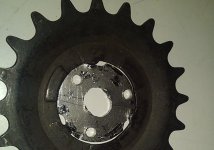
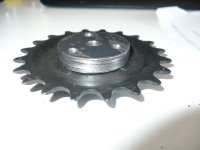
building output sprockets with a hole-saw

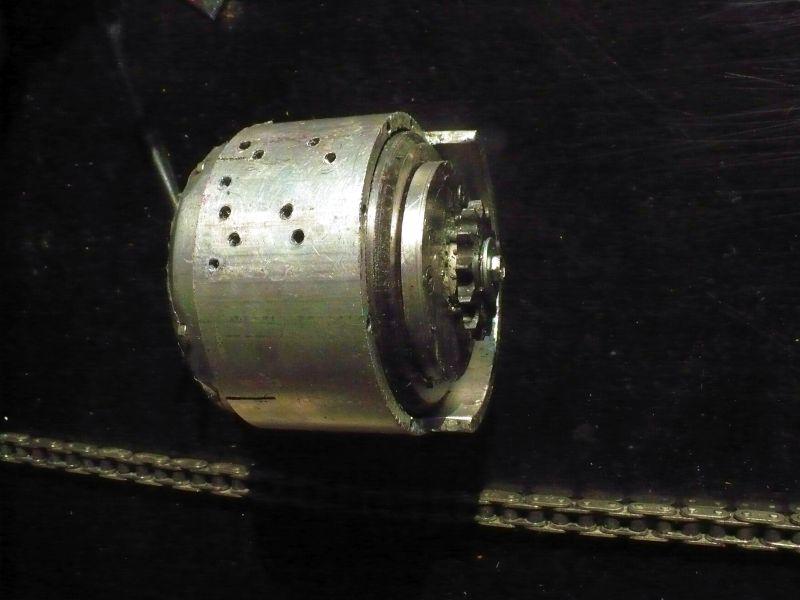
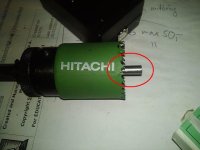
already told you a bit how it works. here are some pics that may show this more clearly. If you use the hole saw:

-Always step on the sheet
-Lubricate well
-Wait for your drill to cool down. It has a hard time sawing steel, let it take a no-load-break, just spin it without engaging to make it suck in cool air.
 

Attachments

  • outpu_sprocket_1.jpg
    outpu_sprocket_1.jpg
    125.3 KB · Views: 8,416
  • outpu_sprocket_2.jpg
    outpu_sprocket_2.jpg
    85.4 KB · Views: 8,417
I disassembled the drive today, to see how it looks from the inside now. The old output sprocket was fastened by 2x4mm ST37 steel and 2.5mm alloy (the sprocket adapter itself), the new one with 3x2mm ST37 steel and 2mm ST37 adapter. The old one did much better. More engagement. I will build one from stainless steel tomorrow and post more pics.

The hole-saw does not center perfectly, since the drill frassles the initial hole. I will make a stencil and use a plane shaft for the hole-saw instead of a drill.
 

Attachments

  • outpu_sprocket_3_dissaembly.jpg
    outpu_sprocket_3_dissaembly.jpg
    80.7 KB · Views: 8,421
I wonder if there would be any chance of an off the shelf sizing of Stainless Steel fender washers that could come close enough to use for the adapter. Even if it was a little large on the OD maybe get it spinning on a drill press and size it down and then file out your notches etc. I know stainless is hard to cut so it may be nice to start with a fender washer that is closer to you needed size if you were wanting to go with stainless.
 
no issue--i'll just try to cut it with the hole-saw. If that doesn't work, i'll try St37 filed more precisely. St37 has worked for me since half a year, it just sucks to disassemble, since the shaft eats into the torque arms.a I wont go for stainless torque arms... ST37 works if it is thicker. It's just the three attechments on the sprockets that eat into St37 :? That's why I wanna make the thin 2mm adapter sheet from stainless.
 
BTW, I developed a new fastening method for Jackshafts in general. It utilizes a chain tensioner function by varying shaft distance. Due high contact pressure between mount sheet (fastened on the bottom bracket) and Jackshaft sheet, the tensioner holes can not move. As connecting screws I propose to use chain-wheel-screws, since they have very fine threads that can release great contact pressure - perfect for our purpose.

The front light-grey sheet is for distribution of contact forces and for covering the oblong screw holes . The front light-grey-sheet has no contact to the BB, only the rear one is fastened on the BB. There are 3sheets on each side of the BB. The light grey ones are made from 2.5mm stainless or ST37, the dark grey ones from 5mm alloy.

Compared to my old version, the BB-sheet is much smaller, screw holes sit near the BB for better stiffness.


raceface-chainring-bolts-med.jpg


CAD_1.png

CAD_3.png
 
test assembly of the new sprocket adapter. Note the 6mm initial hole that i did not bore up yet. I use a 6mm silver steel axle to align/center all parts. After screwing it together, the final 10mm bore is made, then only the flat cams are still missing.

I now used a single 8mm thick ST37 piece. after the experience with 4x2mm sheets, it seems that a fat single piece does better than multiple thinner ones. It's sadly not as easy to make.
 

Attachments

  • outpu_sprocket_4.jpg
    outpu_sprocket_4.jpg
    53 KB · Views: 8,334
got the new V2 ouput sprocket adapter installed. This time I used 8mm ST37, which got its final shape of the shaft-tappet itself: I filed till it almost fit, and then pushed on the adapter with force, cutting the 4 edges perfectly :p 
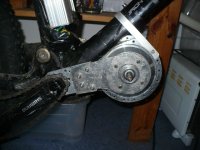
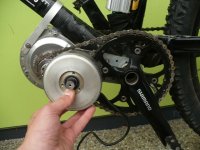
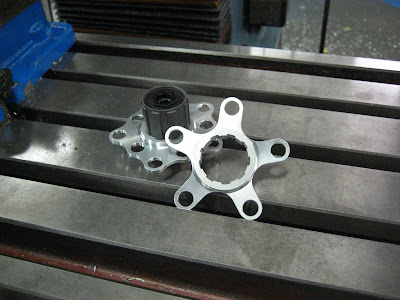
Now it sits as tight as it can sit! Never will wear out again now. But lubricant on it to prevent it from rusting.
P1020901.JPG


Note the three screws block the nut from unscrewing. Now used M5 screws, more durable. Sadly the V2 adapter is around 200g now (not measured yet) :shock:
P1020902.JPG
P1020905.JPG
P1020908.JPG
P1020910.JPG


The V3 sprocket adapter will be made on a lathe, saving a lot of weight. I'm thinking of a right side adapter that also takes the freewheel sprocket for the crank drive, so both would be right :? This way only one chain cover would be needed. BUT the bending loads of the crank drive on the shaft would be increased, since the freewheel would sit further away from the shaft/axle bearing :? I will come up with some CAD pics of V3 sprocket adapter. I have got a lots of spare parts for this motor, so it is no big issue if this fails to work. I must do the Stress analysis math for these bending loads before I can proceed.

Also changed my 1:2 shifter setup for a 1:1 ESP setup, what a huge difference, shifts so much easier and faster :p New setup: SRAM Comp 3.0 with SRAM 7.0 derailleur.
 

Attachments

  • P1020912.JPG
    P1020912.JPG
    74.1 KB · Views: 8,268
Hi all!
Please list hubmotors (weighing less than 2 kg) that can be used to convert? (with V3 sprocket adapter)
bafung (8fun) swxu can be converted?
 
I found only:
Bafang SWXU Motor 1.9kg - outrunner
Keyde 98SWX 1.6kg
Keyde 98SWXN 1.4kg
Cute 85 1.76kg - inrunner

and http://www.alibaba.com/product-free/107567648/Super_light_weight_electric_bicycles_hub.html
 
the keyde is much like the tongxin. I personally dont like them, they have quite low efficiency and are prone to dirt damage to the friction rollers (friction planetary drive). Very hard to convert since they're are inrunners, i did that once : http://endless-sphere.com/forums/viewtopic.php?f=3&t=34146#p495887
i231717_P1020545.jpg

c23gk0xggdbtmms44.jpg


the tongxin died after only 6000km. It can not be converted so that the axle becomes a shaft. Fitting a sprocket is quite hard to do, even more hard to do is seal it right with low friction induced by the seal. Not a good construction possible without a lot of rework. Same with Cute inrunners. That is only possible with outrunners. I would stick to the SWXU, should work exactly as I did with the SWXB and SWXH. Be aware that 500W is the most you should push into this motor, or 15amps @ 36V. SWXH is fine with 25amps, SWXB with 35amps. BPM should be ok with 50amps. Always use a close 1:1.5 or lower phase to battery current ratio, otherwise you'll have low efficiency at low rpm/start-up and your gears will get tooth decay.
 
SWXU Comversion:

I dont know the KV of these motors. Guess a 24V motor for 28" wheel will do fine with 44.4V or 12s Lipo, should be around 42KV. If you run it this fast and keep phase amps low, 15amps battery current should be ok.

made a spread sheet for you:
 
with this tiny motor, only 100mm in dia, you may want it closer to the BB then mine. With a 3/8" x 7/32" chain a 32T/12T pedal->motor overdrive would be only 105mm in chain wheel dia, so this would be possible. You would then need a freewheel crank on the right side, since there are no 3/8" sprockets.


Just for comparison, the motor I have in hand is 105mm in dia.
 

Attachments

  • SWXU comparison.jpg
    SWXU comparison.jpg
    79.5 KB · Views: 7,916
crossbreak said:
a cad pic to get some Idea of the look of a converted SWXU
Thank you! Cool idea.
But this option does not suit me, since this bike will sometimes drive a person weighing more than 140kg,
It will almost certainly break the сhinese freewheel (in crank).
----
For light bikers can be use try #25h.
For example: http://item.taobao.com/item.htm?id=16972158879
It is true there is not suitable for carving bmx crank
Then smaller star can be a large number of teeth.
Instead 32T/12T (pedal-> motor) > 55t/20t.
 
From Wynebergman's built thread who has finally finished his built http://endless-sphere.com/forums/viewtopic.php?f=28&t=49467&start=50#p764359


jk1 said:
Cross break " i run them faster rpm with more voltage at lower speeds mph/kmh. "

Ahh yes that would make sense, since that is the purpose a mid drive to allow the motor to run at a higher more efficient RPM band, but has the side effect that their is more noise.

So I guess this is the case for any hub motor conversion to mid drive, that it will be louder then it was as a wheel motor, which is a surprise no one considered before ?

Being a mid drive I guess you still have the choice of any gear at any time, so if you really need it to be quiet you can run it in the hardest gears to slow it down and quieten as well. Steel gears maybe better if you want to run it very slow speed and high torque to keep it quiet.

ALso with the crank drive gear ratios, you can adjust them to allow higher top speed then when the motor was in a wheel motor, wouldn't that also mean that their is more load on the motor then 1:1 in a wheel ? i.e overdrive ratio and hence louder and also the risk the plastic gear teeth breaking ? Whereas originally the plastic teeth could never break even with the same motor power in both cases ?


This has been considered already, talked about that some pages ago. The max load on the gears depends ONLY on what phase current you set in your controller. It determines the torque that the motor produces. If you run your motor slow and too hot at low effciency you may want metal gears, since plastic one will melt. If you keep motor temp down and run it at efficient rpm x torque =power, you will be happy with plastic gears.

If you run at small load you can indeed run it almost silent in a fast gear. For a given setup, more power always means more noise, even if you run the motor slow you will hear gear noise at high torque. There just is no free lunch ;)
 
Chalo is quite opinionated, but I must give him credit when his experience is helpful concerning bicycle gear. He pointed me to this short cassette that uses common Shimano splined-bore sprockets with tooth-counts from 11T-36T. It is designed for a BMX that wants to easily change the sprocket size frequently.

The sprocket is normally held on by a common 1.38 X 24 lock-ring, but since there are "fixie" sprockets that have a threaded bore, the threaded-bore sprocket can be used in place of the lockring and make this shorty cassette a "two-speed" (this was of interest to me since external chains can take more power than an IGH).

This shorty-cassette "might" be able to be disassembled and parts of it salvaged to make a shaft adapter with two sprockets. The fixed sprockets with threaded bore can be found with a tooth-count of 13T-20T

IMG_2819.jpg


xxxxxxxxxxxxxxxxxxxxxxxxxxxxxxxxxxxxxxxxxxxx

Here is an adapter from common Shimano splines to a 74-BCD chainring (tooth-counts from 24T-32T available)
http://www.endless-sphere.com/forums/viewtopic.php?f=28&t=7192#p198285
june+09+030.jpg


xxxxxxxxxxxxxxxxxxxxxxxxxxxxxxxxxxxxxxxxxxxx

Also, Staton-inc is now carrying a shaft adapter with a 3/4-inch bore that accepts the 3-tab IGH sprockets plus a second sprocket. I cannot tell how the second sprocket is attached yet, but it "looks like" it might be threaded as a 1.38 X 24.

http://www.staton-inc.com/store/pro...freewheel_Sprocket_3_prong_Design-815-27.html
894_thumb.jpg
 
spinningmagnets,

That BMX hub is what I have been wishing geared hubmotor makers would do for three years now. When I built my mid-drive setup, I bought a rear right side cover, and asked the machine shop about milling splines into the threaded steel, freewheel insert. But the price would have been prohibitive at that point. It would be pretty cheap for BMC, or MAC to do before it is cast into the side cover. If you are using it as a hubmotor it would mean nothing, but it would make conversion to a mid-drive a no-brainer. In my case, I could have used a splined BMX sprocket, on the inside, to drive the rear derailleur, and a 16 tooth freewheel to lock it on, and act as a freewheel for the cranks. Everything would be cheap, and readily available.
 
I asked today for a price at my local machine shop. The can make one piece for 70€ four pieces for 140€ plus tax, so 167 for four. That would be $54 for one adapter plus shipping. Anyone interested at this price?

When I was able to produce 100, I could sell them for $15, but i'm not sure if I can sell so many... also this would mean I have to pay $1500 at a time :shock:

file.php

file.php
 

Attachments

  • Sprocket_Adapter_V3.jpg
    Sprocket_Adapter_V3.jpg
    55.5 KB · Views: 7,346
Back
Top