Crystalyte Controllers - Repair and Modification information

fechter

Moderator
Staff member
Joined
Dec 31, 2006
Messages
16,617
Location
California Bay Area, USA
Here's information I've gathered by reverse-engineering a couple of controllers.

The information is based on the examples I've worked on, but there are variations in the models, so individual components and wire color codes may vary.

The ones I'm working off were apparently 24 - 36v, 35 amp models.

The basic circuit board seems to be the same on all the 35 amp models.

For starters, here's the owner's manual. I don't necessarily agree with everything in there, but it's a good reference:
 

Attachments

  • Crystalyte_Owner_Manual.pdf
    3.8 MB · Views: 2,137
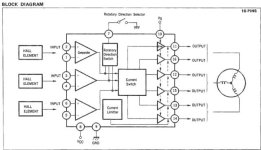
The basic building blocks of the Crystalyte controller are the uPC1246C brusless motor commutator chip, the KA3525A PWM chip, the IR2101 gate driver, and a dozen IRFB4710 output FETs.

Here's a block diagram of the C1246 commutator chip:
The hall sensors are supplied with power from the controller (I measured 6.8v) and the ouputs from the sensors go to the C1246.
 

Attachments

  • uPC1246C block diagram.jpg
    uPC1246C block diagram.jpg
    28 KB · Views: 27,932
  • C1246 commutator.pdf
    1.7 MB · Views: 1,077
The output from the commutator chip goes to three IR2101 gate driver chips, one for each phase. The IR2101 provides the proper timing and voltage requirements for the FET gates.
 
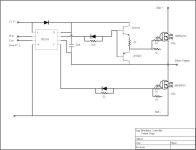
The ouput stage is really three identical sections, one for each phase. The FETs switch the phase wires to the battery +, the battery -, or stay open, depending on what part of the cycle they're in.

The FETs that switch to the battery + are called the high side FETs.
The FETs that switch to the battery - are called the low side FETs.

The high side FETs need to have the gate voltage driven 10 volts higher than the supply when they are on. This is done by a "bootstrap" circuit, that supplys the elevated voltage from a capacitor that gets recharged during the off part of the cycle.

Here's a reverse engineered schematic of one output stage.
Keep in mind there could be some mistakes in the drawing.
 

Attachments

  • Brushless Controller Output stage.jpg
    Brushless Controller Output stage.jpg
    17.9 KB · Views: 27,904
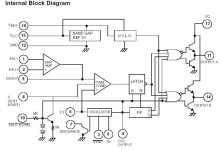
To control the speed of the motor, the high side FETs are pulse width modulated (PWM). The PWM is done with a KA3525 chip.
A block diagram of the KA3525 is below:
 

Attachments

  • KA3525A pwm block diagram.jpg
    KA3525A pwm block diagram.jpg
    29.8 KB · Views: 27,814
  • KA3525A.pdf
    84.1 KB · Views: 632
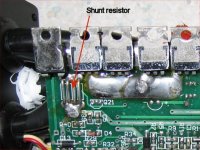
The battery current is measured by measuring the voltage drop across a shunt that goes between the battery - wire and the bank of FETs.

The shunt has a resistance of around one milliohm. This means for every amp of current, the voltage across the shunt will be one millivolt.

The shunt is made from four wires of a special alloy that does not change resistance much with temperature. It is located on the bottom side of the circuit board.
 

Attachments

  • Shunt Resistor.jpg
    Shunt Resistor.jpg
    74.3 KB · Views: 27,795
The signal from the shunt goes to a section in the KA3525 to form the current limiter circuit.

The low voltage cutout is combined into the same part of the circuit.

When the current tries to exceed the limit (35 amps), the comparator in the KA3525 starts to reduce the duty cycle of the PWM to keep the current at the limit.

If the battery voltage drops enough, the same comparator will reduce the duty cycle to prevent the voltage from dropping further. This results in a loss of power when the battery hits the LVC.

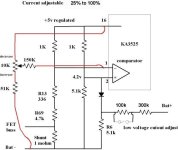
Here's a reverse engineered schematic of the current limiter / LVC part of the circuit.
 
The current limit is determined by the values of the resistors.

If we want to vary the current limit, a resistor network and variable resistor can be added to allow the current to be adjustable.

This drawing shows how to make the limit adjustable downward.
 

Attachments

  • Brushless Controller Adj Current Mod2.jpg
    Brushless Controller Adj Current Mod2.jpg
    26.8 KB · Views: 27,632
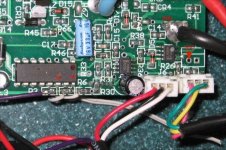
  • Brushless Controller Adj Current pcb.jpg
    Brushless Controller Adj Current pcb.jpg
    73.1 KB · Views: 27,594
The stock FETs are IRFB4710's in most controllers. They're rated for 100v, 75 amps each, with an on resistance of 14 milliohms.

In the output stage, the FETs are in pairs, so the total current rating would be 150 amps.

At low throttle settings and a 35 amp current limit, the current in the FETs can be over 100 amps due to the current multiplying effect of the PWM.

The stock FETs have a poor track record as far as failures and I suspect they are being pushed close to the limit in the stock configuration.

If we want a higher current limit, new FETs would be advised. There are a number to choose from.

Below is a spreadsheet of many possible replacements. The best ones on the market today are the IRFB4110's. They seem to be in short supply these days, but have a much lower on resistance and much higher current capacity.
 
If we just change the FETs, the current limit will still be 35 amps. If we want a higher current limit, the best procedure is to "beef up" the shunt resistor.

I found that if you fill in between two of the shunt wires with solder, the new current limit will be around 60 amps.

You could also leave the shunt alone and change the limiter circuit resistors, but the stock shunt might overheat and melt at a higher current, so it's better to solder up the shunt.
 
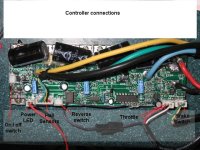
Below is a picutre of the board with the connectors labeled.

The fat black and red wires go to the battery. The fat yellow, green, and blue wires are the motor phase wires.

Yellow= A
Green= B
Blue= C

The hall sensor wires have corresponding phase colors, the black and red wires are the hall sensor power feed.

The throttle wires as shown are
Red= +5v
Black= ground
White= signal
 

Attachments

  • Brushless Controller Connections.jpg
    Brushless Controller Connections.jpg
    70.6 KB · Views: 27,510
The low voltage cutoff circuit is made up a three resistor voltage divider and a diode. When the voltage at the high side of the 5.1k resistor gets low enough for the diode to conduct, it starts reducing the output.

You can change the value of the resistors to get any low voltage cutoff you want. You could install a variable resistor to make the cutoff voltage adjustable.
 
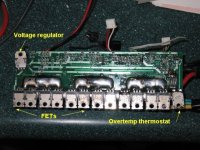
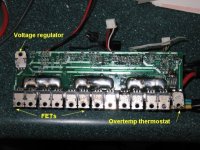
On the bottom of the board, we can see all the FETs and two other similar sized devices. One is an overtemperature thermostat, which will kill the power if the heatsink temperature gets above 70C.

The voltage regulator transistor takes the battery voltage and steps it down to around 15v. The transistor has a 400v rating. The 15v powers the control circuits and also feeds a 5v regulator.
 

Attachments

  • Brushless Controller backside.jpg
    Brushless Controller backside.jpg
    75.4 KB · Views: 27,388
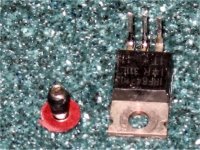
One weakness in the design is the way the FETs are insulated from the screws. There's a thin piece of heat shrink tubing that surrounds the screw along with a fiber washer under the head.
 

Attachments

  • FET insulator standard.jpg
    FET insulator standard.jpg
    70.4 KB · Views: 27,103
The stock heat shrink tubing has a very thin wall and is easily punctured.

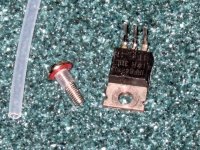
One way to improve on this would be to use thicker tubing to insulate the screw. I found some nice Teflon tubing that barely fits in the hole. The wall thickness of my tubing is more than the depth of the threads, so there's not much chance of cutting through.

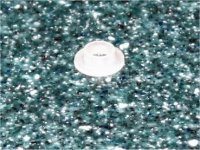
The "downtown" way to handle the insulation would be to buy a set of specially made washers that have the sleeve built in. These come in different sizes, so it would be good to find some that had longer sleeves.
 

Attachments

  • Heatsink Washer.jpg
    Heatsink Washer.jpg
    33 KB · Views: 26,995
  • FET insulator improved.jpg
    FET insulator improved.jpg
    88.7 KB · Views: 26,952
FET REPLACEMENT

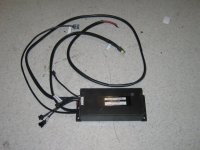
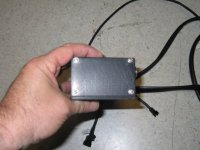
Here's our test subject; a Crystalyte 36v - 72v, 35A immediate start controller.
 

Attachments

  • Before picture.jpg
    Before picture.jpg
    44.6 KB · Views: 15,188
Start by removing all the screws on the end plates and on the bottom.

I like to keep some zip-lock bags around to put the screws into so they don't get lost.
 

Attachments

  • Img_0752.jpg
    Img_0752.jpg
    42.3 KB · Views: 15,170
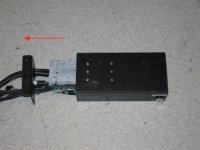
After removing the screws, the guts will slide out in the direction of the wires.

The wires going to the reverse switch will need to be disconnected. Just cut them off. If you need a reverse feature, the wires will need to be reconnected later. If you leave them cut off, the controller will be permanently forward.
 

Attachments

  • Img_0754.jpg
    Img_0754.jpg
    39.4 KB · Views: 15,165
The next step is to remove all the screws holding the FETs onto the heatsink. The screws for the regulator and thermostat must also be removed.

The screw for the voltage regulator will hit the circuit board before it can be fully removed. Remove all the other screws first, and then the regulator screw can be removed.

Be careful with the voltage regulator and overtemp thermostat. Bending the legs can cause them to break off.
 

Attachments

  • Brushless Controller backside.jpg
    Brushless Controller backside.jpg
    75.4 KB · Views: 15,166
I like to remove the FETs intact so they can be reused. For newbies, it's best to use a small wire cutter and snip off the FET legs close to the FET body. Leave as much leg sticking out of the board as possible.

BE SURE you don't snip off the thermostat or voltage regulator. :oops:

Before unsoldering, I recommend using a wire brush to clean the connection points. This will help the heat transfer when soldering.
 
It's real handy if you have a circuit board vice to hold the board while working on it. Adequate lighting and magnification help us older, visually impared types.
 
Getting the old FET legs out of the holes and clearing the holes is the hardest part of the whole job.

There are many techniques for removing the parts. I'll show a few here, but use what works best for you.

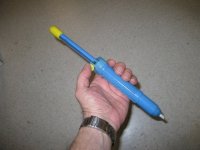
I'll start by attempting to de-bulk the big pile of solder around the leads with a solder sucker.
 

Attachments

  • Img_0746.jpg
    Img_0746.jpg
    36.6 KB · Views: 15,134
When desoldering anything, you must limit the amount of time you heat the connection to avoid damaging the board and lifting traces.

Heavier connections take longer, but I would limit heating time to less than 15 seconds on even the heaviest connections.

The idea is to heat the joint, suck, and get out as quickly as possible.

To speed up the heating process, good thermal contact is a must.

I wipe the iron tip with a wet sponge, then apply a tiny amount of fresh solder to the tip to get better heat transfer. Once you tin the tip of the iron, you have about 20 seconds before the solder oxidizes to the point where it needs to be redone.

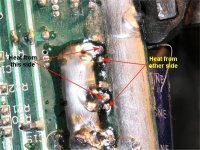
Another important point: The traces with heavy solder buildup take a lot of heat to melt. It works best to heat from the heavy side.
 

Attachments

  • Img_0768.jpg
    Img_0768.jpg
    82.9 KB · Views: 15,130
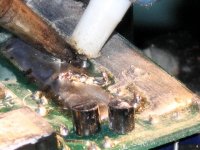
With the tip freshly tinned, press the tip into the intersection of the FET leg and the solder trace.

You want to make physical contact with the leg so the heat can follow it down through the board until it melts to the other side.

As soon as the leg moves or the solder looks melted for a few millimeters around the hole, bring the solder sucker right down on the intersection of the leg and the board, opposite of the iron.

Hit the suck button and remove the heat.
 

Attachments

  • Img_0762.jpg
    Img_0762.jpg
    57 KB · Views: 15,114
Here's an attempt at a video:

<embed src="http://www.youtube.com/v/SPGTI29RZro" type="application/x-shockwave-flash" width="425" height="350"></embed>

I was having camera problems, so please excuse the poor quality.
 
Back
Top