Custom Build... 2 Speed H.O.B.O Powered e-Cruiser

Carv'n Marv'n said:
....Morning Kim.

interested to see how your battery pack and charging setup works... I really like the look of those nano-tech turnigys. If/when I have the money I would like to upgrade to a 72V 35A pack, and up-frock to more beefy hubs - really pushing the current setup - voltage sag is disapointing. Want to up cruising speed from 55km/h to 85km/h.

@ 350km have had a few issues with my Thundersky's - destroyed one of them by overdischarge, and have replaced it to end up with a very unbalanced pack, and think I have another cell or two on the way out... a smoking LiFe has an interesting smell.

...as every person who reads your thread says/thinks - fugg'n marvelous, truely inspirational. I will have to visit on my next trip to Perth and see it in the flesh.

sick of driving to work.... I wanna ride.


Would be great to catch up when your in town for sure! Just p.m me when your heading this way and ill shoot therough my contact info again ;)

The nano tech lipos are fantastic no doubt, unfortunately out of my price range i settled for the same ol 20C-30C Turnigys
that went onto the cruiser....the difference this time round will be the charging setup... El_Steak has made a great lil
diagram of how to hook up packs for bulk charging/balancing using a Hyperion 14s charger-->

P1030468.jpg


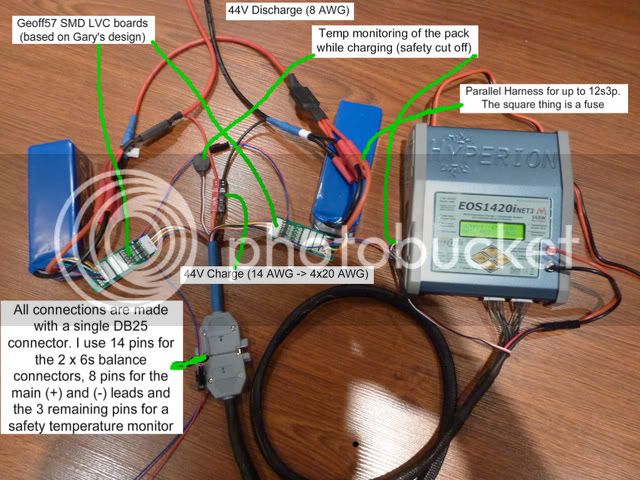
My setup will be pretty much identical (with exception tono temp monitoring) although mine will likely have
alot more cable sleeving and heat shrink :lol: these charges are brilliant IMO i have all the settings sussed with exception of the cycle settings still
unsure of this and have to check what each of the alterable settings do, the destruction manual is next to useless as per
most Asian manuals the translations are just horrible... About to finish the soldering now, shall up pics
of the bus bars with the bullets connected soon...

KiM

p.s Carv'n Marvi'n have you already been for your trip to the US?
 
Heeey stranger :p good to hear things are back on track for you Chad
shall catch you up on MsN ;)

@Carvi n think you might need a few chargers mate, but i'm far from
experienced in this field...hopefully one of the gurus will chime in...Luke..Jeremy?

This is the third time i have attempted this post for one reason
or another the browser was closed grr freakin hate that....anywayz
...bus bars soldered with 4mm bullets :: check ::

bus_bar_series_pic_3.jpg


Very happy with how the soldering went, when finished i gave
the copper a quick 'whip' over with a wire brush on the dremel
to clean them up a lil...

I also did a lil video, im far from an expert when it comes
to soldering with a butane torch, this was my first effort at it
never the less it might help others here in some way-->

[youtube]J4pu0Yk-NQ0[/youtube]

The next issue was the serial connection, the brass threaded
rods are quite close together but there's room enough for some
juicy connections still, I decided on 8 guage size wire for this connection.
After removing the wires insulation at the end points i proceeded too
split the copper wire into equal lengths, then wrapped the ends
around a jewelers screwdriver too form a 'loop' then flooded the
wire with solder-->

bus_bar_series_pics_4.jpg


When the wire was totally soaked through with solder, i used a
file & dremel with a grinding stone to shape & flatten the wire/solder
out so as a good connection with the bus bar is possible when
fastened down...

I will continue with the wiring today, not sure how far i will get
not feeling too sharp this morning....back with whatever work
done later today :D ...

KiM
 
Nice work bro!

Bus-bars FTMFW!
 
johnrobholmes said:
That is pretty slick! Are you running the two buss bar sets in series?

Cheers Mr Holmes and yes, thats the plan
each pair of bus bars paralels fur 22v packs...they are then connected in series.

liveforphysics said:
Nice work bro!

Bus-bars FTMFW!

HAHA thanks Luke, i wouldn't of thought of doing it if it wasn't for
your excellent diagrams for EVdragracers battery setup ;)


gtadmin said:
Excellent KiM, that's how I imagined you would be joining them

Cheers mate, pretty simple when its all together, hope your setup
works out too best of luck with it :)

back soon...more soldering more wiring aaaaargh someone kill me now!

KiM
 
Carv'n Marv'n said:
..with respect to bulk charging - is it going to be feasable to charge 18 x 10s packs with one charger??

Was that a typo ? You want to charge EIGHTEEN 10 cell packs ?!
It's possible but you'd want a whopper of a charger if you want it done in under 2 days. A 350w meanwell ain't going to cut it.

GT, grab yourself one of those little blow torches on ebay HERE same price as jaycar but delivered to your door.


Nice buss bars Kim. I've been thinking about using something along the same lines but moreso for connecting packs multiple packs together to keep the overall external size down for mounting in the smallest possible enclosure (inside the bike frame tube)
Eg. using a 20mm wide thin copper strap instead of using relatively fat 10ga wire
 
Hyena said:
... GT, grab yourself one of those little blow torches on ebay HERE same price as jaycar but delivered to your door.
Thanks Hyena, I already have mine (Jaycar dealer is only 2 min down the road!)

Eg. using a 20mm wide thin copper strap instead of using relatively fat 10ga wire
That's sort of the way I'm doing mine, but only 12mm wide. The busbar WILL be the connecting "strap". I'll draw a piccie if you can't visualise it, but perhaps in another thread?

Thanks for the vid KiM

Cheers,
GT
 
flyinmonkie said:
Nice work Kim, and good to see some good beer in the background. ;

HAAH thanks Clay, the beer is nearly always "freebies" so i dont
usually have a say in the brand i drink whats bought too me LoL

@olaf-lampe...I won't be losing sleep over
the solder, the 4 SLAs i used on my two trikes
were connected using the same soldered eyelets
they sat connected and working after ~ two years.

I got shortening all the leads on the lipo today
the wire is now around 2 inches long on each
positive and negative lead...

Bus_bar-Series_pics_4.jpg


I also did a quick video showing the method i
use to solder connectors to the leads, i thought
it might be helpful for others that haven't done
this before...I'm no expert on this, it's simply
how i do it and its worked without failure.

[youtube]clIesCK1MsQ[/youtube]

I have decided how the rest of the wiring will
be done after much procrastination today
involves one project box containing a 200amp
switch a Lyen DC-DC converter and a couple
of small bus bars ...Luke i think i'm a
bus bar addict now too HAHA

...Back tomorrow folks...

KiM
 
I used to do alot of buss bar fabrication in my car audio/SPL days. I love doing that kind of work.

Right now, my yellow trike rebuild is killing me because I am trying to hide all wiring that I possibly can in a box that is far too small to work well in. Like you, I really do not like wiring. But, I sure enjoy making buss bars. I also like the finished product when it truly turns out well.

Matt
 
Apologies for lack of updates people, but its been so DAMN hot here, we have broken the Western Australia
record for most consecutive days above 30C..17 straight and counting, consecutive higest lowest temp also
broken 15 days above 20C IIRC...has slowed me slightly but the main reason there's been no updates is
lack of a functioning camera, my trusty Canon after being hit by RC chopper blades dropped kicked and
treated like shit has finally called it a day...

Timma2500
(Paul) has generously loaned me his for a few days (Thx again buddy ;) )
to snap some pics of the work i have done, after this though there isn't going to be any pictorial
updates for a very long time. I have to buy a new MiG welder and a new bench drill before
i can fork out for a new camera :( Pretty pissed about it to TBH but, such is life..

With the recent LiPO charging 'how-to' threads popping up on the forum i thought i would take some pics of how i have set my 12s
pack up to bulk charge and balance via 2x 24v Meanwels running a Hyperion EOS 1420i NET3 14s purchased from Mr GGoodrum.. :wink:
I have utilized DB25 connectors as part of the charging 'harness'

LiPO_DB25_connector_series_pic1.jpg

I had to balance pack with one hand and hold camera with other, pics are lil blurry sorry
the fluro light in my shed don't help matters .. :-(


The DB25 connector has as its name suggests 25 pins. I have used 14 of these for the balance tap wires
the remaining 11 were split 6 pins for the positive and 5 for the negative main charging leads.
I have used 10awg size wire for these hella overkill but i have many meters of it and it looks the shit LoL.
The main wiring coming from the bus bars is all 8awg size wire. The result of this setup allows for
bulk charging of my pack with simultaneous balancing all via the one DB25 plug. Unfortunately the
lack of a camera whilst assembling this didn't allow for any pics, i will though say it is a lil fiddly, if you
can solder and have average skills its very doable and IMHO worth the 'hassle' as the prize is one plug
balance charging with a quality rc charger. (Just a note too...the harness is obviously not complete
the main charge leads have yet to be 'tied in' to the pack, this will happen via another small
set of bus bars in a junction box)


GGoodrum will have similar harness available on TPPacks.com soon i believe Gary pictured a completed harness
on Hyperion review thread alas recent forum upgrades have seen many pictures disappear, his new harness being one of them :-(


Dunno when i will be able to give you fellas another update, again apologies for those
that have been following, be assured though i am working on the bike daily doing bits and pieces.
I have received a nice sheet of carbon fiber from Matt.S (Mr Recumpence SiR) Thx again Matt ;)
Shall be cutting into this later today making new brackets and mounts for the junction
box and 12 Fet infinion controller, which i am still waiting for, Lyen has sent me a tracking number but according to that
its still in San Fransisco as of last night. OH i also got a servo for the gear change unfortunately that don't
work on the lik circuit Mr J.Harris made, damn cheapo HK stuff haha not too worry shall order another
was only 23 bucks hopefully they will swap it. Think thats it for now...

KiM

p.s local kerbside collection has been on last 2 weeks Matt.P and myself have been out having fun hehe also had
my mates keep an eye out for stuff, they scored me 12 computers thus far of which i made 6 working units slowest
being P4 2.5Ghz what people throw out up here continues to amaze me...
 
AussieJester said:
The DB25 connector has as its name suggests 25 pins. I have used 14 of these for the balance tap wires
the remaining 11 were split 6 pins for the positive and 5 for the negative main charging leads.
DB25s are the shizzle for plug and play balancing (I used them a year or 2 back for an 18S back but don't bother any more because I never need to balance anyway :lol: ) but I dunno if I'd trust 5 of them to take the main charging current. What are you pushing with those 2 meanwells, it must be about 30amps right ? Or are the meanwells for bulk charging and you just 'top up' and balance with the hyperion ?
 
Hyena said:
What are you pushing with those 2 meanwells, it must be about 30amps right ?

Meanwels maybe capable of puting out near 30 amp but they power the Hyperion
i think Gary was getting around 14amp from the Hyperion with the two meanwels powering it IIRC
I also wll never have to worry about balancing when i bulk charge HiGHSiDE as
the Hyperion does it all for me as it bulk charges the pack, complete peace of mind IMO
I also have a 48v meanwel i could throw in the back pack if i needed to top up or fully charge
as a 'lightweight' alternative if ever needed for a long ride...

KiM
 
i like your charging setup AJ, in fact ive stolen lock stock lol, hyperion on its way, to charge my 6ah turnigy nano techs see :mrgreen:

D
 
deecanio said:
i like your charging setup AJ, in fact ive stolen lock stock lol, hyperion on its way, to charge my 6ah turnigy nano techs see :mrgreen:

D

HAHA there he is the man without an e-bike for 2 seasons :p So..uhm...what exactly you doing with the nano techs Deec?
Building another bike are we? Back to the frock motors then?

KiM
 
Awesome work Kim. Those bus bars and the single plug for charging and balancing make everything so clean. I have a 1420i on the way as well as some replacement batteries as one of mine went bad and took another with it. Looking forward to balance charging every time. Your setup almost makes me want to rethink mine, but I just want to ride the bike and mine works pretty well. Keep up the work and get pics when you can.

Clay
 
hahahaha, second build is on hold lol, nano's going on the Kona mate, same 3220 single stage setup as last year, new thinner battery enclosure :shock:
This time i have a few things different, charging setup as yours with same hyperion and method of charging, moved from 11t/80t to 12t/70t for the 219 sprockets,new carrier. 4 nano's giving me 50.4v 12ah,1 x full grip magura, 1 x CA, 1 x black anodised MS clutch 8) 1 x knee/shin pads, 1 x 661 full face.
All i need now is some new balls to get on and ride it again :twisted:

Clay, yes 1420i Hyperion, nice - will dust off my old thread once i have some pics.


D
 
Props to Edward Lyen for a fine job modifying a 12 Fet Infineon for me, arrived
along with some hall sensors and programing lead this afternoon, all going well
should be up and running be the weekend ;)

KiM
 
Thought i would make a post letting all interested know the bike is ready for its
first test ride today (soon as charged)

I will be borrowing a camera (hopefully) over the weekend to get some stills and
some video of the bike. Its obviously not completely finished needing paint and the
carbon fiber enclosure still but its ready to ride and 'tune' I have one of Burties
Timing adjusting (TA) doodas but have yet to 'play' with it, i thought first i would
give the bike a run before blowing the controller up when i do something wrong
programing the TA LOL I also need another project box to mount the unit in the one
i bought for the purpose prior to receiving the TA is slightly too small. Other things
not done, the servo operated gear change, unfortunately the circuit Mr Jeremy Harris
made for me is now broken, not sure how i did it or if it was done in transit even? all
I know is it worked perfectly when J.H had it, i saw video of it working. Another case
chalked down to KiM and electronics not working well together...story of my life i'm
afraid LoL..So for the time being i have made a ~5in alumnium bar that is moved
forward and back to change the ThudSTaR 8) 2 speed box.

There have been a few hiccups in getting things running small things that needed
making switch box, brackets, leads etc etc time consuming but not difficult. My hate
for wires and wiring has made progress slow, as much as i hate doing the wiring, i
can't rush through it as i also can't stand messy wiring, so after days of doing and
redoing i have come up with something that's IMHO, incredibly neat but also
allows for easy interchanging of components without pulling everything to bits.
Electrically we have the linear actuator, 2x 60mm fans (mounted on a Highly
Modified 12fet Infineon)
and an on/off switch for the controller all clustered
together on one bar mounted 'box' <--box has CF on it too, gotten a lil silly with
the CF and epoxy i have :mrgreen: LoVE the stuff sooooooo easy to work with
cuts like butter with a hot knife using the angle grinder and ultra thin cuttoff
disks.

There will be several small modifications made when the bike is pulled apart for
beautification more carbon fiber basically LoL Thanks to the generously sized
CF sheets Mr Recumpences sent me! i have more than enough to do the
battery mounting panel in carbon fiber! Just need to source carbon fiber
right angle (which Rodgah IIRC? or was it Timma2500?) said is avaialble
then the entire center section of the bike will be made of CF WooTz anywayz...

I have zero progress shots of all the work done the last week and a half
which sucks ass i know i tried taking stills with the lil spy camera i have but
they were massive FAILS, i do plan on purchasing a replacement camera
when i am paid next so i can continue to document the build, apologies to
those missing out on stages of construction, i can document what was missed
mostly anywayz, when the bike is rebuilt after paint :)

Back in a day or so with some stills of bike and some video too hopefully...

KiM
 
Back
Top