Doc's Watercooled Hub motor project ( 5403)

UPDATE 22june 2012

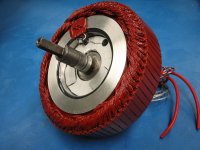
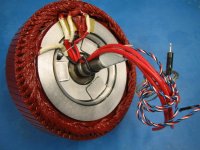
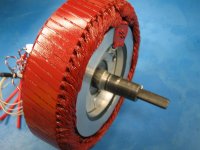
Motor is almost completed :mrgreen:

- Stator was pressed to remove 3mm width on each side and is now 62mm width
- The clearance for each side between the side cover and the stator winding is 3mm
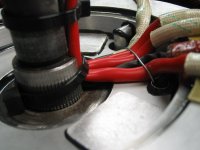
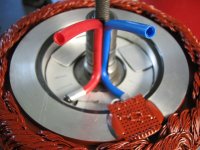
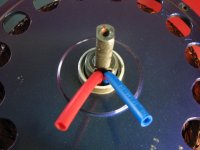
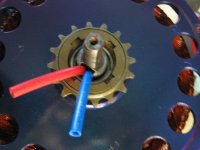
- The pipe on the axel for the liquid have been replaced by polyethylene tubing with 0.200" I.D.
- The flow rate with the 50 psi pump is still impressive with only 0.200" I.D for couples of inches long for these pipe.
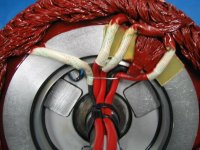
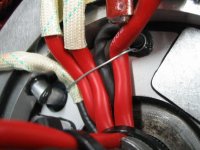
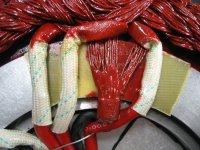
- The hall sensor connections upgrade is done and is made with a PCB and some 24 AWG Teflon skin wires
- The Phase wires will be 3 x 10 gauge Silicone Turnigy wire
- The BBQ temp sensor will be installed on the winding.
- I also plan to put some Thermally conductive Silicone between the winding and the stator armature to have better heat transfer.
- I will put special motor purpose varnish on the winding and all exposed steel parts.
- The 2 x 6005 SKF top quality bearing are installed in teh side covers

More to come! :wink:

that motor will be on the road soon guys!

Doc
 
:mrgreen:


The bad new: I will have to shave like 1/8" inside each side cover near the winding and the phase connections to not have any mechanical interference :?
BUt after that it will work!

The good news:
Stator is almost finished!

The only missing parts are the two polyethylene tubes that goes on the axel

Here is some pics for the pleasure of your eyes 8)
 

Attachments

  • Picture 002_800x600.jpg
    Picture 002_800x600.jpg
    79.5 KB · Views: 3,246
  • Picture 003_800x600.jpg
    Picture 003_800x600.jpg
    92.4 KB · Views: 3,246
  • Picture 004_800x600.jpg
    Picture 004_800x600.jpg
    91.6 KB · Views: 3,246
  • Picture 005_800x600.jpg
    Picture 005_800x600.jpg
    52 KB · Views: 3,246
  • Picture 007_800x600.jpg
    Picture 007_800x600.jpg
    82.9 KB · Views: 3,246
  • Picture 011_800x600.jpg
    Picture 011_800x600.jpg
    68.7 KB · Views: 3,246
  • Picture 012_800x600.jpg
    Picture 012_800x600.jpg
    112.5 KB · Views: 3,246
Now with the pipes installed
 

Attachments

  • Hose 001_800x600.jpg
    Hose 001_800x600.jpg
    77 KB · Views: 3,245
  • Hose 003_800x600.jpg
    Hose 003_800x600.jpg
    61 KB · Views: 3,245
  • Hose 007_800x600.jpg
    Hose 007_800x600.jpg
    54.4 KB · Views: 3,245
Holy mother....

How much thickness is 1/8" off the side cover going to leave you?

Did u test for leaks?

How wide/deep is the channel you milled in the shaft? Do you think you could've made it smaller now that you have the tubing installed?
 
hillzofvalp said:
Holy mother....

How much thickness is 1/8" off the side cover going to leave you?

Did u test for leaks?

How wide/deep is the channel you milled in the shaft? Do you think you could've made it smaller now that you have the tubing installed?

That will leave like 1/8 thick on the side cover larger diameter area. The side cover are 1/4" thick !!


No liquid leak.. it'S perfectly sealed :wink:

The channel i milled is 250mil deep on the larger axel side so this still leave alot of metal. On the other side ( the smaller side axel i milled like 80mil since the diameter is already smaller on that side.

But if you read few page back you will find that i installed two 6005 bearing ( the larger one) so this motor is not using two same bearing instead of one small and one big like the conventional X5 are

Doc
 
keyne said:
How well do the pipes fit past the dropout? Is there enough space because of the single speed freewheel?


Exact.. there is more than enough space :wink:

Doc
 
hillzofvalp said:
What is that paint called hat you applied? Is that just to protect steel components from rust?


Nop.. It's Rust-oleum spraypaint that is COLORSHIFT... the color change with angle of view :wink: You can have these info on the begining of this thread :wink: :wink:

Doc
 
Looks like allot of werq went into that motor the quality looks good. Thanks for sharing this. Hope it does a good job at cooling things down for you. I am looking forward to seeing it on the road. I used that color shifting paint on the grill of my pick-up it looked cool. :)
 
Hi Doc,

This is a very nice project... but I noticed only one thing that bugs me and it is the metal wire you used to hold the power phase wires... this wire should be replaced by a non conductive hi-tempearature industrial tie-wrap...
http://www.hellermanntyton.us/productDetail.aspx?lon=T50L1STNLM4
Watercooled Hub.jpg
Your local distributor for this product is ''Pro-Technique'' they sell Hellermann Tyton products.

Keep up this outstanding achievment!... (once tested and operational you will soon have to market this new watercooled hub-motor)
 
Very nice Doc.

I'd be a bit worried about that metal wire pressing on the insulation of those phase wires. In my experience, the hobby king silicone wire is not very abrasion resistant. No sense in setting yourself up for failure down the road.
 
ZOMGVTEK said:
Very nice Doc.

I'd be a bit worried about that metal wire pressing on the insulation of those phase wires. In my experience, the hobby king silicone wire is not very abrasion resistant. No sense in setting yourself up for failure down the road.

silicone jacket is very temperature resistant, but it will easily cut..
 
ZOMGVTEK said:
Very nice Doc.

I'd be a bit worried about that metal wire pressing on the insulation of those phase wires. In my experience, the hobby king silicone wire is not very abrasion resistant. No sense in setting yourself up for failure down the road.

I know, but it's on usuall motor installation... if you take care of rounding any sharp edge with a grinder or a file and also add some grease to teh wire before to insert the bearing on the axel, that solve the problem :wink:

All my motor are modded with these 10 awg silicone wire.. it's still the best solution i found.

Doc
 
Motor WORKING... :twisted:


I assembled everything to test it and it's all good!

Final watercooled motor weight: 29.0 pounds ( including the water inside the liquid path :lol: )

The official RPM per Volt of that motor ( 5403) is 9.7rpm per volt :( .. so that theory that a motor with same turn count on the winding but that is wider stator will lower thr rpm.. IS TRUE

I get 484rpm at 50V no load

So this make the 5403 a trade off between the 5304 and the 5303 rpm per volt i guess..

not sure where exactly these 5300 rpm per volt data are.. :?:

Doc
 
Doctorbass said:
Motor WORKING... :twisted:


I assembled everything to test it and it's all good!

The official RPM per Volt of that motor ( 5403) is 9.7rpm per volt

I get 484rpm at 50V no load

That seems a bit on the low side doesn't it? The Cromotor is 9.3-9.5KV with a 50mm wide stator and 4 winds per tooth, I would think a 40mm stator with 3 winds per tooth would have a KV over 10KV probably closer to 11KV. Did your mods slow it down compared to what it was stock?
 
Maybe its the copper fill on the cromotor that make up for one more turn.

Doc whats the winding on the the 5403, like 20 x 3 or something like it?
 
Ypedal said:
on what bike are you going to install this motor ? ( rim size ?)


That's teh question... probably the Giant :wink:

i like the 24" wheel ( 24" x 2.5 hookwork ) but since the rpm is a bit low i might go with the 26" and go back to 26" wheel... but that motor was to beat my own record of 113km/h that i had with the 5303... and 24" wheel..

so notw this make it impossible sinc ethe motor is just hiugher torque but lower speed than the 5303... :(

i'm already at the max voltage of the kelly with 125Vdc,... i could still go with 135Vdc and get 5-10kmh more but...


I might need to go with the 5302 that i converted to a 5304 on my kmx for speed record....

and keep the Giant /5403 combo for the drag racing :twisted:

Doc
 
gensem said:
Maybe its the copper fill on the cromotor that make up for one more turn.

Doc whats the winding on the the 5403, like 20 x 3 or something like it?

Would copper fill effect the KV? I'm no motor expert, I'm curious because the little I do know stats that when you double the stator width and keep the same number of winds (with everything else the same) the KV gets cut in half.

Anyone know the inductance of a 5403 or 5404? I kind of wish I had one to play around with myself simply for the sake of experimenting. Can't wait until it cools off and I can start playing around with my bikes some more.
 
Back
Top