• Howdy! we're looking for donations to finish custom knowledgebase software for this forum. Please see our Funding drive thread

Hill Climbing eBike

Ianhill said:
Stop crazy bad idea.

My other ebike has a #219 chain and I get nothing in the area I'm looking at.

If it does not work I can always try the NEXT idea.

Sprocket Brake Idea.jpg

This one is the best of all if it works. (because it is near zero weight)

And I doubt I'll need too much braking beyond the 203 mm front disk.

Downhill the front wheel does most of the harder braking.

file.php


Right now I'm using some really old disc brakes, so if I want "SafeDiscDancing" levels I know where to buy it.
 
Bike Rack Shock Mount.jpg

So I'm going for the "Bike Rack Shock Mount" idea.

The added benefit is that it eliminates the uncertainty about where everything fits.

Enough for today... that's 3 hours of cutting, grinding and welding.

Note the "cute" little rounded end tabs.

That's mostly for show but you might attach a tie down to it.

We are talking an ounce here if even a full ounce and by welding inward I was able to use a really thin cross member and get it to actually weld without melting.

The usable rack area will be about 5.25" wide and somewhere around 10" long which will be a nice rack.

Might as well use it for something.

file.php


This part here will be on it's fourth recycle and that's after it was created for something else.

The plan is to blend this part and the "Bike Rack Shock Mount" into one unit bringing several different mounting points on the frame together.

------------------

When I bought the shock I had no idea how stiff it would be ($25) and the very aggressive 30" swingarm obviously means there is a lot of leverage if you mount the shock inward.

But an extended frame that doubles as a rack is not so bad in the weight department because what really would have been required for a forward mounted shock would have been a HEAVIER SHOCK.

So thinking only about weight I'm probably ending up lighter this way... a light shock made to absorb less leverage.

I'm guessing this shock is three or four pounds just by feel.

--------------------

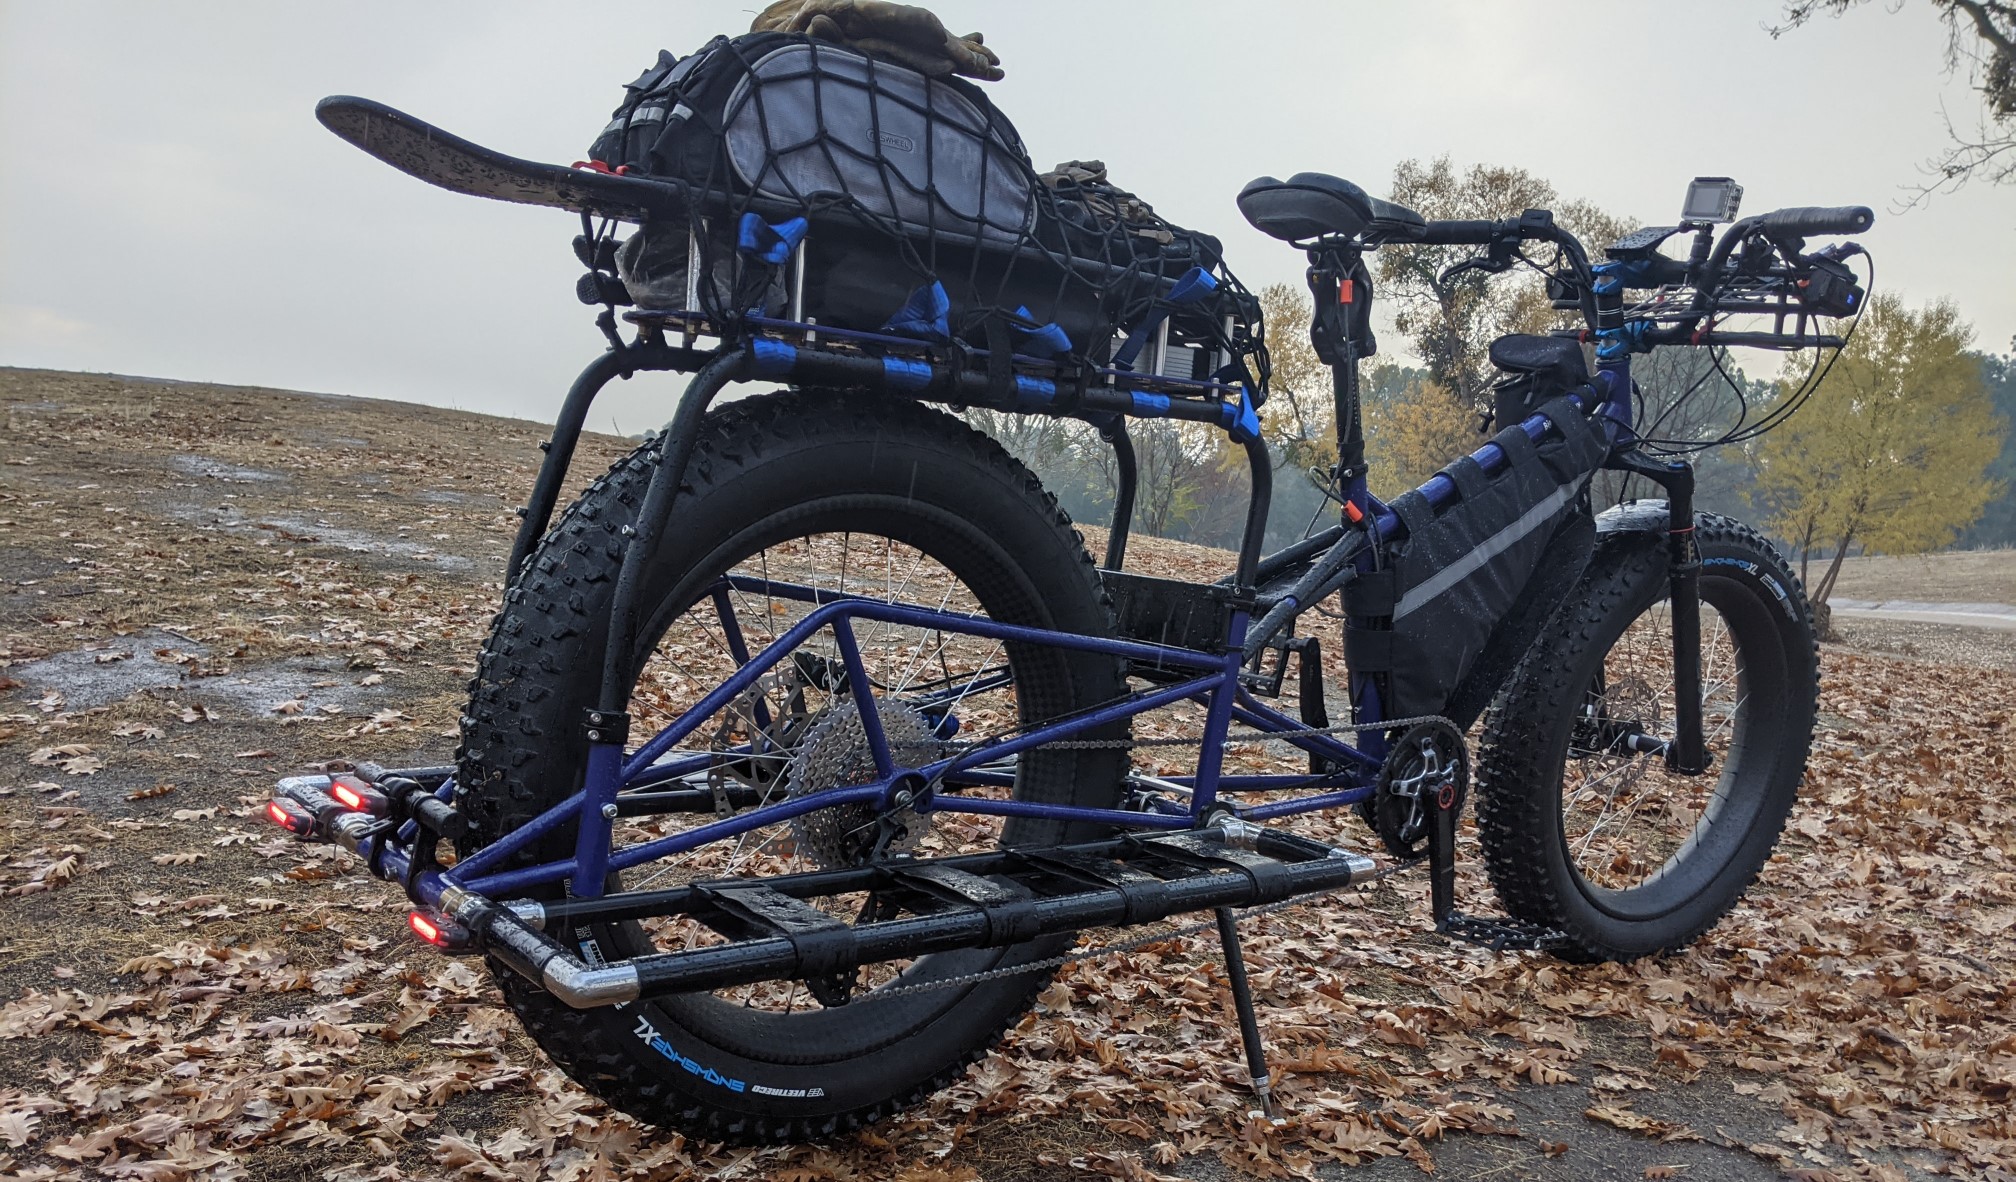
Looks like I picked up a little from this image posted earlier.

pxl_20201217_165311168_2016.jpg


That looks like it could be longer than a 55" wheelbase. And it has a massive bike rack.
 
Location of Rear Brake.jpg

Wow... for California it's a cold morning. Below freezing in some areas. Ten degrees below normal for this time of year.

Anyway... just thinking some more about the rear brake.

The Shock will slide back to the cross brace which is the area where the return chain will be guided by a roller.

There is just enough room between the two chain paths to fit the rear brake.

It's important to narrow the chain in order to get full contact on the front sprocket which at the moment is 10 teeth.

On my other ebike I have an 11 tooth for the front and it's just at the limits so I might need to go up to 11 teeth before I'm done on it.

0000-motul-chain-lube-road.jpg

My experience with the street version of the Motul Chain Lube is that it's like tar... it simply sticks forever and ever and is really hard to remove. It also works great (once warmed up) and reduces chain noise a lot too.

Now Motocross chain lube I know is different and is designed to get thrown off as you ride so that's an area I'm going to be concerned about.

I might decide to go with the street version then get more Gunk Cleaner to clean it up.

Lot's of uncertainty there. Dirt in abundance is going to test what lube works and what is a mess.

Another thought is of dry lube like for bicycles. It tends to get excessively built up over time but won't fly off easily and will stay clean of dirt. That would limit any greasy mess. But it will require that every few months I'll need to clean the whole chain back to bare metal.
 
Start of the Day.jpg

Getting started... that's a rough estimate of where things go. 17" and 17".

Extra bracing will tie it together.

Probably like a spine... one larger tube branching off with small tubes making the whole thing a bike rack and a shock mount while not wasting anything.
 
Mounts and Bolts.jpg

New bolts.

New mounts.

Altered spacing to go very narrow.

More of a refinement and finalization of the necessary stuff needed to "get er done".

Probably all I'll get done today.
 
Spine Design.jpg

This is the idea of creating a "Spine" down the middle of the bike rack.

Then you link the whole thing to the upper brace. (which defines the ride height)

All loads are then spread out to every part of the mount. (shock loads travel down three tubes)

Plus... the addition of the lowest mount point which was the original shock mount now acts as a lever against the upper mount.

It should work... the tube for the "Spine" is about an inch in diameter and 1/16" thick so very light weight but rather stiff.

Hopefully I get something going tomorrow but the cold mornings are rough.

I actually prefer riding my ebike to DIY work when it's in the 30's and 40's outside. (the batteries are weak in the cold however)
 
Axle Completed.jpg

That was two hours to finalize the axle which included trimming it down and threading it fully to accept the bolts. (I had gotten it started, but it needed the finishing touches)

Plus I changed the spacers a bit (1/4") to skew it slightly towards the pedal side. (right)

Feels very "robust" and unlikely to cause any problems.

The axle alone being now Aluminum rather than Steel probably saved a pound and there was a spacer inside between the bearings that was heavy too and that's also now Aluminum.

I bought the recessed screws to attach the pedal side plate to the hub, but have not yet countersunk them or installed them. So that's another hour to do.

And I needed to get this done before I weld anything because I need to be sure to keep the spacing right and if you have it rigidly put together the heating will be less likely to warp anything.

The hub has two large sealed bearings and spins very freely.
 
One To One.jpg

At night I tend to think up ideas and research them.

So I thought... "What is the leverage ratio for a standard caliper brake?"

Seems to me that's pretty close to exactly One-To-One just by looking at it.

Am I wrong?

Think about what that means... it means that the shape we see is all about getting around a big fat tire that is in the way.

But it also means you could get the same leverage if you went directly from brake pad to brake pad

And that suggests a "Sprocket Brake" might just work with a One-To-One leverage ratio too.

You can imagine where that goes....
 
Cantilevered Simplicity.jpg

How about the easy way?

This is using one Cantilevered brake arm that is a standard bicycle component.

The Aluminum Sprocket is very rigid and I'd guess 5 times stiffer than a typical bicycle disc.

Why not just do one pad?

Many standard disc brakes are only activated using one pad and then rely on disc bending to get full braking.

The advantage is all I need is to cut and weld the bolt to the swingarm... Simplicity.

And if that is not enough brake force I can add something more elaborate later but this gets me a rear brake instantly.

It even comes with the return spring built in.

Added weight near zero.

Outside only pad exposure means cleaning would be easy.

The leverage ratio will depend on where I put the bolt.

My guess is it could range from 1-1 to about 1-2.
 
I can remeber as a kid riding about on my bmx not stopping with both pads and both brakes

I'd need new shoes every few weeks from jaming my foot in the back wheel to make it skid and stop

My concern is the sprocket will deflect i get your trying to save weight but dont make it at the expense of your health.

That sprockets slick so the grip is gonna be very little needing tons of preasure for any real work to happen and the sptocket will just deform been pushed from one side only.

Disc brakes didnt only increase work rate with hyrdralic pistons they increased the bite rate with a carbon steel disc and sintered pads thats just not an option here.

Im glad your hill climbing not decending lets put it like that, but i can not believe your taking brakes so lightly.
 
Ianhill said:
I'm glad you're hill climbing not descending lets put it like that, but i can not believe your taking brakes so lightly.

Or "making the rear brake so light weight". :wink:

Well, I am thinking rather than weld in a bolt for this I'll build a clamp to make it temporary.

Another factor is "Tire Size Leverage".

Bigger wheels are going to take more braking force to achieve stopping power.

This is an outside diameter of 18" so one would think it might require less braking.

Yet another factor is the low gearing and the backEMF (regen) the motor will produce. (top speed is under 20 mph)

My guess is if you combine all those factors it should brake "good enough".

And the front wheel has a 203 mm disc brake so the front end is fine.

One can always upgrade... no project bike is ever "done" you just decide to stop improving it.
 
SafeDiscDancing said:
Why not just do one pad?
Upon first view your concept looks like it would provide minimal braking power, but since it is so easy to implement as an experiment, why not try it? Seems like with a longer bolt you could additionally mount the other cantilever on the bottom side of the chainstay, to realize two pads working on the sprocket.

Ianhill said:
Im glad your hill climbing not decending lets put it like that, but i can not believe your taking brakes so lightly.
You probably know this, but no rear brakes is not uncommon on dedicated hill climb MCs.
 
99t4 said:
You probably know this, but no rear brakes is not uncommon on dedicated hill climb MCs.

I did not know that.

It kind of makes sense because on a steep downhill 90% of the braking is with the front wheel and 10% is on the back so I can see not even having one.

I find that the rear brake on a downhill is a way to have more "feel" than actual braking.

When entering a turn on flat land it's nice to either have some motor braking or a light rear brake force because it gives you a better "feel".

Anyway... I'll try the single pad and see how it goes.

There is still a heck of a long way ahead before this thing even runs.

And often I just decide to ride my other ebike and use up a lot of my day. (two rides already today)
 
SafeDiscDancing said:
Spine Design.jpg

This is the idea of creating a "Spine" down the middle of the bike rack.

Then you link the whole thing to the upper brace. (which defines the ride height)

All loads are then spread out to every part of the mount. (shock loads travel down three tubes)

Plus... the addition of the lowest mount point which was the original shock mount now acts as a lever against the upper mount.

It should work... the tube for the "Spine" is about an inch in diameter and 1/16" thick so very light weight but rather stiff.

Hopefully I get something going tomorrow but the cold mornings are rough.

I actually prefer riding my ebike to DIY work when it's in the 30's and 40's outside. (the batteries are weak in the cold however)

I'm pretty sure you're going to snap the bar that holds the saddle if you do this. That's a lot more leverage than it was designed for. In the opposite direction.

If you want to do this, you're probably best off bracing the shock mount bar to the main pivot.
 
SafeDiscDancing said:
Or "making the rear brake so light weight". :wink:

The foot in the wheel option adds no additional weight to the bike, so that's one bookend. I guess the other options will be a trade off of braking power vs weight. I'm skeptical about the single pad, but I'm hoping to be surprised.
 
file.php


So more prep work... had to grind off some stuff then sand these tubes clean.

Spine Cleanup.jpg

The DEFINITIVE ANSWER on the braking question seems to be "let's test it".

If the real Hill Climbing Motorcycles do NOT need a rear brake then they might not be that important.

As for the Spine I'll know once it's finished.

You can always add more bracing. (and I have something in mind as an extra)

Oh... one more thing... since I deal with the scrap parts available most of the time the Spine will only go as far forward as the tube.

So I was thinking 10" but it's looking more like under 9".

This means the brace to the upper mounting plate stretches back a little more.
 
So you want a nice looking, shiny, eye catching bicycle?
Many people will be interested in looking at your bike.

SafeDiscDancing said:
So more prep work... had to grind off some stuff then sand these tubes clean.
 
Spinal Tap.jpg

Spine is in place.

Next step will be to tie all the pieces together and in as near perfect alignment as I can get.

One hour to do this step.
 
Bike Rack Shock Mount Done.jpg

Okay... overall five hours to get to here.

The Shock is STILL a little weak despite it being pushed out to 17".

With a lot of preload it should work okay, but definitely not ideal.

On the positive side the front and rear suspension actually seem better matched because the front is pretty soft too.

So at this point it's probably time to just keep going and get it running.

First in line is the bottom bracket and then hook up the chain so I can begin riding it as a bicycle.

Then after some testing I'd be installing the electrical stuff.

The Bike Rack Shock Mount seems very rigid so I think that area is fine.

Still some more things I'd add to it but that's enough for today.

Alignment all the way around looks good.

Just looking at the picture the addition of the bottom bracket, pedals, chain and sprocket will fill out the middle which looks oddly empty right now.
 
SafeDiscDancing said:
The Shock is STILL a little weak despite it being pushed out to 17".

With a lot of preload it should work okay, but definitely not ideal.
Keep in mind to get it dialed in you may end up swapping out the spring for a heavier rated. Should be widely available. You already saved $$$ by buying the shock so cheap! :D

Also: Remember when climbing you will likely be standing with your weight far forward-- less weight for the rear suspension to counteract.
 
99t4 said:
You already saved $$$ by buying the shock so cheap! :D

It's at the point of "good enough".

The front forks are really soft so having soft suspension in the rear isn't bad.

I'm guessing that front and rear bottom out equally now.

But in a perfect world both front and rear would be stiffer... especially if I wanted to do jumps on the bike.

For nothing but trail riding on steep fire roads it's probably okay.

At this point I just need to move forward and get something to test in the real world.
 
Morning Sunshine.jpg

Just a picture from a different angle.

More Views.jpg

With battery.

LIGHT WEIGHT

I can say I achieved my goals of it being light weight.

Not sure of the exact weight but under 60 lbs seems realistic... only need to add a few more things which might get it to 60 lbs but overall the weight is where I wanted it to be. It feels light and easy to lift.
 
Back
Top