HS3540 BOSS BUILD. Now H4065 Boss Build

Just got the new andersons from icecube in last night and replaced the old andersons. One suggestion I have for anyone who is as accident prone as I am, I would recommend putting some sort of grease on the andersons before putting them together. It does one thing only..... Helps take them apart. Within thirty seconds of putting together the rest of the series block I realized I put the andersons together the wrong way...... Thank god I put the grease on. It turned a thirty minute job into a ten second job and all the andersons slid right off. :lol:
 
I got some of the cycle lumenators from ebikes.ca a couple days ago! Now I can commute to and from work without a car in the world! Except for rain. I'll upload some pictures when I get them on my laptop. These things are bright and worth it! They are comparable in brightness to the headlights that new cars are starting to come out with. Light up everything in sight and they take anywhere from 15-100 volts so no problem here! :D I am also thinking about getting four more batteries to double range, and while I'm at it I am going to see about getting another harness from icecube so I can switch between 72V 16 aH to 36V 32 aH :twisted:
 
Alrighty
If you guys were ever thinking about buying Cycle Lumenators from ebikes.ca but never wanted to because of there price. Well they are worth about every penny! These things are the greatest things since sliced bread. If you buy the anderson tap with the lights, they are already soldered! This was fantastic because I though I would have to solder the balance tap on myself :shock:
Another great thing they have going for them, they have a 15-100V Dc-DC converter already in the case! Fantastic!!!!
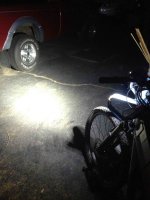
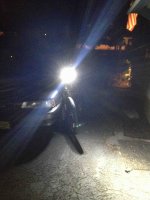
Enough of my typing heres two of the photos I took of these two beasts just lighting my drive way :twisted:IMG_0935.jpgIMG_0937.jpg
 
In other news.... I found a guy riding a moped at a red light. I could no help but ask him if he was up for a drag race..... :twisted:
I introduced myself and I found out his name is RJ. After the into we were both raring to go at the sight of the green light. As soon as the light turned green we were off. As soon as we started he was in my rear view mirror.... and well stayed their :D So I pulled over to the side of the rode and he past me and slowed down a little bit edging me to keep racing. So I catch up to him stay at the same speed he is at, tell him I have to go to work and speed by him like he isn't moving at all. :D Big win for ebikes in my area. :mrgreen:
 
Trackman417 said:
In other news.... I found a guy riding a moped at a red light. I could no help but ask him if he was up for a drag race..... :twisted:
I introduced myself and I found out his name is RJ. After the into we were both raring to go at the sight of the green light. As soon as the light turned green we were off. As soon as we started he was in my rear view mirror.... and well stayed their :D So I pulled over to the side of the rode and he past me and slowed down a little bit edging me to keep racing. So I catch up to him stay at the same speed he is at, tell him I have to go to work and speed by him like he isn't moving at all. :D Big win for ebikes in my area. :mrgreen:


The last time I met a gasser, I really felt like I was sandbagging. I meet gas scooters (Honda Ruckus or similar) at lights at times, and usually it's pretty comparable, but hard to tell if they are WOT or what. If I go to 60v instead of 48v it would be a lot more interesting.

Glad you're enjoying your new ride. The black battery boxes look much better.
 
Sooooooo I ended up frying my connectors... Again.i guess I got lucky last time, as opposed to this time because now I fryed two balance ports and the plastic got so hot so quickly it actually started a fire! :shock: so now I am cruising around at half power and waiting for my new battery to come in tomorrow. Which is a pretty good turn out for hobby king because I bought the battery on Monday and it is arriving on Wednesday. However they only had one of my battery's in stock at the US warehouse :(. Which is a good thing because now I won't be poking around at 25 mph.
The one thing I must admit, I really like 40V lipo. Smooth power delivery and I use 15 amps at 25 mph as opposed to 38 amps at 40mph and 72 volts. So that's just about a 15mph speed difference with half the volts. That's my fun fact for the day:D
 
veloman said:
The last time I met a gasser, I really felt like I was sandbagging. I meet gas scooters (Honda Ruckus or similar) at lights at times, and usually it's pretty comparable, but hard to tell if they are WOT or what. If I go to 60v instead of 48v it would be a lot more interesting.

Glad you're enjoying your new ride. The black battery boxes look much better.
Lol sorry I ignored I didn't know you posted anything :oops:
Yeah I really like my bike, when everything is in order. However these last few days have been challenging. After I fried the connectors, the two packs that I have been using, have gotten extremely out of balance...... over night. I don't know how this could have happened and right now I was setting my icharger on discharge to get all the cells down to the same voltage. 5 hours later, and to my surprise they are now slightly less out of balance.
Lol I just can't win :evil: I'm torn between trying to figure out what's wrong or if I should even bother with these cells and get 3 new packs from hobby king, when they get in stock...... I just found a post by Ykick and he uses a special plug that goes into the balance leads and it will only show that one cell that you want. I might give that a try tomorrow, if I can't get it to work.
 
One quick question for people who are much more knowledgeable about circuits than I am....
I got a harness from icecube that series' my packs for discharging and then parallels them for charging. When I charge the battery's, I series the discharge leads and the balance leads.... This is where there is room for error. I have connected the series plug with the balance connectors two times too many. So my way to combat this problem is to add a small 4-5 amp fuse inline with each and everyone of the balance leads. The main belief behind this theory is the wires melt... Melting wires means more current than is good for the wires. So the fuse will break and instantly cut off the parallel connection between each individual cell. Other than a ton of soldering, are there any objections? More importantly Would this work?? :mrgreen:
 
Trackman417 said:
One quick question for people who are much more knowledgeable about circuits than I am....
I got a harness from icecube that series' my packs for discharging and then parallels them for charging. When I charge the battery's, I series the discharge leads and the balance leads.... This is where there is room for error. I have connected the series plug with the balance connectors two times too many. So my way to combat this problem is to add a small 4-5 amp fuse inline with each and everyone of the balance leads. The main belief behind this theory is the wires melt... Melting wires means more current than is good for the wires. So the fuse will break and instantly cut off the parallel connection between each individual cell. Other than a ton of soldering, are there any objections? More importantly Would this work?? :mrgreen:

it should work ok, though 5amps is probably a bit much. if you connect everything right then the max amps should only be whatever your balancer can handle, ie <1A. so you could probably use a 2.5-3A fuse or something, to ensure they blow fast enough to prevent damage to the rest of your setup. it just means if you upgrade your balancer, you might need to upgrade your fuses too.

another simpler but more crude alternative is to use pcb boards with long straight traces, and use them as your fuse. just leave a few holes gap between your cell connector and where it gets paralleled to the rest of the packs. This is all I use, and the one time I did accidentally short out a couple of cells they sizzled and popped within a couple of seconds. a bit of a pita to have to take it all apart and fix compared to a fuse, but far less time consuming to build in the first place.

95-x-127-mm-vero-strip-board-pcb-clad-prototype-adimage.jpg

thats the only example I could find with a quick searh, but it gives you the idea. leave a 3-4 hole gap between each connector and it should do. just make sure the underside isn't against any packs, as there could be sparks etc if they do pop.


eidt
found a better pic
PrototypeBoard_0.jpg
 
hmmmm.
So just get pcb board and solder on the connecters, and then make a point were they all get paralleled. No fuses involved? That sounds like it would save me work, but when I eventually do short something out, I have to redo everything.... Do you have pics of your setup? I am more of a visual guy when it comes to circuits (I don't know much :mrgreen:)
 
There is a simple way to arrange your balance wires for series charging of a parralel setup, have a look at how i did it in this thread;

http://endless-sphere.com/forums/viewtopic.php?f=2&t=39489

This is the bike build thread which will enable you to understand the setup and therefore the explantion better;

http://endless-sphere.com/forums/viewtopic.php?f=6&t=37489

Simon.
 
Tench said:
There is a simple way to arrange your balance wires for series charging of a parralel setup, have a look at how i did it in this thread;

http://endless-sphere.com/forums/viewtopic.php?f=2&t=39489

This is the bike build thread which will enable you to understand the setup and therefore the explantion better;

http://endless-sphere.com/forums/viewtopic.php?f=6&t=37489

Simon.
Alright Tench! Thanks for the links. I was looking at your build a month or two ago for inspiration. One question I have for you is where did you source the D-sub connectors. I was shown links of pictures of them however no links or stores to buy them :| .
Can you post on your page how you made the plastic connect blocks aswell? I am sure plenty of people (including me) would like a rather robust way to charge and discharge packs, with ease and simplicity. If you wanted to, I bet you could make some money making custom charge/ discharge blocks. I wouldn't mind being your first customer :mrgreen:
 
The 25 pin D-sub connectors where bought of ebay,

the female socket with solder pins for wires not a pcp mounted type;
http://www.ebay.co.uk/itm/25-Pin-D-Sub-Solder-Socket-Serial-Port-Connector-2x-/180525988828?pt=UK_Computing_Sound_Vision_Audio_Cables_Adapters&hash=item2a082ffbdc

the male socket; (this one comes with the hood but they are also available seperately)
http://www.ebay.co.uk/itm/25-pin-way-D-Sub-Chassis-Plug-DB25M-c-w-Shell-Hood-Cover-/230784570435?pt=UK_BOI_Electrical_Components_Supplies_ET&hash=item35bbd51443

The hood;
http://www.ebay.co.uk/itm/25-Pin-D-Sub-Plastic-Cover-Shell-Connector-/180519816368?pt=UK_Computing_Sound_Vision_Audio_Cables_Adapters&hash=item2a07d1ccb0

The white nylon blocks i made where just drilled to accept the bullet connectors, the one mounted to the bike is potted with resin to hold them in place with an acetate sheet insulator behind it aswell, the 2 removeable ones are drilled for the bullets which are bolted to the brass bus bars that go throught the cross hole connecting the 2 bullets together, i didnt take any pics of them during manufacture.

The D-sub connectors are available in many different sizes, i am going to use a 15 pin one on the next bike for a 14s balance port to connect an Hyperion charger.
 
Trackman417 said:
Tench said:
There is a simple way to arrange your balance wires for series charging of a parralel setup, have a look at how i did it in this thread;

http://endless-sphere.com/forums/viewtopic.php?f=2&t=39489

This is the bike build thread which will enable you to understand the setup and therefore the explantion better;

http://endless-sphere.com/forums/viewtopic.php?f=6&t=37489

Simon.
Alright Tench! Thanks for the links. I was looking at your build a month or two ago for inspiration. One question I have for you is where did you source the D-sub connectors. I was shown links of pictures of them however no links or stores to buy them :| .
Can you post on your page how you made the plastic connect blocks aswell? I am sure plenty of people (including me) would like a rather robust way to charge and discharge packs, with ease and simplicity. If you wanted to, I bet you could make some money making custom charge/ discharge blocks. I wouldn't mind being your first customer :mrgreen:

I recon tench has one of the best setups ive seen for switching reliably between series and parallel.

depending on where you are, you can pick up the Dsub connectors from most electronics stores (like Jaycar), though ebay is the cheapest usually. that way you can still use the pcb traces as fuses, as its far less likely you'll have an accident.

hey tench, did you use 2 blocks for each connector you fabricated (edit, nvm just looked at your links)? basically so you can drill out 1 side to fit bullets etc, and then glue the backing on? cheers mate. ps hows the bike chain holding up against 4kw?

sorry for jacking the thread a bit... :oops:
 
sn0wchyld said:
I recon tench has one of the best setups ive seen for switching reliably between series and parallel.
Ohh yeah +1 on that. Easily the best charging/discharging setup out there. It is quite literally fool proof.

sn0wchyld said:
depending on where you are, you can pick up the Dsub connectors from most electronics stores (like Jaycar), though ebay is the cheapest usually. that way you can still use the pcb traces as fuses, as its far less likely you'll have an accident.
On my way to work I decided to stop by the local radio shack, and guess what they had! 25 pin D-Sub connectors! Looking at them thinking I have to solder each balance lead on there, looks like a pain in the neck! :x while I'm there I'm gonna need to pick up a small soldering iron as well. The iron I have has a tip the size of a big old construction pencil :shock:

sn0wchyld said:
sorry for jacking the thread a bit... :oops:
Ehh. Don't worry about it. I was going to ask that question eventually anyway :wink:
 
Trackman417 said:
sn0wchyld said:
I recon tench has one of the best setups ive seen for switching reliably between series and parallel.
Ohh yeah +1 on that. Easily the best charging/discharging setup out there. It is quite literally fool proof.

sn0wchyld said:
depending on where you are, you can pick up the Dsub connectors from most electronics stores (like Jaycar), though ebay is the cheapest usually. that way you can still use the pcb traces as fuses, as its far less likely you'll have an accident.
On my way to work I decided to stop by the local radio shack, and guess what they had! 25 pin D-Sub connectors! Looking at them thinking I have to solder each balance lead on there, looks like a pain in the neck! :x while I'm there I'm gonna need to pick up a small soldering iron as well. The iron I have has a tip the size of a big old construction pencil :shock:

sn0wchyld said:
sorry for jacking the thread a bit... :oops:
Ehh. Don't worry about it. I was going to ask that question eventually anyway :wink:


if you really hate soldering, you can get db25's that connect to ribbon cables. you need a bench vice or something to do it well but it can make the job much easier. like these...
400X060_PLI.jpg

it does limit you to 28g wire (the thickness of ribbon cable) but lessens the workload allot. 28g should be ok for up to about 500ma, or 1a if its got lots of airflow over it. that's pretty conservative #'s too.

Really soldering them is pretty easy. get a iron with a small pencil like tip. first, go and fill all the little 'pins' on the back of the db25 connector with a bit of solder. just enough to fill the little hole + a bit more. then tin up the wires you're connecting. finally, heat up one of the pins to get the solder to melt, and jently push the wire into the hole. leave it there with the iron for a second or two, take the iron off and then your done! its pretty quick once you get the hang of it. just one big tip though: make sure you draw up which pin is going to which pack before you start, or else you might need those fuses sooner than you thought!
 
sn0wchyld said:
Trackman417 said:
sn0wchyld said:
I recon tench has one of the best setups ive seen for switching reliably between series and parallel.
Ohh yeah +1 on that. Easily the best charging/discharging setup out there. It is quite literally fool proof.

sn0wchyld said:
depending on where you are, you can pick up the Dsub connectors from most electronics stores (like Jaycar), though ebay is the cheapest usually. that way you can still use the pcb traces as fuses, as its far less likely you'll have an accident.
On my way to work I decided to stop by the local radio shack, and guess what they had! 25 pin D-Sub connectors! Looking at them thinking I have to solder each balance lead on there, looks like a pain in the neck! :x while I'm there I'm gonna need to pick up a small soldering iron as well. The iron I have has a tip the size of a big old construction pencil :shock:

sn0wchyld said:
sorry for jacking the thread a bit... :oops:
Ehh. Don't worry about it. I was going to ask that question eventually anyway :wink:


if you really hate soldering, you can get db25's that connect to ribbon cables. you need a bench vice or something to do it well but it can make the job much easier. like these...
400X060_PLI.jpg

it does limit you to 28g wire (the thickness of ribbon cable) but lessens the workload allot. 28g should be ok for up to about 500ma, or 1a if its got lots of airflow over it. that's pretty conservative #'s too.

Really soldering them is pretty easy. get a iron with a small pencil like tip. first, go and fill all the little 'pins' on the back of the db25 connector with a bit of solder. just enough to fill the little hole + a bit more. then tin up the wires you're connecting. finally, heat up one of the pins to get the solder to melt, and jently push the wire into the hole. leave it there with the iron for a second or two, take the iron off and then your done! its pretty quick once you get the hang of it. just one big tip though: make sure you draw up which pin is going to which pack before you start, or else you might need those fuses sooner than you thought!
Yeah, but if I am going to do a job, I mine as well suck it up and do it correctly, or to somewhat good standards. :wink:
The more work done now, is less work done later :D
sn0wychyld said:
Really soldering them is pretty easy. get a iron with a small pencil like tip.
Yeah I dont have a soldering iron, with a small pencil tip, but that can be changed! :mrgreen: Ill post pictures on how everything goes and how I did everything.
You are way too much help for my own good Sn0wychyld! :mrgreen:
 
ha no probs mate. Just tryin' to give back some of the love ive gotten from es'ers over the past year or so. I look back at my first posts now, and its startling just how much ive learned. Hell, I didnt even know what 's' and 'p' on batteries meant then!

And while soldering + thicker wires is better for balancing, there's nothing wrong with using the ribbon type connectors. You just need to be aware of their limitations.
 
sn0wchyld said:
ha no probs mate. Just tryin' to give back some of the love ive gotten from es'ers over the past year or so. I look back at my first posts now, and its startling just how much ive learned. Hell, I didnt even know what 's' and 'p' on batteries meant then!

And while soldering + thicker wires is better for balancing, there's nothing wrong with using the ribbon type connectors. You just need to be aware of their limitations.
Yeah for balance leads, 500ma is probably all they are every going see, but when I had to charge each cell individually, 500ma is not going to suffice :( . I was putting two amps through the balance leads, and they were a little warm, but nothing to worry about.


In other news, I finally decided enough is enough with my rear rack that was holding my controller. I mostly take my bike to work. And my job requires me to wear black jeans, or khakis. The black jeans I wear, are a little tight and I was getting tired of having to stretch my leg uncomortably over the rear rack. So my job yesterday and today was to build something that would hold the controller in the frame.
The first place I started was A&P to get some more of those orange champagne boxes, from the liquor department.... What else would I make a mount out of? :mrgreen: .
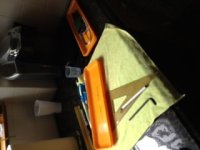
I ripped the cap off the box I received from the Liquor manager, and melted some holes where the two bolts along the top side along the down tube, great place to mount stuff, in this case my controller :D photo 1-1.JPG
After finding the correct placement for me to mount the controller while allowing a me to take off the controller mount I melted the holes, neccesary to mount the controller onto the mount as. After everything was nice and set up, I spray painted the mount black to match the controllerView attachment 1
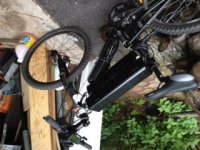
And after a good 5 hours of figuring out puzzles and such I finished everything, and here she is!photo 3-1.JPG
The thing I like about this new setup is the on/off switch is easily accessible and there is no need for me to do stretches before I haul my ass onto the bike :p .
And I personally think it looks ALOT nicer than it was before. Now that there isn't this Thing hanging off the back of the seat post. :mrgreen:
BTW if anyone needs my rear rack, for anything let me know. I'll be happy to sell it for $10 (shipping not included).
BTW Idk why my pics are al appearing upside down, I will try to fix them later, I am in a rush. :?:
 
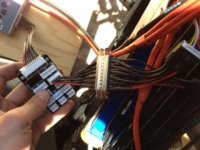
So I spent a good portion of yesterday wiring up a D-Sub connector. When I say it took me a good portion of the day, I mean 2-3 hours of soldering. I go new soldering station with a pencil tip just for the job. The one problem that I found was finding a way to parallel the leads through the other connector. So I got some copper cable from my previous bike unthreaded it, and soldered them into the connector. Sorry I don't have pics of that process but I do have pics of the end product.

After rewiring or making a new connector, does anyone find themselves connecting the new piece slowly or inspects it 1,000,000 times before zero hour? In hopes that if something does go wrong you will spot it and correct. I was doing just that! I connected the first JST-Xh connector, then I went for the other one, slowly. Then came the real test of paralleling them with the other connector. If anything happens it was going to be that one last connection.

DSUBphoto.JPG
Damn I do a good job, when I know what I am doing :lol:
YOu like what you see Sn0wychyld? :mrgreen:
 
I remember when the time came to plug my harness together for the first time, i checked the continuity and insulation of every connector and cable, balanced all the packs, double checked then tripple checked, then bit the bullet and plugged it in, right first time! :D

My setup is working extremely well, every time i plug it onto the icharger all the 6p cells strings are at identical voltages, the most i have used of the 16ah is about 11ah so i am recharging when it is at about 3.8v, i charge right up to 4.2v.

Snowchyld, Initail rides showed up a little too much chain slap and i once had the chain skip when on the 11t top gear, i was bunny hopping a speed hump! i refered to Sheldon browns pages to find the correct way to determine chain length for a deraillier system and had to remove 6 links!! to do it his way, it is perfect now! The whole drive system is standing up well, i dont know yet at what mileage things will need to be replaced but i am confident that with care and good maintainence it is going to be dependable and reliable.
 
Trackman417 said:
So I spent a good portion of yesterday wiring up a D-Sub connector. When I say it took me a good portion of the day, I mean 2-3 hours of soldering. I go new soldering station with a pencil tip just for the job. The one problem that I found was finding a way to parallel the leads through the other connector. So I got some copper cable from my previous bike unthreaded it, and soldered them into the connector. Sorry I don't have pics of that process but I do have pics of the end product.

After rewiring or making a new connector, does anyone find themselves connecting the new piece slowly or inspects it 1,000,000 times before zero hour? In hopes that if something does go wrong you will spot it and correct. I was doing just that! I connected the first JST-Xh connector, then I went for the other one, slowly. Then came the real test of paralleling them with the other connector. If anything happens it was going to be that one last connection.


Damn I do a good job, when I know what I am doing
YOu like what you see Sn0wychyld? :mrgreen:

nah man, looks like crap...

:p :p :p :p
just jokes mate. Great job! looks nice and tidy! and yea, I've built a few packs now and I'm still tripple checking everything, and connecting things as slowly as possible... half expecting there to be a flash and a puff of the magic smoke! sadly, for me, it has happend a couple of times. Once I dead shorted a 10s's 4mm bullets. POW! then i was left, staring down at my stumps where before there'd been bullets... :cry: . second time I managed to f'up my circuit board connections, which meant connecting the top half of a 8s pack to the bottom half via its balance leads. fortunatly I'd built it to blow like a fuse if anything like that happened. No harm done to the packs or me in either case. There's allot to be said for not playing with batteries when you're tired eh?


Tench said:
I remember when the time came to plug my harness together for the first time, i checked the continuity and insulation of every connector and cable, balanced all the packs, double checked then tripple checked, then bit the bullet and plugged it in, right first time! :D

My setup is working extremely well, every time i plug it onto the icharger all the 6p cells strings are at identical voltages, the most i have used of the 16ah is about 11ah so i am recharging when it is at about 3.8v, i charge right up to 4.2v.

Snowchyld, Initail rides showed up a little too much chain slap and i once had the chain skip when on the 11t top gear, i was bunny hopping a speed hump! i refered to Sheldon browns pages to find the correct way to determine chain length for a deraillier system and had to remove 6 links!! to do it his way, it is perfect now! The whole drive system is standing up well, i dont know yet at what mileage things will need to be replaced but i am confident that with care and good maintainence it is going to be dependable and reliable.

great to hear mate... Ill have to make sure the chain's tight on mine (though really I want to do a left side drive... twin 8085s used as a 2 speed :twisted: ). are we gonna see some more vids of that beauty in action?

i know other's have probably said it... but I'd also try charging to 4.15volts to see if there's much difference. I cant say from personal experience (only put 50 odd cycles on mine yet), but reports are that its really helpfull for extended cycle life, and the difference between 4.15 and 4.2 for me is less than 300mah out of a 10ah pack. 3.8v is really shallow too!
 
Sn0wychyld said:
nah man, looks like crap...
just jokes mate. Great job! looks nice and tidy! and yea, I've built a few packs now and I'm still tripple checking everything, and connecting things as slowly as possible... half expecting there to be a flash and a puff of the magic smoke! sadly, for me, it has happend a couple of times.

Tench said:
I remember when the time came to plug my harness together for the first time, i checked the continuity and insulation of every connector and cable, balanced all the packs, double checked then tripple checked, then bit the bullet and plugged it in, right first time!

My setup is working extremely well, every time i plug it onto the icharger all the 6p cells strings are at identical voltages, the most i have used of the 16ah is about 11ah so i am recharging when it is at about 3.8v, i charge right up to 4.2v.
So cheers for getting new wiring stuff right most, if not all, the time guys :lol:
I really believe that after some people make their first... or second mistake people (like me) they tend give a lot more respect to things they don't think will happen or think they are not proned to do.
Sn0wychyld said:
Once I dead shorted a 10s's 4mm bullets. POW! then i was left, staring down at my stumps where before there'd been bullets... . second time I managed to f'up my circuit board connections, which meant connecting the top half of a 8s pack to the bottom half via its balance leads. fortunatly I'd built it to blow like a fuse if anything like that happened. No harm done to the packs or me in either case. There's allot to be said for not playing with batteries when you're tired eh?
That must've been one hell of an experience! There is nothing like the smell of melted connectors in the morning is there?
I made all my series/paralleling mistakes when I was tired or just distracted by me wanting to get a ride in, because of how awesome the day turned out to be. After my little "oopsies", no matter how good the day was, the rest of the day was crap.
I am still paying for that mistake that was, what, a month ago? Because I am still waiting for hobbyking to get in 5s 8Ah zippy packs. Does anyone know how long it will take to get them in? Is it taking longer than usual? I am tired of topping out at 25.. its incredibly boring and slow :cry:
 
you guys havent heard of KFF??? :mrgreen: :mrgreen: http://endless-sphere.com/forums/viewtopic.php?f=2&t=31627&hilit=184v only one example....i remember metalover had some nice metallica lookin black marks on his hand lol
 
hydro-one said:
you guys havent heard of KFF??? :mrgreen: :mrgreen: http://endless-sphere.com/forums/viewtopic.php?f=2&t=31627&hilit=184v only one example....i remember metalover had some nice metallica lookin black marks on his hand lol

yea, that's a BAD case of kff for sure. mine wasn't bad at all, the slightest bit of black on my thumb was it.
 
Back
Top