jonescg's NEW electric racebike BUILD thread!

Mike Edwards said:
wedge said:
If you find you need more cooling you could add a second radiator underneath the seat, Britten V1000 style.
BRITOP.jpg

Or just copy the Mission R with the radiator horizontal directly under the battery pack.

Yea Mugen does the exact same thing with one of their radiators (I think its the motor radiator). They have the radiator tilted forward to create a diverging volume to help push the air through it.
 
As of today, my frame is on it's way to Perth :D It took much longer than expected because the forks I'd ordered on flea-bay were damaged, so the replacements (very good of them) only just arrived and were fitted up to the bike.

Airfreight, door to door came to AU$1350. Wow :shock: I was expecting something in the many thousands, not a US grand. I guess I won't relax until it is sitting safely inside on my dining table.

SO there you go, fully custom frame with everything but the rear shock, wheels and brakes came to $10k. About what I anticipated, so that's good :)

Will post some frame pr0n once it arrives :twisted:
 
Nuts&Volts said:
Yea Mugen does the exact same thing with one of their radiators (I think its the motor radiator). They have the radiator tilted forward to create a diverging volume to help push the air through it.

Have you got any pics of this? Thanks.
 
Mike Edwards said:
Nuts&Volts said:
Yea Mugen does the exact same thing with one of their radiators (I think its the motor radiator). They have the radiator tilted forward to create a diverging volume to help push the air through it.

Have you got any pics of this? Thanks.

This is probably the best picture I have. Also I meant converging, definitely typed the wrong word.

20130604_143853_zps289c5d19.jpg
 
Nuts&Volts said:
This is probably the best picture I have. Also I meant converging, definitely typed the wrong word.

Okay that makes more sense :) Interesting that there was a need for so much cooling. I guess they were harder on the throttle than in a circuit racing environment, but the airflow is higher at these speeds too.

Tinto - Friday is the ETA 8) I still have to clear it through customs and pay all my duties, but after that I can start kitting it out to look like a bike. I learnt that I can get carbon rims to suit for about $4000 ...if I had any cash left after this.
 
jonescg said:
Okay that makes more sense :) Interesting that there was a need for so much cooling. I guess they were harder on the throttle than in a circuit racing environment, but the airflow is higher at these speeds too.

Cooling the motor and controller seem to be the biggest challenges although I am looking to cool the battery pack also on a separate circuit.
 
Katherine will have to excuse me while I have a moment with my frame :)

I had to pay $1270 to customs and the GST collectors, but from now on I should be able to source parts locally. The cells will have to come from China, but at least Brett has inverters in Newcastle.
View attachment 1
The fun commences, right after I find a job. frock I'm broke now.
 
jonescg said:
Katherine will have to excuse me while I have a moment with my frame :)

I had to pay $1270 to customs and the GST collectors, but from now on I should be able to source parts locally. The cells will have to come from China, but at least Brett has inverters in Newcastle.
View attachment 1
The fun commences, right after I find a job. frock I'm broke now.


Looking good mate!
 
Hi Chris,
Bernel in the UK, I have just caught up on your Voltron build and have have been following your new build. Very impressive, yours and Rippertons builds inspired my build and I am looking forward to seeing this completed. You guys in Oz seem to be leading the charge on electric race bikes from privateers and inspiring others.

Good luck and I hope you get sponsorship.
 
Hey Bern- Yeah I will definitely need sponsorship if I want to see this bike turning a wheel before March next year. Glad to hear I was an inspiration to you. You're lucky we don't send you invoices ;) Honestly the trick to a solid electric motorbike is to plan thoroughly, design with ruggedness and reliability in mind, buy the best components you can and spend the money on good quality stuff wherever possible. It will be worth every cent.

Abraham - fairings arrived in good shape. We had barely got rid of all of the cardboard boxes from your e-bikes and now there's about another cubic meter of box to contend with :lol:

Tony, cheers mate, I look forward to finishing it and giving you a ride. Should leave the rest for dead I reckon.

I've nearly finished the Kiwi-LiPo-E-Bike. I gotta make room in the shed for Voltron-Evo, so I might wind up selling it since I'm so strapped for cash right now.
 
Mike Edwards said:
I am looking to cool the battery pack also on a separate circuit.

You mean like this...
FAN1_zpsc5f1b8f2.jpg


I bet your a happy dude right now Chris, do I have to start worrying yet ? anyway hope you find some cash soon.
 
Yeah Dan, once I find some serious money you can start worrying. Till then you're in the clear ;)

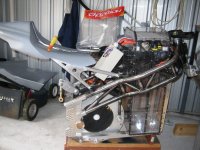
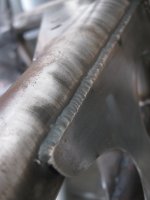
This frame is truly a work of art. Every weld is a perfect stack-o-dimes, every bolt hole is thoughtfully placed. I still haven't attempted to fit the battery pack into position but I think we're in the clear. If not, I can always shorten the main shock stud since that's the only place it will foul.

The Kawasaki fairings have lots of holes so you can still see the frame and pack through the sides. Good for air cooling too ;) The honking great motorplates are probably a bit of overkill, and future weight reductions may start there.

Randy said he was happy to build more frames following this format, so for anyone looking for a custom frame, you can benefit from a great system already! And a great price too, all things considered.

If you'll excuse me I might go look at my frame some more....
 
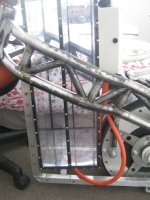
So the same massive weather system which is pushing Abraham, Ching and Maurice back to Sydney is the same system which makes going outside unpleasant here in Perth. Still, I had enough clear sky to go out and attempt to fit the battery pack to the frame.
Voltron Evo in the house 001.jpg

Damn.. Shit balls cock arse damn! I had to walk outside for a little bit, realising what I was about to face - years of planning, kilometers of emails to Randy, ten thousand dollars, and it doesn't fit!!??? Does it have to come to this?

I calmed down a bit, put the frame together and removed the main control box from the battery. I dropped it in, and to my massive relief, the pack sat down perfectly and at the ideal height. PHEW!!!! :D

Voltron Evo in the house 010.jpg

So, it's actually better than I thought. This goes in the space where the base of the fuel tank would normally be, which is actually pretty spacious. I reckon I can still use the same main control box with all the goods, I just need to mount it on a diagonal support and shorten the main power leads going into the box.
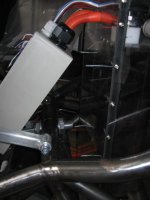
Voltron Evo in the house 008.jpg

Voltron Evo in the house 009.jpg

So all up I am much happier about the situation. Could have been disastrous, but in the end I think we're in the clear.

The look of the bike from the cockpit is pretty good. I was worried the box might foul the reach to the handlebars. Sure it's not super convenient but not in the way, really.

Voltron Evo in the house 007.jpg

In the meantime, I am just admiring the workmanship on this frame. It is truly something else.

Voltron Evo in the house 011.jpg

Voltron Evo in the house 012.jpg

Now, tomorrow I will be racing E-max 110s scooters at Wanneroo Kart track, so feel free to come up for a stickybeak!
 
It's an all day thing, so come up when you feel like it.
 
It still won't clear the shock, Dan. It is very close though. Even so, I'd need to use different cable cause the radius is too tight. Personally I like the new arrangement as it means I can look through a window in the tank cover and see the contactor LEDs. I'll still shorten the main power cables though. It frees up some of the other solid mid-frame attachment points too. This thing will be tank.

I'm also going to need to get a 2 mm Ally tray built to hold the base of the pack nice and snug. I had a little panic moment, but after a cup of tea and some deep breaths, it will all work out :)
 
Must be massively satisfying to have it in your hands.
I'd imagine there are plenty of riddles to solve now that key parts are together, but great to see you taking them in your stride!
 
Yeh that box is an issue Chris.
Sparkies would say a box that size was well to squeezy for what your trying to do there, but yeh totally understandable when your trying to squeeze things in.
Sounds like a hack, but can you turn the box sideways on by doing away with the entry gland set up and drill holes in the box sides for the main cables.
 
It's a bike, not a house ;)

But yes, it necessarily needs to be squeezy. I think I've done well not to have contactors and fuses hanging everywhere off the frame. Self contained and rugged - that's been my design philosophy.

Putting the box up there would make the battery pack even bulkier at the top. I'm not completely comfortable with how big it is in it's current form, but its as good as I can get without compromising ground clearance at lean. Also, entering the cables through the back of the box would mean a complete redesign of the control box; something I am reluctant to do but not completely adverse to. I do think it's better to have it laying diagonally as it fits the underside of the tank cover well while being pointed in the right direction for the battery cables to exit and connect into the motor controller. I still need to fit wheels to the bike so I can get some idea of ride height and clearance.
 
jonescg said:
It's a bike, not a house ;)
Definetely not a house, got a lot more power going in than any house i've seen :wink:
Good to see the beast taking shape.
 
It looks like another bad boy bike coming to the tracks soon form Australia. The races will be sweeter next next year!

Keep it Clean and Green
Richie
 
Back
Top