jonescg's NEW electric racebike BUILD thread!

Okay, so who wants some thermally conductive, electrically insulating epoxy potting/adhesive compound?
Cause the minimum purchase is 70 kg! That's AUD$3550. I only need about 10 kg, but will buy 20 kg if I have to. But 70 kg!?
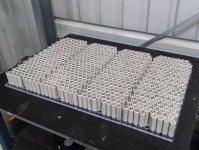
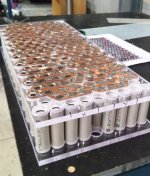
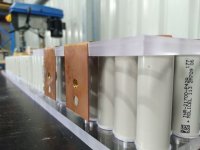
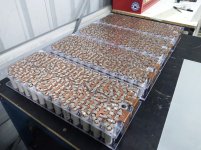
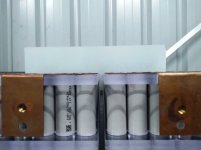
Curious... How thermally conductive is it?
 
1.4 W/m K verified by myself with a test rig. So for a 1-2 mm thick layer it's actually pretty good. It's not the best potting compounds due to it's high viscosity, but it does have a long pot life (about 15 min).
But the offer is probably best suited to folks in Australia / Perth...
 
Chris, have you looked into RTV? I once built a hybrid PV panel that used cells imbedded onto an aluminum plate using RTV. It worked quite well (the idea was that heat generated from the photovoltaic cell was transferred to water which was used to preheat domestic hot water. I can't remember the specifics on type of RTV but it was off-the-shelf.
 
Okay, so who wants some thermally conductive, electrically insulating epoxy potting/adhesive compound?
Cause the minimum purchase is 70 kg! That's AUD$3550. I only need about 10 kg, but will buy 20 kg if I have to. But 70 kg!?

$50/kg? That seems excessive? (but then, platinum-cure silicone isn't cheap either, and is in the same general range; I've used it to cast parts from and make molds for others.)
 
I think this stuff is particularly good because it's both an adhesive and a potting compound, It's got pretty good peel and lap shear strength. There are cheaper potting compounds around but they tend to be quite inert, and don't bond like you want them to.
I'm certainly looking for something a bit cheaper.
 
Sprocket is done! Just need to taper the teeth so the chain doesn't get lifted.
0012ff634024a3d8abf817a95524cac.jpg
4f70f335ba74ac714bd5a4e360e14a6.jpg
 
Two modules done, two to go. Might try and order some Electrolube. Nothing sus about that product name at all...
 

Attachments

  • 20230827_150008.jpg
    20230827_150008.jpg
    418.6 KB · Views: 30
I’ve used some stuff called RTV3140, which is a flowable non corrosive silicone. Not cheap but nice results.
 
Well despite the thickness of the sprocket not being right (I designed it for 530 chain, when its actually 525) and the teeth need to be tapered, I gained almost 10 mm. So the smart move is to remove thickness from the inside just to ensure we clear the tyre.
20230831_165654.jpg20230831_165705.jpg
 
Finally had some time to check the chain run. Looks like I won't need to mess with the chassis, which is great.
20230902_093137.jpg
I'll get the sprocket trimmed down on the inside, and re-faced on the front so there's a bit more purchase on the stud nuts.
 
Sorry if this looks like I'm posting the same thing, but the chain run is complete, wheel is in position, and the chain alignment is as true as I can get it without fouling the tyre.
Time to move on :)
 

Attachments

  • 20230905_164157.jpg
    20230905_164157.jpg
    202.4 KB · Views: 23
  • 20230905_164139.jpg
    20230905_164139.jpg
    285.6 KB · Views: 24
  • 20230905_160450.jpg
    20230905_160450.jpg
    192 KB · Views: 23
Looking at the last picture - the chain is nearly touching the tire. Won't it rub when cornering and tire deforms?
 
Looking at the last picture - the chain is nearly touching the tire. Won't it rub when cornering and tire deforms?
It might rub a little, but the tyre only gets narrower with speed (centrifugal deformation). It was a balancing act trying to reduce the moment on the driveshaft while not fouling the tyre.
 
It might rub a little, but the tyre only gets narrower with speed (centrifugal deformation). It was a balancing act trying to reduce the moment on the driveshaft while not fouling the tyre.
Ok, thanks for explaining.
 
Electrolube ER2074 is a 10kg kit of thermally conductive epoxy.
Try contacting one of the distributors.
Well I desperately bought about 5 kg of this stuff because the next order was 4-5 months away. It arrived as 20 x 250 g mix-sacks.
I tested one of them for lap-shear strength... effectively none 😖.
The black stuff I normally use was a much, much better adhesive. This stuff sets like a hard plastic and just cracks off any surface it's fused to. I still have a little bit of the black stuff left over so I'll just persist and see how I get on.
Why the shear strength is important in your application?
 
Why the shear strength is important in your application?
Because I use the thermally conductive epoxy to adhere the sheets of G10-FR4 to the faces of the battery:
 
Figured I might as well start putting the overall enclosure together. As always, polycarbonate is a winner. Screwed together using countersunk self-tapping stainless steel screws. The top shelf will have a number of holes and so forth cut out in order to accommodate the main power leads, contactors and BMS etc. while some fans will pull air from the gaps between each module. Not perfect, but it's the best I can manage.

Cylindrical pack enclosure.jpg
 
Populating the capture plates and checking them twice...
They are about 1 mm apart in the worst case, which is not ideal, so I might go between them with some RTV silicone before welding the tabs down. In the meantime I'll be soldering and routing balance wires and cutting the sheets of FR4 to suit. I might have enough of the original black expoy adhesive... I hope!
 

Attachments

  • 4 modules assembly.jpg
    4 modules assembly.jpg
    219.3 KB · Views: 18
  • Checking with busplates.jpg
    Checking with busplates.jpg
    138.8 KB · Views: 19
Terminals weren't quite right, but easily fixed.
 

Attachments

  • 20230923_165910.jpg
    20230923_165910.jpg
    127.7 KB · Views: 11
One of the more satisfying elements of a battery build.
 
Getting closer to sparkletime!
Actually I'll be putting all the balance wires on before I go spot welding anything, and frustratingly the top cover PCBs are about 2 weeks away. I can make a bit of progress up to that point, mostly around the enclosure I guess.
 

Attachments

  • sparkletime.jpg
    sparkletime.jpg
    332.3 KB · Views: 18
I've budgeted for a complete module being 78 mm thick. I think I'll come in just under, which is a nice touch.
Next challenge is to find a path out of the over enclosure for the main conductors. The BMS wiring is in the way...
 

Attachments

  • 4 modules on their way.jpg
    4 modules on their way.jpg
    369.3 KB · Views: 14
  • module profile.jpg
    module profile.jpg
    126.9 KB · Views: 14
I might be able to get rid of the box out the back...
 

Attachments

  • HV hardware layout.jpg
    HV hardware layout.jpg
    467.6 KB · Views: 8
Back
Top