jonescg's NEW electric racebike BUILD thread!

Full-Throttle kindly produced some Gerbers for me of the main control board. Too many high voltage wires hanging around inside this box, too much potential for a short somewhere. So I figure this board will simplify things greatly.
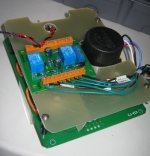
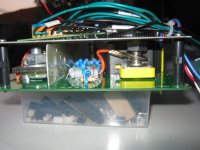
Full Throttle Cont Brd 001.jpg

Full Throttle Cont Brd 002.jpg


Now the whole lot goes together much more smoothly and clean. Just have to set the relay logic board up and it's done.

The resistors in the middle are the precharge. I was going to use four 2.2kR resistors in parallel, but I dropped the packet and the bastards broke in half! So now I have two 47kR and two 1kR resistors for about 490 ohms of precharge resistance. Gives a full precharge in 1 second. The high voltage precharge relay from Gigavac is soldered in nicely and no longer needs the jam nut. For voltage monitoring I'll be using the Cycle Analyst with a Vex connection from the voltage divider below. It offers a 1:140 division which should be about 5 V for full charge, and 3.9 V when flat.

Just need to devise some convenient plugs for the contactor LEDs and the 12 V supply.
 
I finished the relay control board and mounted it inside the box with everything. It's not ready to screw the lid on just yet, but all of my logic checks out.

I currently have a 2.2 second delay for precharge. Precharge is actually over in 1 second with the current arrangement, but I think the extra delay is a good move.

http://www.youtube.com/watch?v=vmZHHUPmhLQ&feature=youtu.be

Just need to mount some slightly longer screws through the board to hold it to the battery box, put a decent waterproof plug together for the shunt and voltage divider and maybe run some optic fibre up to the dashboard for the contactor indicator lights.
 
Apart from fixing the top cover to the pack, it's ready for the cells!

Main control box done 001.jpg

ON.jpg

Charging.jpg

I have installed the output leads to the controller, but I will need to install a water-proof, finger-proof socket on the output. Should make pulling the battery out a fairly simple affair.

Now, I will be placing a huge order for individual 40C LiPo cells. About 550 of them to account for duds. If anyone wants in, let me know in the next month or so and I can add them to the order!
 
If I buy 500 or more from the factory I get them for about $9.60 each, but by the time they are shipped and I pay customs and taxes, they will be more like $14 each. Could be less, but with the Aussie Dollar dropping I don't think so.
 
Got it, so my 120, (hopefully 144 cell) pack would be around 2 grand maybe a touch more with shippin to the states.
 
Well I'm buying my cells direct from the factory, and their minimum order is 500 cells. If you could rustle up enough interest in the States you could save on double-shipping, but 500 is a lot. It would cost maybe another $300 to send the cells by boat from Perth to the USA, but at that point I might as well solder up a pack for you. Which I'm happy to do :) Assembling the packs is the easy bit.

Lettuce know ;)
 
jonescg said:
Well I'm buying my cells direct from the factory, and their minimum order is 500 cells. If you could rustle up enough interest in the States you could save on double-shipping, but 500 is a lot. It would cost maybe another $300 to send the cells by boat from Perth to the USA, but at that point I might as well solder up a pack for you. Which I'm happy to do :) Assembling the packs is the easy bit.

Lettuce know ;)

its a shame the aussy store doesn't stay better stocked... ordering in sets of 53 would mean about $12.50 per cell, delivered... or groups of 165 would be about $12.40, maybe less. have you thought about splitting the shipment up so that each one individually is less than 1k? no customs then...
 
It comes down to shipping. The unit price of the cell is nothing special, it's getting it here at an affordable price. They can declare the value so I pay less GST, but in the end it's the cost of packaging them up to DG standards and flying them over. I could wait for sea freight, but there's 7-8 weeks. Not that I will need my battery in a hurry though.

I would rather get a shitload of cells over in one hit rather than do multiple smaller orders, simply to avoid the hassle.
 
The pack, minus the cells, is done.

PolycarbpackFTW005.JPG

PolycarbpackFTW003.JPG

PolycarbpackFTW002.JPG

It is as weather-proof as I care to make it now. The foam strip does a pretty good job of keeping things dry. No, there is no active cooling going on, but the polycarb pack will slowly let heat out if it does get hot. I'm relying on the fact that I'm mostly just tickling the pack.

Hope to have the BMS panels ready to install in a months time.
 
More chassis pr0n :D

I think I will get the powdercoating done here in Perth since I will no doubt need to do stuff to the frame for the tank cover to fit.

Tail4.JPG

The inverter mock-up fits nicely:
Tail5.JPG

Solid subframe:
Tail3.JPG

Nearly ready!
 
Finished the battery charger monitoring box. Basically it's a pair of volt meters and amp meters for both half packs, and these are powered by the battery being charged courtesy of a pair of Myrra power supplies (thanks Heath!). I will also need to set the charge enable leads from the battery chargers up so the BMS will turn them off if a cell goes high. I can't really do this till I have a working BMS, and this relies on having a battery! I can mount these on a panel which can sit flat on the floor where everyone can kick it, or upright so it can fall over more easily.

How bright are these displays eh?

View attachment 4

View attachment 3

View attachment 2

View attachment 1

Charge monitor box 005.jpg
 
Some final pics before it all gets crated up.
The headstem bearing ODs were based on a GSXR, so I ended up buying an '08 Gixxer front end in the USA and had them throw it in the box. They tried it with an older triple clamp and it all fits good. Still need to source some brakes and levers.

Almostpacked3_zpsadbac762.jpg


Bit of a fatty, but no fatter than a typical non-Honda Japanese litre bike.
Almostpacked7_zpsb1bfea22.jpg


Looking nice and shiny :)
Almostpacked2_zps1bc0f364.jpg


Got the holes machined out to 20 mm, which is still probably too small for GSXR rear wheel. Oh well. I should have been more specific than "about 20-25 mm". I can still make it work with spacers.
Almostpacked4_zpsfcfd3978.jpg


Randy is still working on the output shaft bearing and support. Still quite a lot of support needed for this much torque. And once this is paid for, I will be almost completely broke. Time to get that crowd funding target set up...
 
Some last pics to show you before it gets sent off. I got Randy to build an output shaft bearing support, as the chain run would foul the tyre unless the motor was shuffled further to the left. We couldn't go too far as the motor would end up touching the inside of the swingarm bridge, so it meant mounting the drive sprocket some way out. In order to support the shaft, the new bearing goes to the inside of the drive sprocket, leaving full access if you needed to remove the chain.

Outputshaftsupport_zpscd3bd4a7.JPG
He also added some attachment points for the all important sharks fin sprocket guard, and some spools for the track stand.

Swingarmspoolsandguard_zps48794bc7.JPG
Finally the bump-stops for the steering. Don't want to chip the paint now!


And that, I believe, is that! It's done. I will get the shipping bill in a week or so, and I can tell you the complete cost of the custom frame construction. It wasn't cheap, but I would have spent the same money converting an existing bike and have to compromise more. Can't wait to get a job and start finishing this machine!
 
Love this build, and I'm extra excited to see how it goes because I have a CRX to electrify as well :D
 
inh said:
Love this build, and I'm extra excited to see how it goes because I have a CRX to electrify as well :D
We will have to start a club ;)
 
Well another milestone made. The invoice has been paid and the bike has been packed up. All up it came to a bit over US$8000. This is including the ZX-10 fairings, custom motor plates, custom linkages, custom subframe and custom battery cradle. I paid an additional $750 for some forks and triples, as well as the $500 alloy swing arm. Hopefully we can work out a cheap and fast shipping method. Sea freight from LA to Sydney might take about 6 weeks, and Sydney to Perth another 2 weeks.

For the curious, Evo-GKN have informed me that they are willing to accept small orders of motors provided there is a business case for continued orders into the future. So for any budding open-wheel racers, or Evo-motorcycle builders out there, all is not lost. I'm guessing the economy is so bad in the UK they are happy to sell to anyone again :)

And more exciting news - I had a job interview with a big company who does Subsea ROV work. It went really well, but I will have to wait another month or two to know the final word. 4 weeks at sea piloting tethered subs and 4 weeks off. Might be rough, but for a few years it would make for some serious cashflow. Fingers crossed!
 
Where are you going to put the radiator and how big will it be? There is no room behind the front wheel and not much above it.
 
I've generally been planning on putting it in front of the battery cradle, up as high as possible. The radiator is only about 300 mm wide and 200 mm tall, and barely 30 mm thick. If it doesn't fit there I'll try to fit it underneath the battery tray or something. I'll find a way :)
 
The total volume of your radiator is 1.8 litres. I estimate it will hold about half that amount of water, say 1 litre. The coolant flow rate for the AFM-140 must be greater than 8 litres per minute. I'm not sure what your controller requires but if we assume it is at least 4 litres per minute you will need a total flow rate of at least 12 l/min. I don't think your radiator is big enough.

A lot of people think an ICE needs such a big radiator because they are very inefficient. It is true that they are inefficient, but their radiator is actually very small compared to the amount of heat they produce. The water cooling system of an ICE engine only dissipates about 20% (my estimate) of the waste heat, the majority of the waste heat goes straight out the exhaust. An EV creates much less waste heat, but nearly all of it has to be dissipated by the cooling system.

If you find you need more cooling you could add a second radiator underneath the seat, Britten V1000 style.
BRITOP.jpg
 
wedge said:
If you find you need more cooling you could add a second radiator underneath the seat, Britten V1000 style.
BRITOP.jpg

Or just copy the Mission R with the radiator horizontal directly under the battery pack.
 
Back
Top