new eZip motor

Status
Not open for further replies.
latecurtis said:
I would then need to switch to the SONA or Samsung packs for the trip back home going up hills. It sounds like too much trouble when I can simply run all four Sansung packs in parallel. Thanks.

Exactly! Let's try to make things easier, not harder!!
 
The biggest problem with soldering the cells is the new soldering iron. It is a piece of junk. The old 60 watt iron had a little knob to turn to adjust heat output.

I watched a video where it looked really easy to accomplish it however they sanded the top of the cell to rough up the surface. I did the same. In the video the tip of the soldering gun they used was in fact different and was very hot.

the end of the tip was just touching the top of the cell and melted a perfect drop of solder. It was then melted and the end of the wire inserted.

My attempts were futile. I did the same exact thing and even used a little flux. The melted drop of solder stuck to the end of the soldering iron and would not stick at all to the top of the cell like in the video, I do not see how a different tip would work unless like the one in the video.

https://www.youtube.com/watch?v=e0PVM6b0VRs

This guy makes it look easy. Maybe he is related to DA. I really do not understand why the solder stays on the cell in the video but sticks to the solder tip I got and none of it sticks to the cell. It is about the same amount of solder.

I would need to order the exact solder gun and flux pen and solder he is using and maybe I could get the same results. However I do not have the money. I also do not feel like waiting around for it. The solder gun I got is so cheap that the power cord is like 22 gauge wire. I should have never ordered it. It was a waste of money. thanks.

LC out.
 
gun.pngliquid tape.png

I know I can solder these cells but not with a 30 watt or a 60 watt without temperature adjustment.

there is a setting on the 60 watt which hopefully will allow the solder to melt in a pool on top of the cell. If the iron tip gets too hot it stick to the tip of the iron. If it does not get hot enough then the solder wont melt.

As far as the tips go perhaps DA is right and there is a tip which will do the trick and the solder won't stick to it.

DA. Is it possible you could do a video using the proper tip ? Do you have a cheap 60 watt iron with the proper tip for the job I want to do?

If you only have an expensive set up like the one in the video then there is no sense. I just really want to do this as I have looked online for different kits but see nothing. Also the solder-less model I designed is a lot of work.

I lost my money card so probably wont be ordering anything else but if this iron works then the liquid electrical tape will fix the spots where the heat compromised the insulation on the cells I attempted to solder. Thanks.

LC out.
 
[youtube]OtHw-RNyl3g[/youtube]

[youtube]e67byImYuL0[/youtube]
 
View attachment 1

I do not have that equipment but hopefully the larger tip will show up with the iron I did order.

I already accomplished a perfect solder connection with the shitty 30 watt iron. but only a couple cells and only the one LG cell.

I am not using bus bar. I simply want to accomplish 39 more times exactly what I did one time. Hopefully soon I can.

I can use the liquid electrical tape to fix mistakes so the cells do not short.

It will be very simple to hook up the BMSs if I can get a wire soldered direct to each of 40 LG cells.

I will need to sand each cell and rough up the surface. Apply the flux , Then hopefully with the new iron and larger tip the solder will melt and not stick to the tip.

Hopefully :!: :!: :roll:

It sems like as soon as I have a few beers in me I get the urge to solder. This is the third time.

first time.

Limited success.

second time

total failure.

Third time.

https://www.youtube.com/watch?v=v0kDSZTmHBg&feature=youtu.be

Now as stubborn as the Taurus bull that I am and as cleaver as they come I turned the solder tip around on the 60 watt iron and did three more cells. I think that is five now. 35 to go. :lol:

I will probably have half done before the new iron shows up. My question is should I cover the entire joint with high temperature JB weld or put the liquid electric tape all over around the solder area and fix the melted insulation that way. Liquid electric tape will not be as strong a bond as JB weld bu twill JB weld conduct electricity.

i am thinking a tiny brush for liquid tape and some metal area left for the JB weld. It will make sure there is still contact if the solder joint fails. Like an insurance policy and the liquid tape takes care of the melted exposed metal around the edge where it got melted.

Please let me know. Thanks.


LC out.
 
Your solder connections are poor, the ball of solder might actually be "welded" at some extremely small point. You want a dome of solder, not a ball. Not more solder! ... better melted solder.

Both cells are damaged at the neg casing outer rim, you touched the soldering iron against and melted the protective ring and shrink wrap.
Surprised they didn't short, or maybe they did sending extra amps through the irons tip and, possibly, producing enough extra heat for something of a weld?

The heavy chisel tip can transfer much more heat than your thin pencil tip.
Similar to electricity, 8ga wire is rated at 50A while 16ga is rated for 10A.
Heavy "chisel" tip might transfer 5x the heat of the "pencil" tip, and the chisel tip angles down for best contact, eliminating the risk of melting the protective rim.
 
OMG!
The video of you "soldering" was painful-torturous to watch!

Did you not watch the 2 videos? At all!?
Pre-tin the cell!!!
Flux on wire
Pre-tin wire
more flux
clean soldering tip - shape, tin and keep tip clean

You can file or grind your tip to a heavy chisel type but then "tin it".
(the pencil tip end - the big round end is needed to absorb heat from heating element)
Apply flux to new shape
heat up and apply solder to new tip
it should coat easily
ready to use.

Clean tip
dip in flux - occasionally
wipe on damp sponge - often

You want solder to stick to and flow on to tip, this ensures good heat transfer and solder melt.
 
i am thinking a tiny brush for liquid tape and some metal area left for the JB weld. It will make sure there is still contact if the solder joint fails. Like an insurance policy and the liquid tape takes care of the melted exposed metal around the edge where it got melted.

Please let me know. Thanks.

Someone I have known since I was 16 years old died of throat cancer today. Doctor said two months about 9 weeks ago I think. Maybe sooner. He drank a lot, was a redneck and beat people up. But I know his family and though a lot of the time I knew him it was unpleasant sometimes we had a good time. Mostly when we were younger raising all kinds of hell.

I have not saw him in four years. but approx. 24 hours before he died I had a dream that I was sitting somewhere in an apartment with my ol lady and Dave was half drunk his big head in the window outside. I opened the door and he had a 12 pack of that nasty Milwaukee's best ice he drank for years.

A lot of stuff happened growing up in Canajoharie. Dave saw me take on two town cops when I was about 16 and put 5 stitches in ones head and got his head caught underneath the steel legs on the park bench. It was actually an accident. I did not mean to hurt anyone.

I was close to 17 I think and about 180 pounds and five foot 8". A 220 pound six foot officer swung hard on me with a foot long steel flashlight because I called him a pig. I blocked it with my right arm and grabbed it out of his hand and threw it to the side however a second officer (his skinny little friend with a necktie )was attempting to sneak around behind me and the flashlight caught him in the side of the head and put 5 stitches in his head. The bench flipped over on his head as I was wrestling with the bigger cop.
Two sheriffs came with dogs and I did about 40 days in the county after getting my a s s kicked.

A few years later Bernie. The big cop failed to catch a dirt bike flying thru town doing wheelies so quit his town cop job and got a job driving a school bus. It was special education. Dave was on the bus with my friend Carl who went to Marcy Central NY psychiatric center at 14 for chasing his mother and sister around with an ax.

Both kids were about 260 to 280 pounds at 17 and neither could take me on until they turned 18 but sure did give poor Bernie an earful on the way to special school every day. " scotty kicked both your a _ _ _ S. The Sheriffs had to save you guys. he he he"

I do not have a ride but if I get one I will have to go. I really hate funerals and had to go to my fathers back in 09. Throat cancer also.

Will the liquid electrical tape work ? If not do you recommend something better to fix the damage to the insulation. Should I use high temperature JB weld instead. Or put the liquid tape around the edge of the cells and then JB weld over. Please let me know. Thanks.

LC out.
 
This is where I expected to be at, when LC first tried to solder, which is why I said I was impressed even with the first job that didn't wet properly. To get solder to stick to 18650s, you need to sand, apply flux evenly and leave for long enough, large tip with thermal mass, very short and precise contact.

LC, you CANNOT melt solder onto the soldering iron and then try to transfer the solder onto the target with anything larger than about an 8AWG cable. It's too big a heat sink. Solder will only stick to a hot surface. If you've had success on cables smaller than 8AWG, it's because your iron has been able to transfer enough heat to the small, exposed part of the cable before your tip ran out of thermal momentum.

I can't believe I am taking the time to do this right now, when I'm supposed to be writing management reports on a Sunday...

You cannot dispute any of these facts. I'm sure DA and WTurber will agree with me:

1. Solder will only properly stick to a surface that is above its melting point.

2. Doing things poorly, you *can* sometimes get away with heating the solder above melting point, then transferring it to a small item like a thin wire. The reason for this is because solder melts at 190*C roughly, and most soldering irons heat to 300*C+. What is actually happening, is that the solder has enough energy to heat SMALL items to above 190*C, the solder sticks, then solidifies. On a large item, this will not happen. The energy has to spread out further and faster, never letting the item get to required 190*C+

3. For a large item, there are two ways to get the surface hot enough - You heat it for a long time, or you heat fast. Transferring heat to an item to be soldered, is like trying to fill a bucket with a small hole in it. As you fill the "bucket", some of it is going to leak out to the air, or worse, in your case, to the actual chemicals inside the cell, shortening its life.

If you use an iron that has a low wattage, it's like having poor water pressure. It doesn't matter how big the tip or the hose is, the bucket will leak faster than you can fill.

If you use an iron that has a high wattage, but has a small tip, it's like using a fire engine with a drinking straw. It doesn't matter that you can pump thousands of litres a minute (60 watts of heat), you can't push it through that tiny small tip.

That's the end of the facts. The rest is my opinion:

1. Sand the ends of the caps until you can see criss-crossed scratches on them.
2. Clean the ends of the cells with alcohol, and don't touch them with your fingers. Any oil from your fingers will stop you soldering, and even if your hands are clean, as long as you're alive, you have very small amounts of oil on them.
3. Apply flux to the end of the cell. Leave for a couple minutes to allow it to etch the surface a bit
4. Make sure you get the biggest tip on the highest power rating iron you have. The tip HAS to have a flat surface. The edge is round, and you cannot use pointed tips. big surface area = fire hose. Fine surface area = drinking straw, remember? Ensure the tip is entirely clean, has been "tinned" with solder (The tip is silver, not black/brown).
5. Press the tip against the cell, and say "One thousand and one". If you're like most people, that's about a second give or take 10%.
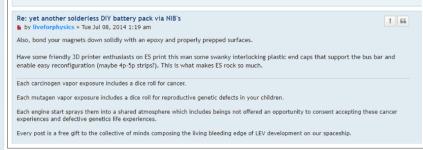
6. Touch the solder to the CELL not the soldering iron, though you should be as close as possible without touching. If you have done this right, the solder should melt on the CELL and properly adhere forming a dome, instead of balling. Take the iron away, and blow until the solder is solid.
7. If you're willing to take the risk, very quickly dip the first 1-2mm of the cell end into a plate of water to cool it instantly, reducing the damage to the cell.

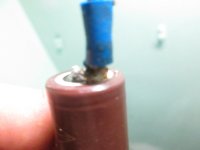
That should give you a very small dome of solder on the end of the cell, with no wire attached.

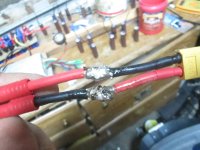
Now, tin each wire or nickel strip away from the battery. When you're ready to connect, simply melt the solder on the wire and the solder on the battery together. As the solder is already properly wetted to the battery and wire, you don't need such high heats and big tips. You can use a very fine tip small iron and be very precise.

I had better get back to my management reports. Good luck, let me know how you go, but I will be on a management retreat for the next week and probably won't get to respond. I *may* get to read your responses though (Can't watch videos though)
 
He has been trying to solder for years ...
Despite effort and help from many, LC just can't seem to listen or learn!
 
IMG_3739.JPGView attachment 1

well on a good note I have managed to do two without damaging the outside insulation. I like the connectors better. for the job.

The single wire without the connector is more difficult and sloppy.

I sanded the top of the cell good. put a little flux on the cell top and on the connector and got the iron very close. Just over the hole and melted the solder into the hole. I melted it again and again after sticking to ensure a strong bond.

The cheap 60 watt stopped working and am using the 30 watt with the thin tip again.

I believe Liveforphysics mentioned high temperature JB weld. Also once it is applied it should reinforce the contact. He was discussing using magnets and 3D printed plastic caps. I am not going that route but if he said high temperature epoxy will work I would like you guys opinion on it. Obviously my soldering skills are questionable.

The new solder iron and tips will not be here until the 20th. I am not waiting that long. Also the way the connector is applied it may be possible to place a zip tie over the connector and torque down after solder and JB weld is applied. Then if the solder bond was to lose contact in the future due to heat the JB weld and a zip tie would ensure contact. Thanks.

LC out.
 

Attachments

  • Untitled.png
    Untitled.png
    167.9 KB · Views: 1,649
Yep, just totally ignore the advice I just spent time to help you during time I set aside to write reports...

You keep telling us you buy "junk", but won't bother to learn how to use it.

On an unrelated topic, can any of you guys tell me why the hammer and screwdriver I bought is "junk"?

e831ec03a790c4eff542ffb6712ec9dc.jpg
 
Sunder said:
Yep, just totally ignore the advice I just spent time to help you during time I set aside to write reports...

Yeah. This is what I said earlier:

Most things are achievable by most people if they are simply willing to:

1) Be coached and learn from others.
2) Practice
3) Practice some more

So LC, you proceeded to not follow instructions given by others and then went straight to soldering on your LG cells rather than some junk cells. So effectively no practice. So it is no surprise that you are getting minimal success. It isn't that you are inherently incapable. It is just that you don't do the things that will help you to become capable.
 
Sunder said:
You cannot dispute any of these facts. I'm sure DA and WTurber will agree with me:

1. Solder will only properly stick to a surface that is above its melting point.

2. Doing things poorly, you *can* sometimes get away with heating the solder above melting point, then transferring it to a small item like a thin wire. The reason for this is because solder melts at 190*C roughly, and most soldering irons heat to 300*C+. What is actually happening, is that the solder has enough energy to heat SMALL items to above 190*C, the solder sticks, then solidifies. On a large item, this will not happen. The energy has to spread out further and faster, never letting the item get to required 190*C+

3. For a large item, there are two ways to get the surface hot enough - You heat it for a long time, or you heat fast. Transferring heat to an item to be soldered, is like trying to fill a bucket with a small hole in it. As you fill the "bucket", some of it is going to leak out to the air, or worse, in your case, to the actual chemicals inside the cell, shortening its life.

If you use an iron that has a low wattage, it's like having poor water pressure. It doesn't matter how big the tip or the hose is, the bucket will leak faster than you can fill.

Sounds right to me, but my soldering experience is limited. And by limited, I don't mean in number of solder joints made, I mean in the range of types of solder joints that I've soldered. I worked on the MDF (Main Distributing frame) for Mountain Bell from about 1978 to 1985. My conservative guess is that I've soldered unstranded 20 gauge wire to terminal blocks at least 100,000 times (Funny, while doing that estimate I figured I ran about 200 miles of wire while working. That's probably conservative.) The number of soldered connections might easily be double that given that I worked on some major switch conversions where we were making hundreds of connections (thousands?) a day. Anyway, my experience was that a clean freshly wetted tip is key. Our 100 watt soldering irons were left on all day long. So the first thing you'd do is clean and wet/tin the tip when getting ready to solder a connection. The irons had no heat adjustment. All the adjustment was done through technique. That said, soldering terminal blocks wasn't really tricky once you'd done it a few hundred times. There's that practice thing again.

I can't imagine how a 30 watt iron would work well for 18650 cells. I also can't imagine practicing on good cells. I'd find some old laptop batteries to disassemble and practice on first. This whole battery assembly thing seems difficult and tedious to me. It also isn't particularly interesting. And while some people have clearly soldered packs together successfully, the heat puts the cells at more risk than does spot welding. I may some day find a reason why I have to do this kind of thing. And if I do and if I choose to solder, I'll be sure to practice on some junk cells. The process appears to be a bit tricky and requires some skill. It looks hard enough even if you've worked on doing everything right. But if you don't go through the steps properly, it seems super difficult.
 
I prefer a single connector for each battery terminal rather than a bar connecting two or more cells together in parallel. If there is a problem with one cell it can be easily removed and replaced. Much easier than the VRUZEND kit in fact. That is difficult to take apart and will run into many problems putting it back together.

The biggest problem is the screw coming loose from it's solder and spinning around preventing the nut from torquing down to get a snug connection. You can take my word for it as it happened more than just a few times. At least 5 or 6 if not more. The kit was a big disappointment.

When I hook up the BMSs I will use wire nuts and secure them with electrical tape. This will allow me to easily swap out a bad cell for a good one if or when I need to. The extra space between cells also will allow better cooling. I do not see why these cells should not be capable of at least double the discharge as the VRUZEND caps with the same or less heat.

How will I know if the cells are damaged by soldering. The liquid electric tape will cover the spots around the edge where the insulation melted. Will the voltage be lower if the heat of soldering compromised the cell or will the capacity be less or will they get hot faster than cells NOT compromised due to heat soldering. Please let me know. Thanks.

LC out.
 
Test cells the way I test used cells

1. self discharge
Charge all cells to same exact voltage
Let set several days
Discard any with noticeable voltage loss

2. IR (Internal resistance)

Comparative IR - identical cells under identical discharge will sag in voltage to the same voltage
With cells of identical voltage
Connect discharge device to cells, individually, in turn
check and note cell voltage at a specific time during discharge
Discard any with excessive voltage sag

3. Capacity
From full voltage, run a metered discharge
discard any with substantial capacity loss
or
after marking each cell with capacity, build banks of identical capacity

Bulk testing
After self-discharge test
String batches of 30s cells in series = ~120V
Discharge using 2x 60w light bulbs = 120w
Monitor all cells
Each hour of discharge = 1Ah of capacity
Stop discharge when any cell hits low voltage
3.40V - very safe discharge point, don't recommend below 3.00V
Label each cell with residual voltage
1hr = 1000mAh + 3.95V?
2hr = 2000mAh + 3.75?
3hr = 3000mAh + 3.45?

Bulk building
With all cells identically discharged
Sort all cells from best remaining voltage to worst
Sort into banks with best cells to worst
10s >> 1 2 3 4 5 6 7 8 9 10 10 9 8 7 6 5 4 3 2 1 1 2 3 4 5 6 7 8 9 10 etc
This will create banks of nearly identical capacity ... banks will safely balance if within ~.1V ... barring any cells of radically different voltage ...
Combine cells - since all cells are free of self-discharge and were identically discharged, simply bulk charge to full pack voltage
Good Lithium cells, discharged at moderate rate will bulk recharge right back to their starting voltage!
Should have good solid pack of reliable tested cells.
Best news ...
Should be good for bulk charging ... with no need for balance charging!

Oops! I forgot, good for bulk charging if pack of sufficient size for moderate discharge rate.
 
DAMM.

Tghat is a lot of information.

Kind of drunk bro.

I can't see how complicated works. I toild you about math teacher in college about 15 years back. Almost figured out short version to problem. Then long version (EXAMPLE) lost me in space somewhere.

I did solder all the wires at least for tops. Bottoms are easy wont short. Looking for heat resistant. Epoxy and waiting for the liquid tape.

Bottom line is will itb work or not. 40 LG cells NOT limited by some cheap lego kit ?? Soldered wires instead. If I pull it off it kind f makes me successful even if the solder jod is not perfect.

The correct response if it works even for 6 months would be "Great job LC " :lol: :lol: :lol:

I will make this work justb to hear you say it. Thanks.


LC out.

6:02 PM.

I was a little drunk earlier. I had to sleep about most of the day. I guess I like soldering when I am wasted. :lol:

OK I read it. It makes sense now with a clear head. I am waiting for the liquid solder so I can repair all the damage to those cells where the insulation burned off.

Probably take forever as well as the BMSs. I have to look. Probably ssssslllllllllllllloooooooooooww shipping from China. :roll: Thanks.

LC out.
 
As the Hub Motor Turns and the LiPo Fire Burns.

All the plugs for the new Samsung packs are here and I will very soon start charging them. :D

Bottom picture is the LG cell which I could not tell by eye if the solder joint was too close to the edge but I guess it will work. I am just waiting on the liquid electrical tape and will then repair the damage to the insulation and start soldering the bottoms. Thanks.

LC out.
 

Attachments

  • IMG_3751.JPG
    IMG_3751.JPG
    151.4 KB · Views: 1,561
  • IMG_3754.JPG
    IMG_3754.JPG
    151.5 KB · Views: 1,561
  • IMG_3756.JPG
    IMG_3756.JPG
    174.9 KB · Views: 1,561
  • IMG_3762.JPG
    IMG_3762.JPG
    71.6 KB · Views: 1,558
I hope you are not using that awful kestor lead-free silver solder from Home Depot. They put it in the electical section and it belongs in plumbing, Old toxic leaded solder is what works best. I bought a coil of the new silver stuff when I couldn't find the 1 pound roll I've had for 25 years. I could barely get an XT-60 to wet with the new stuff. THen I saw the dog had pushed the old solder roll under my desk.Back with the good stuff.
 
docw009

Thanks for posting. I sent a friend request.

I would be interested to hear more about solder. It is NOT one of my strong points. I have different tips now to experiment with thanks to the excellent advice here from DA.

I already soldered 20 cells positive most difficult terminal with cheap irons with bad tips. All is needed to repair cell casing is liquid electric tape on the way.

Now if I could find better solder that would increase my chances even more for success. Thanks.

LC out.
 
The new Genuine Samsung packs are not all the same. One pack only charges to 39.8 V and the other three are 40.4 V.

I am leaving it on the charger for awhile.


https://www.youtube.com/watch?v=OHGOkkAf5pU&feature=youtu.be

Not sure but might need to return one and hopefully get a replacement. Not only is the wire different but the top cells were not taped down. I had to use packing tape. Thanks.

LC out.

PS. I have combined the packs for 3p or 13.2 Ah. That pack probably is not new so am seeking a refund on that. Thanks.

LC out.

PS again.

Mystery of the 20" bike failure solved. :D

Thinking about putting the 20" hub motor on the front. Beefing up the front braces with larger bolts. It could become a serious hill climber with two motors. :D

Also it would double my chances of getting home. A front hub motor and controller. + a rear brush motor and controller. Both capable of climbing a small hill could accomplish a medium size hill easily. If one motor and controller fails. i CAN STILL WALK UP ANY HILLS LEFT AND MAKE IT HOME. :lol:

thanks.

LC out.
 

Attachments

  • IMG_3768.JPG
    IMG_3768.JPG
    176.5 KB · Views: 1,514
  • IMG_3769.JPG
    IMG_3769.JPG
    184.4 KB · Views: 1,508
  • IMG_3770.JPG
    IMG_3770.JPG
    152.3 KB · Views: 1,507
  • Untitled.png
    Untitled.png
    115.4 KB · Views: 1,503
As the Hub Motor Turns and the Lipo Fire Burns.

Well basically I tried to make four packs work but failed miserably. I figured since the first three packs were still exactly 4.04 V exactly and the fourth pack was only 3.97 V today that if I used a pre hook up cable I could make it work. I did not need the pre - hook up for the packs which were exactly the same voltage.

The top picture was the result. the thing which make bullets better than XT-60 or 90 connectors is you can easily separate bullets with a hack saw. I shorted out the plug when I tried an alligator clip for the negative side before I could even use the pre hook up cable.

I guess I am stuck with 60 cells in parallel instead of 80. Not sure what to do with the pack #4 but maybe can hook it in parallel with the LG packs I am building.

The SONA packs have been ran many times now and are at 4.05 V . This is another reason how I know something is not right with the fourth new pack I got.

I would have gladly sent the fourth pack back like I did the 100 fake cells I bought BEFORE the LG cells. I just was not paying shipping. I would rather have waited for a replacement pack than a refund.

My card is lost but still automatically linked to pay pal. I ordered a second 36 volt charger like the first one I ordered. I can't get my card information for a replacement but can still order stuff. I was on the phone all day for customer service. Thanks.

LC out.
 

Attachments

  • Untitled.png
    Untitled.png
    98.2 KB · Views: 1,484
You got a refund ... buy another one, quick, only 4 left!

Rejoice in the free pack that you shorted, still good cells, (BMS protected).
 
You got a refund ... buy another one, quick, only 4 left!

Rejoice in the free pack that you shorted, still good cells, (BMS protected).

I was thinking about it but ordered a second charger last night as I only have one. Dan sent me one but have no idea if I need to hook up 3 or 4 packs in parallel to it or more. Over twice the size as the one I have been using. Also no specs on the 36 V brush-less controller I was thinking about using.

If I had access to my money card I probably would order another however it has been lost for a week. A real nightmare as I was on customer service for hours yesterday and nobody could help me out. I am not sure if it is stolen. Not in my house anywhere. I am calling for a replacement and hopefully the money will transfer like it did when I lost it before.

I still have two 10S- BMS showing up as well as the liquid Electric tape. I am thinking about running that lower voltage pack in parallel with the two LG packs when I build them for a second 60 cell 10S pack. Also the SONA packs read 40.5 V after sitting several days. I am good with 36 volts for quite awhile but will be looking to order two 10.0 or 12.0 Multi-stars hopefully next month for my 12S needs. Thanks.

LC out.

PS. I took the three new Samsung packs (13.2 AH) 3p downtown today to City hall and on the way back went to the New York bike company at the bottom of Congress st. hill. I was looking for a 700c tube to fix easy st. (my 700c hybrid with the geared hub motor) Unfortunately they were closed. Wall-Mart only has the slime tube and not dealing with that.

The Hill that I destroyed the original Currie motor and same hill I went up with the dual motors and part way up with the 1,000 watt Unite motor. I walked the bike most of the way up the hill and went second av. which was only a slight incline , twice the distance to get to third av. but way less stress on motor , batteries and controller.

I traveled approx 2 miles and over 3.9 V left in the packs. The SONA packs would be at 3.74 V same trip. That is the difference between 2p and 3p. 60 cells are better than 40.

I was also thinking if I run the three new Samsung packs for about 6 weeks and do not run the SONA packs I could parall up with those for a 5p - 100 cell total 10S pack. However the current basket wont hold that many and think it not necessary for flat and small hills. The SONA packs are perfect for Easy street as it is most efficient and greater pedal assist.

I am not done with that hill though. I just prefer to tackle it with pedal assist and two motors at 36 V. 3p - 60 cells front and the same for rear with approx. 1,500 watts total and < 30 mpg gearing. Next build hopefully. :mrgreen:

I ordered a new Wall Mart card today. $32 will be transferred to new card. I will get it in 7 days approx. That money will go toward Multi-stars next month. Thanks.

LC out
 

Attachments

  • IMG_3775.JPG
    IMG_3775.JPG
    161.6 KB · Views: 1,445
guy downstairs I was having trouble before with almost killed my friend Doug in my living room last night. In front of a 6 year old and one year old child. Then a bunch of teenage gang members stormed the house. I saved my TV and kept the woman and children safe.

Doug is now blind in one eye and just got out of the hospital. he is really banged up.

I will be moving to Ohio. Marys son the truck driver is on his way to get us and is bringing his gun. police were here all night.

My apartment is a crime scene. Eric is going down 5 to 15 years in state prison.

Trying to get money to put my bikes and computers and few things in storage now. thanks.

LC out.
 
Status
Not open for further replies.
Back
Top