Ross' bike pusher (trailer) project...

When I started brainstorming hitch designs one of the first elements I though to use was a ball end joint.

roda.jpg


The rod end would be held in a clevis in double shear with a quick release pin. Sort of like this, but the bolt in the picture would be a quick pin show below. The clevis would be attached to the bike frame by some means. Your triangle clamp would work fine.

Tabrack38clevis.jpg

lock1_big.jpg


For my trailer, instead of the connection point on one side of the rear tire, I was thinking of using the bike rack attachment points and bringing a hitch point to behind the tire.

trailer3oj7.jpg
 
Thanks for the feedback guys. I'm makin this stuff up as I go. I like the ball hitch... I don't know if side connection is the best to go with or not. A lot of people opt for the rear straight on connection. A bit more complicated but probably better in the long run. And it's the only way to go if you use a single wheel trailer.

I've heard comments about the possibility of a pusher-trailer flipping over. Ha! If you do something that flips this trailer over, it's likely that's the least of your problems. Like you went over the edge of a cliff!

It's all about center of gravity. With a reasonably wide wheelbase and keeping the weight below the axil you'd be hard pressed to turn this thing over.

Actually, I made another mistake. I intended to have a three inch clearance below the battery cage... I've only got two. Oops! I meant to weld the battery cage up the side of the 1" frame. So I lost that extra inch. Talk about low CofG! Two inches might get me by but I'll probably go ahead and break the tack welds and move it... AGAIN!

***bother***

And MAN these batteries are heavy. What was I thinking! Ha!

I did get the wheels on and batteries loaded into it this afternoon. It's looking pretty good. I might work on the hitch tomorrow. More pictures soon.

Got my honkin' single-pole 600 amp relays in. Sweeeet!

The trailer weight is not over the axil. It's back heavy which puts lift on the connecting arm. Probably about ten or fifteen pounds of lift on the tounge. Don't think it's a problem but do wonder how that would affect things (if at all). I still have to mount the motor and controller... that might change it a bit.

More later...

Thanks for keeping up with me!

Ross
 
Ross, I don't think your weight distribution will bother you. The rule of thumb for small automotive trailers is to have at least 10% of your weight on the hitch, but I think the car and trailer suspension plays the bigest role in undesireable sway. Both of my two wheel trailers have been pretty much balanced on the axel and neither has swayed. I also think your choice of hitch location is actually better for control than a rear hitch, because the trailer will have less leverage for side to side motion, kind of like a fifth wheel trailer versus a conventional trailer.
 
Thanks for the vote of confidence Rassy. Still... I am having nightmares:

"OH MY GOD... I CAN'T STOP THIS THING!!!"

I don't know the first things about brakes. Nothing. NADA! And I have a bicycle that I am mounting this monster on that has TWO BROKEN BRAKES! **OH MAMA!**

And it's a cheap bicycle. It needs tires, and probably some descent tubes. And the wheels need un-woblefieing. Got to get one of those spoke thingies! I'll probably just make matters worse.

And folks... I'm running out of cash. I can't throw more than another $75 at this thing before I start dipping into my kids education money! Ha!

Wait... maybe they can skip school for a year. Get a job... their own apartment. They could pay for MY things for a while... :shock:

...

...

...

Sorry.

Where's my meds. :roll:

Sigh.

Ross
 
I've found out how to put more time on my projects.

1) Don't eat.

2) Don't sleep... you can catch up later.

3) Ignore the kids needs.

4) Don't go to the john... that's a five or ten minute savings right there! Besides... I think if you hold it long enough, your body goes into some kind of recycle mode. It's a hell of a thing.

5) For God's sake... don't answer the phone.

6) And when your wife asks you to do something... just do it. Some things can't be put off without a serious time penalty later!

Ok... that said...

I have some pictures to share. Really crankin here. Five hours and some aluminum chips later, I've completed most of the trailer attachment. Really happy with the results. It's solid. Nice clean, snug action. Not loose. I like that. I'm warming up the bondo. I'll use that in the grooves instead of epoxy. It should do nicely. But I've been storing it in my garage and it's about ten degrees F out there. So I'll warm it up first.

Heres the pics...
 

Attachments

  • Trailer Front Iso.JPG
    Trailer Front Iso.JPG
    106.9 KB · Views: 3,406
  • Trailer Rear.JPG
    Trailer Rear.JPG
    105.2 KB · Views: 3,404
  • Attachment front iso.JPG
    Attachment front iso.JPG
    70.1 KB · Views: 3,412
  • Attachment side.JPG
    Attachment side.JPG
    84.7 KB · Views: 3,415
I don't know what you can do for brakes. My original project used a $53 Wal-Mart MB with terrible brakes. I could barely stop at the end of my driveway, and each trip down the hill wore off about 1/4 of the brake pad. I found some pads that wore good and stopped good, but they were REAL loud. Since you probably have a freewheel, plug (regen/motor) braking is out. Since your welding skills are good you could probably put a v-brake on each trailer wheel operated by a third brake lever, with a balancer, similar to a cars hand brake, on the front of the trailer.

Good Luck! :D
 
Welding skills???

Put your glasses back on! I do what I can then dunk everything in elmers glue. Amazing Stuff!

:D
 
Actually Rassy...

I have thought about regen braking. If it will push straight with one wheel then why wouldn't it stop straight with one wheel.

Actually, it doesn't have to stop... just slow or un-load the inertia of the trailer itself. The bike brakes can do what they're meant to do... stop the bike. I'll need to think about regen braking some more.

Thanks,

Ross
 
Quick update:

Designed the motor mount. It's quick and simple. Should work ok and allow four degrees of adjustment for chain tension and alignment.

Also figured out how I would mount the sprocket to the cheap 16" bike hub. That took out a few brain cells. I'll be welding the sprocket directly to the steel hub of the wheel. It's just outside the inner bearing race for the caged ball bearings. It will be a bit dicey welding it but I'll give it a go.

Pics when I get them.

Here's the CAD views of the motor mounts. I'll make them this afternoon.

Merry X-MAS!

Ross
 

Attachments

  • Pusher Motor Mount 1.JPG
    Pusher Motor Mount 1.JPG
    48.9 KB · Views: 3,296
  • Pusher Motor Mount 2.JPG
    Pusher Motor Mount 2.JPG
    50.2 KB · Views: 3,294
Unbelievable...

So... the trailer is mechanically together. Connected to the bike. Took it for a spin... just to pull it around without power. Lookin good. Smooth... hardly felt it behind me. Battery weight not bad... a little more inertia for starts and stops but the bike felt like a bike. I really like that.

So... I just finished wiring it up.

Oh... Merry Christmas! :D

Ok... wired it up. Tentatively connected the controller to the motor, the throttle, battery connection negative... battery... connection... positive...

... rotated the throttle...

nuttin.

I know this is long winded... but I'm trying to get this off my chest.

So I pull out my Fluke meter. Checked battery voltage... two 24VDC Marine batteries in series... should be 48 vdc right? I get 24 volts. :shock: What the heck! So I test across just one battery... 12 volts! The other battery... 12 volts! NOOOOOOooooooooo! How did I confuse these 12 volt marine batteries for 24 volts!!????

I'll tell you...

The flippin' model number for the batteries I bought is 24DC-6 Ever-Start Battery!!!

I am dumb-founded! What idiot thought to use 24DC in the model number of a 12 volt battery!!!??? :x There is nothing on the battery to indicate it is 12 volts. NOTHING! I thought it was designed for use with 24VDC trolling motors! 24DC! AARRRRRRGGGGGHHHH!!!!

SOMEBODY GET ME A BB GUN!!! :x

...

...

...

...

ok...

I'm calm...

**razzberry**

Soooooo... I have a 36 volt motor, a 48 volt controller and two 12 volt batteries.

Sheeesssshhhhh!

Where's my wife's Zanex!???

Ross
 
Hey Ross, sorry to hear about your dilemma. I've had several electric trolling motors, and it went right over my head that your batteries were just standard 12V marine type. There may be a nice DC/DC converter that will boost from 24V to 48V (and cut your AH in half). Or maybe the experts here can tell you how to make a basic converter.

Merry Christmas, and good luck getting to 48V, or at least 36V. :D
 
Ross, a couple more thoughts. If your motor is brushed, you could just install a switch and relay for initial testing at 24V, or you could put a cheap 24V controller on it for starters. I have the 24V brushed scooter controller from my original project that you can have (pm me if interested). If your motor is brushless, maybe someone else has a controller they aren't using anymore that they will loan or give to you.
 
Thanks gents,

Yeap... this is my life these days... keeps me from takin' up skydiving!

I appreciate the thoughts on the 24vdc controller Rassy, but would rather keep the voltage at 48 for now. But thank you for the offer!

I may do the 24vdc switch idea... I bought some nice fat single pole 100 amp relays off ebay... could use them to toggle the motor on and off... we'll see. It would be nice just to do initial testing... find out what other gotcha's are hiding from me.

I'll look into the 24 to 48 dc converter. If there's a simple version I could cob together... I'd be up for the task. I've made a few circuit boards in my time. The toner transfer method rocks! If there's a cheap but robust alternative I'm all ears.

The other option is to return these 12volt babies and look for four smaller batteries. :roll:

It erks me though... I designed the frame around these batteries. I'd hate to carve it all up all over again.

Pictures soon...

Ross
 
Here are the latest pics.

Excuse the wiring... it was just for trials.

First the pics of the motor mounts... then some shots of the trailer connected to the bike. It looks big... but it feels smooth when pulled behind the bike. Pardon my messy garage. It's winter here... snow, sand and salt dropping off the cars. I threw kitty litter and sawdust around to make it hospitable. That's what's caked on the wheels.

Ok... pics...
 

Attachments

  • Motor Mount 3.jpg
    Motor Mount 3.jpg
    119.7 KB · Views: 2,915
  • Motor Mount 4.jpg
    Motor Mount 4.jpg
    87.7 KB · Views: 2,920
  • Bike Test 5.jpg
    Bike Test 5.jpg
    145.9 KB · Views: 2,917
  • Bike Test 6.jpg
    Bike Test 6.jpg
    123.5 KB · Views: 2,923
  • Bike Test 7.jpg
    Bike Test 7.jpg
    182.1 KB · Views: 2,522
  • Bike Test 8.jpg
    Bike Test 8.jpg
    76 KB · Views: 2,919
Wow i like it, i did not know you only had to hook up on one side of bike for the pusher. keep the pictures coming
Butch
 
That is sweet.

You could give yourself a reward for your hard work: A Milwaukee or Ridgid drill and two lithium batteries.

Then you got juice for the trailer and a new tooltoy too.

Cheers.


P.S. Messy??? You can see the floor... lot's of it!!
 
Thanks Tyler,

I could go for the drill set. :D

Buuuuuuttttt... I've returned the big 12 volt marines for four 19amp/hr glass matt batteries from Wally World. They're small enough that with a little bit of CARVING :| I can get them all to fit and maybe have a flat surface across the top of the trailer. That would be an improvement. It would be easier to put a basket or tote on.

Anyone care to take a guess on how far I could get on four 19 amp/hr batteries in series (48 volts) driving a 36 volt, 750 watt motor conservatively (20 or so miles/hr). My guess... 30 miles???

I'll work on it this weekend... new pics when I get the batteries mounted... test soon!

Ross
 
Glad to see you got the voltage issue solved. :D

My guess is you could get about 40 miles with moderate pedaling and speeds under 20 MPH.

What is the total weight of you, bike, trailer, and batteries?

Ross, I couldn't quite tell, but do you have some sort of torque arms on the trailer? I had a serious problem when one axle nut got a little loose and during a right turn the left most side pulled out of the dropout. The arms now not only help prevent torque twist, but also centrifical force dropout.
 
Thanks Rassy,

40 miles would be ideal... 30 would be plenty.

Total weight? Now you're gettin' personal! :shock: :D

I haven't weight anything but I'm a big guy... around 240. Like I said before... BRAKES BRAKES BRAKES!!! Once I get things running, one of the FIRST mods I'll be working on is "regen" braking. :shock: I know how important that will be for me.

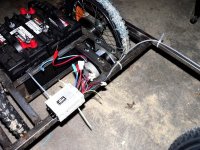
I'm flabergasted that I haven't been able to locate any wiring diagrams that show how switches, accelerators, battery state indicators and so on are wired to the controller circuits. The "schematics/wiring diagram" plog is way out of control with too much conversation and not enough diagrams. They may have the wiring diagram I need but it would be burried in pages and pages of text. I have a cheap controller from TNC scooters and it gives pin-outs and such but it would be nice to see a real wiring diagram that shows switches in their open or closed positions with a brief explanation of their operation...

...such as the brake circuit connection for my controller. I can only assume that this connector should be shorted across it's terminals if you don't have a brake switch on your bike (deducing that if a brake switch failed, it would likely fail open... thus it's operation should be open during braking). But I don't know. It doesn't make since that someone should have to guess on such things.

I'd like to see a new schematics / wiring entry concentrating on the schematics and wiring diagrams and maybe pointers to other entries that discuss each of them in more detail. That way new guys (like me) can find this information easier.

AAAANnnnnyyyyywwaaaayyyy....

I filled the new batteries with acid... that took a while... and I'm letting them sit the required hour before I put the charger on them. That's another area I need to work on. I'd like your thoughts. Would it be best to purchase a small 48 volt charger that I can tie into the charging connector of the controller or should I disconnect the series connections to the batteries some how and use a 12 volt charger charging them in parallel?

What I really want is to have a 110vac plug on the trailer that's always connected. I roll into the garage, hop off the bike and plug in. Done!

Your thoughts???

Thanks for your great input.

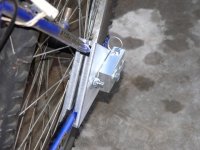
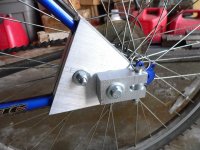
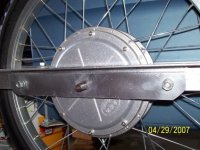
Oh... and tell me more about the torq arm(s). I'm really not up on that. Currently I have only open drop-outs. If a nut comes loose I have nothing else preventing the wheel from comming out on a good bump. I intended to put a 2-hole washer on the axil and screw it into the frame for additional security but haven't gotten to that yet.

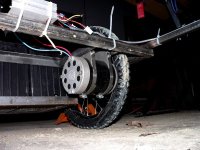
The sprocket is welded to the steel hub of the wheel... so chain force is very close... only about 1 1/2" from wheel center. Can you describe or link pictures of what your are recommending.

Thank you!

Ross
 
Charging:

I think your best bet is to find a little 48V charger, because then you don't need any extra wiring, connectors, or fooling around with the batteries. I don't think trying to charge with one 12V charger is worth the PITA. You could use 4 12V chargers, but the cheap little electronic ones we all have laying around would just supply a trickle charge, so you would probably have to spend as much as one 48V charger to get several amps. BTW, my charger lights up directly from the battery, so it needs to be either unplugged (from the battery), or have a switch (or relay) between it and the battery if you plan to leave it hooked up all the time.

Brakes:

Now I understand, you have no freewheel, so plug (regen) braking should work. I am really happy with my current plug braking system. You have probably read the recent thread:

http://endless-sphere.com/forums/viewtopic.php?f=2&t=2803

Torque Arms:

See the pictures below. Your washer idea may be sufficient. You could weld tabs fore and aft of your dropouts and use a flat piece of steel like mine, or you could use a piece of angle iron and drill holes through the frame to hold it in place.
 

Attachments

  • Torque Arm 2.jpg
    Torque Arm 2.jpg
    50 KB · Views: 4,340
Thanks Rassy,

Your torq arm is perfect... I'll do it that way. Much better than the washer idea. Easier to mount.

Ok... on the charging I'll purchase a 48vdc charger. I thought that might be the simplest way. Thanks for your input.

Yes, I have read the plug braking thread and even put in a couple of ideas. I'll be trying a small coil of stainless wire. Would like to actuate with a couple of FETS. I'll have to call on a buddy to help me with the circuit. It's nice to have an electronic wizzard for a friend!

I'm draggin my feet on work on the trailer. But I have a plan on how to build the next battery supports. Still makes me grumble. :| It's cold in them thar garage! Probably start on it tomorrow.

Stay warm!

Ross
 
First trial run! I got the EV GRIN!!!

:mrgreen:

What can I say? It works! Not to fast (yet). Maybe 15-20 mph. Still has the 11th sprocket the motor came with. I have another sprocket but haven't gotten to it yet. Does great from a stand-still. Good acceleration. One thing I hadn't expected was the trailer bounces somewhat. The batteries are lighter than the ones they replaced and the occasional bouncing is enough to allow the drive wheel to slip. Also the roads are sanded right now so that doesn't help. I checked the tires on the trailer and they were horribly out of round. Cheap Walmart bike wheels. So I ran out and bought new tires and some slime to put in the tubes.

Took it for another test ride and it made a good improvement. Still slips when I hit sand during acceleration but that's expected.

I like that the bike still feels like a bike. The side mount for the trailer does not bother steering or turning. I would not want to accelerate hard during a turn as that could put side loads on the back tire but I have tried some acceleration during turns and it hasn't been a problem. Really... the bike just acts like a bike with a motor. The only difference is feeling occasional bumps the trailer feels.

And it is quiet! Those people with noisy chains should check their alignment. An eighth of an inch can make a significant difference. And my chain has a little slack in it. It's not tight. Very quiet!!!

I'll get pictures up soon. I still have to find a permanent home for the controller and the wires are rat-nested right now. Plenty of clean up and painting to do.

Very happy with the results. I've put about six or seven miles on it so far. When I get it looking nice I'll put a video together.

Still to do:

Better connectors
Clean and paint
Mount and waterproof controller and connectors
Run wiring through trailer tongue
Order 48 volt charger
Head and tail lights and reflectors
Replace brake pads on bike
Plug braking on motor
Build Deck for carrying storage container with lid
Other misc...

Yeee Haawwwww!

Ross
 
Back
Top